Advertisement
Quick Links
Advertisement

Related Manuals for Anilam 3300M


Summary of Contents for Anilam 3300M
- Page 1 3300M CNC Control Training Guide...
- Page 2 Turning the Control ON After the control has been turned ON press F10 to continue. Then press to select next page Select...
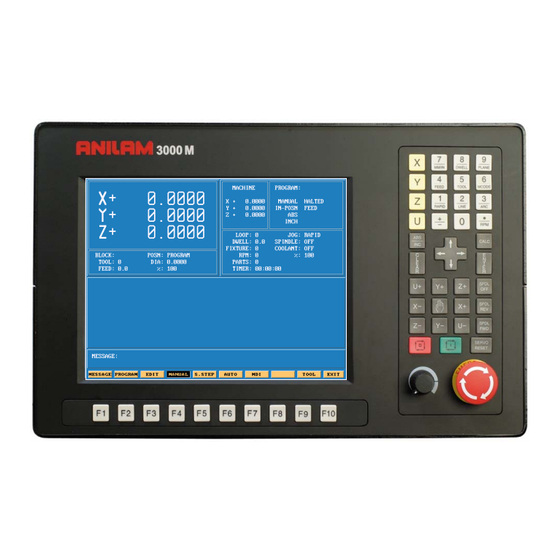
- Page 3 Main Areas of the Display Machine Position from Home Machine Status Programmed Position Auxiliary Functions Message Area Information Program & Tool information...
- Page 4 Areas of Main Screen Program Name Halted or Running Mode of machine Manual , Single Step or Auto Type of movement Rapid or Feed Condition of machine Type of move abs/inc Units Inch/MM Number of loops Type of Manual movement remaining to be done Rapid,Feed,100,10 or 1 Time left...
- Page 5 Keyboard 9 and Plane key 7 and Unit XY,XZ & YZ. Inch/MM. 4 and Feed key 8 and Dwell key 5 and Tool mount 6 and Mcode key 3 and Arc key Axis keys 2 and Line key 1 and Rapid key .
- Page 6 Along with the above we have “Hot Keys” Accesses Rapid menus. Rapid Accesses Line menus. Line Accesses Arc menus. Input feedrate. Feed Tool mount. Tool Mcode inputs. MCode Inch/MM Unit Dwell in seconds Dwell Changes from XY,XZ or YZ. Plane If * put in front of line in program ignores that line.
-
Page 7: Function Keys
Function Keys The Function (or F keys) activate the Mode shown directly above on the Display screen. The meaning of F keys change, depending upon what Mode of operation is selected. An example of how F keys is shown above,this is how it would change when going from Manual to in Single Step or Auto. - Page 8 Display last 8 messages that have appeared Message Program Page at which program files are displayed Go to EDIT from Manual Edit Manual mode of operation Manual S.Step Single step mode of operation Auto mode of operation Auto M D I Manual data input,allow operation without writing a program Not used Tool...
- Page 9 F1 Message Page To enter message page press Message This is how the messages will appear on the screen . When control is turned off the messages will be erased. This is useful to tech’s when trouble shooting problems on the control...
-
Page 10: Program Page
Program Page To enter page Press F2 Program Not used Create This where new program names are type in. Delete an existing program. Delete Edit Programs are written and changed. Allows you to look at program but no Editing . List Picks program to be run. - Page 11 Create When ASCII is pressed, this how the soft keys will look and a table will appear as show below Using the arrow keys pick the letters then press the enter key.When complete press ASCII again and press enter, this will put program into the list of programs with .M extension and highlight will be on program that was just created.
- Page 12 Edit When is press, the screen appear as shown below. Edit Pressing allows user to look you to look at program only. List...
- Page 13 Select Program that is highlighted and then selected will shows up in this area. A program may be edited without being selected , but not run in Single step or auto.
- Page 14 Display Show all in program files but show size of Normal screen only show .m files page program,date and time written Show only .m files but show size of program, Press display one time it will change to date and time written display all files in directory...
- Page 15 F keys there different functions. First press type in a program name or number. Create Edit High light will be on program just created press Teach Let user move machine around and record positions. Draws program be running to see that it is correct. Draw Drill Access to drilling canned cycles.
- Page 16 Press Tool This will bring up the Tool Page. Area #! Area #2 Area #3 Area#4 Area #5 Area #11 Area #9 Area #10 Area #6 Area #7 Area #8 Area #1 Machine position relative to part Zero. Area #2 Machine position relative to machine zero.
- Page 17 Go to FIXTURE OFFSET page OFFSET Not used Clear highlighted line info. ClrLine Search for a tool. Find PgUp Page up PgDn Page down Not used Calib Z Calibrate Z axis offset. Not used Exit to edit page when entered from edit page. Exit If entered from MANUAL page Exit...
- Page 18 OFFSET Press this will take you to offset page. All entries are taken from Machine Home. Entries may be entered manually or by using CalibX or CalibY. When doing manual input , select axis you wise to enter a value , by pressing that axis key and input number require press ENTER.
- Page 19 Enter adjustment value is an added feature that allows altering of existing values in the tool page or fixture offsets display. Use the ABS/INC Key to activate this feature. Example: Altering tool diameter using Enter adjustment value. * Asterisk highlights the selected value. Example: Altering fixture offsets using Enter axis and adjustment value...
Need help?
Do you have a question about the 3300M and is the answer not in the manual?
Questions and answers