Table of Contents
Advertisement
Quick Links
Operating Instructions and Parts Reference
3106 ROCK-EZE
Serial Number AJ330106 & Up
0500104 • J
2018
une
TM
P
roduct
D
T
I
I
ura
ech
nDusTrIes
nTernaTIonal
Po B
1940, J
ox
amesTown
T
: (701) 252-4601• F
el
ax
.
.
www
DuraTechInDusTrIes
neT
I
nformatIon
I
.
nc
, nD 58402-1940
: (701) 252-0502
•
.
.
www
hayBusTer
com
Advertisement
Table of Contents

Related Manuals for Duratech Haybuster 3106 ROCK-EZE

Summary of Contents for Duratech Haybuster 3106 ROCK-EZE
- Page 1 Operating Instructions and Parts Reference 3106 ROCK-EZE Serial Number AJ330106 & Up roduct nformatIon nDusTrIes nTernaTIonal Po B 1940, J , nD 58402-1940 amesTown : (701) 252-4601• F : (701) 252-0502 • 0500104 • J 2018 DuraTechInDusTrIes hayBusTer...
- Page 2 A Tradition of Innovation Since 1966...
- Page 3 3106 ROCK-EZE™ as of the date of publication. DuraTech Industries reserves the right to make updates to the machine from time to time. Even in the event of such updates, you should still find this manual to be appropriate for the safe operation and maintenance of your unit.
- Page 4 A Tradition of Innovation Since 1966...
- Page 5 F O R W A R D Foreword All personnel must read and understand before operating unit • The “Introduction” section, which explains normal operation of the machine. • Section 1, “Safety” which contains important safety information. • Section 2, “Dealer Preperation” to verify that the machine has been prepared for use.
-
Page 6: Table Of Contents
T A B L E O F C O N T E N T S Part 1: Operating Instruction ...........1 Introduction ................. 2 Purpose ..................2 Section 1: Safety ................5 1.1 Safety-alert symbols ..................5 1.2 Operator - personal equipment ................7 1.3 Machine safety labels .................. - Page 7 T A B L E O F C O N T E N T S Part 2: Parts Reference ............35 MAIN FRAME ASSEMBLY .................... 36 MAIN FRAME ASSEMBLY - DETAIL A ............... 38 MAIN FRAME ASSEMBLY - DETAIL B ............... 40 MAIN FRAME ASSEMBLY - DETAIL C ...............
- Page 8 A Tradition of Innovation Since 1966 3 1 0 6 R O C K - E Z E O P E R A T I N G I N S T R U C T I O N S...
-
Page 9: Part 1: Operating Instruction
3106 ROCK-EZE Serial Number AJ330106 & Up Part 1: Operating Instructions 3 1 0 6 R O C K - E Z E O P E R A T I N G I N S T R U C T I O N S... -
Page 10: Introduction
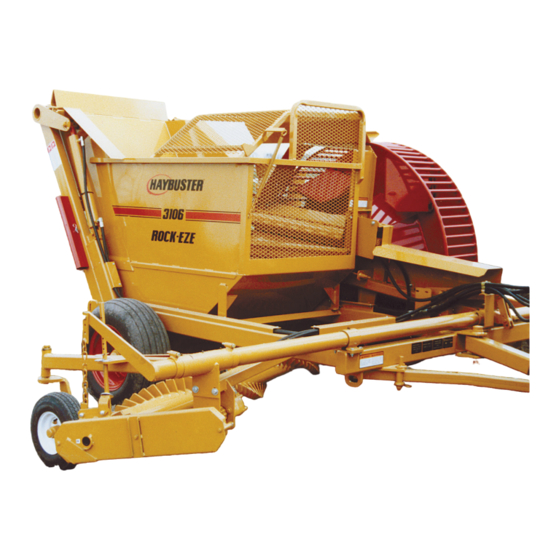
Introduction This 3106 ROCK-EZE combination windrower and rock picker is designed to windrow fields while picking rocks with diameters from 2 to 15 inches. Purpose The purpose of this owner’s manual is to explain maintenance requirements and routine adjustments for the most efficient operation of your 3106 ROCK-EZE. - Page 11 rock box rock wheel Introduction to 3106 ROCK-EZE compo- nents 1 cubic yard Rock Box is full when the rocks are level with the bottom of the screen. caster wheel windrower with paddles installed There are some important points to remember in the operation of your 3106 ROCK-EZE. The Tractor used to power your rockpicker should have an adequate hydraulic system.
- Page 12 Hydraulic specifications Any tractor having an adequate system (minimum of 12 G.P.M. and 1500 P.S.I. at tractor outlets) may be used on th is rockpicker. The 3106 ROCK-EZE comes standard with hoses to accommodate triple outlets from the tractor. Optional kits are available for tractor with single or double outlets. Optional equipment Kits for equipment with single or double hydraulic outlets.
-
Page 13: Section 1: Safety
Section 1: Safety The safety of the operator is of great importance to DuraTech Industries. We have provided decals, shield and other safety features to aid you in using your machine safely. In addition, we ask you to be a careful operator who will properly use and service your Haybuster equipment. - Page 14 DuraTech Industries uses industry accepted ASAE standards in labeling its products for safety and operational characteristic. Safety-Alert Symbol Read and recognize safety information. Be alert to the potential for personal injury when you see this safety-alert symbol. DANGER: Indicates an imminently hazardous situation that, if not avoided, will result in death or serious injury.
-
Page 15: Operator - Personal Equipment
1.2 Operator - personal equipment THE OPERATOR Physical Condition You must be in good physical condition and mental health and not under the influence of any substance (drugs, alcohol) which might impair vision, dexterity or judgment. Do not operate a 3106 ROCK-EZE when you are fatigued. Be alert - If you get tired while operating your 3106 ROCK-EZE, take a break. -
Page 16: Machine Safety Labels
Machine safety labels The safety decals located on your machine contain important information that will help you operate your equipment. Become familiar with the decals and their locations. DANGER: DO NOT REMOVE HYDRAULIC CYLINDER SAFETY STOP UNTIL THE HYDRAULIC HOSES HAVE BEEN CHARGED AND THE CYLINDER FULLY EXTENDED. -
Page 17: Safety Review Section
Make sure the machine is in good operating condition and that all protective shields are in place and in proper working order. Replace damaged shields before operating. • Make no modifications to this equipment unless specifically requested or recommended by DuraTech Industries. •... -
Page 18: Towing/Road Transport
When searching for a suspected leak, use a piece of wood or cardboard rather than your hands. If injured, seek medical attention immediately to prevent serious infection or reaction. • When replacing any part on your 3106 ROCK-EZE, be sure to use only DuraTech Industries authorized parts. 1.5 Towing/road transport •... -
Page 19: Section 2: Dealer Preparation
Section 2: Dealer preparation 2.1 ASSEMBLY Machines are shipped with the Windrower assembly removed. Main frame and rock wheel frame are secured by bolts and clamps. Two transport pins have been provided in upright rock wheel frame guides. Lock pins may be used to keep wheel in raised position for extended periods of time, or in case of hydraulic failure when transporting long distances. - Page 20 illustration 1 S E E A L S O P A G E 6 0 illustration 2 3 1 0 6 R O C K - E Z E O P E R A T I N G I N S T R U C T I O N S...
- Page 21 STEP 4. Remove 3/4” pin and washer from linkage straps (L), connect to hanger tube using center hole as shown in illustration 3. Assemble castor wheel, machine bushings, and cotter pin as shown in illustration 4. illustration 3 S E E A L S O P A G E 4 4 3 1 0 6 R O C K - E Z E...
- Page 22 illustration 4 S E E A L S O P A G E 4 2 3 1 0 6 R O C K - E Z E O P E R A T I N G I N S T R U C T I O N S...
- Page 23 STEP 5. Remove chain case cover. Slide (4) 1-1/2” bushings, and bearing lock collar (M) over Windrower shaft (N) as shown in illustrations 5. Slide 1-1/2” bearing (pre-assembled on case) over Windrower shaft, leaving 3” of shaft extending through case, as shown in illustration 5, 6. Secure bearing to lock collar and tighten Allen screw. Remove motor/ shaft assembly from shipping position.
- Page 24 illustration 6 S E E A L S O P A G E 5 8 3 1 0 6 R O C K - E Z E O P E R A T I N G I N S T R U C T I O N S...
- Page 25 STEP 6. Mount the motor/shaft assembly (K)-as shown in illustration 4 to the mainframe and the hanger support (R) using (4) 1/2x1-1/2 bolts, flat washers, lock washers, and nuts- DO NOT tighten bolts at this time. To get proper chain sprocket alignment,the Windrower must be in working position, and Windrower and drive chain case must be at 90 degrees to each other.
- Page 26 STEP 11. See Tail light assembly on pages 68-69 & 71 right hand tail light windrower marker light left hand tail light windrower marker light 3 1 0 6 R O C K - E Z E O P E R A T I N G I N S T R U C T I O N S...
-
Page 27: Adjustments
2.2 ADJUSTMENTS Preliminary adjustments are made in the factory and during set up. Some adjusting may be necessary in field. Machine was designed for a drawbar height of 16”. Depth of Windrower inner end nearest rock wheel is adjustable in 1” increments as shown at (H) on Page 12. of assembly instructions. -
Page 28: Section 3: Operation
Section 3: Operation To insure long life and economical operation, we highly recommend the operator of the 3106 ROCK-EZE be thoroughly instructed in the maintenance and operation of the machine. There is no substitute for a sound preventative maintenance program and a well trained operator. Prior to starting the engine of the tractor, we recommend the operator make a visual inspection of the unit. -
Page 29: Normal Shutdown Procedure
3.2 Normal shutdown procedure WARNING: For your safety and the safety of others, you must use the following normal shutdown procedure before leaving the tractor controls unattended for any reason, including servicing, cleaning, or inspecting the 3106 ROCK-EZE. A variation of the following procedure may be used if so instructed within this manual or your tractor manual or if an extreme emergency requires it. - Page 30 H I - L I F T H Y D R A U L I C S Y S T E M U S I N G T R I P L E O U T L E T S F R O M T R A C T O R ( S T A N D A R D E Q U I P M E N T ) illustration 3.1 3 1 0 6...
- Page 31 H I - L I F T H Y D R A U L I C S Y S T E M U S I N G D U A L O U T L E T S F R O M T R A C T O R ( O P T I O N A L E Q U I P M E N T ) illustration 3.2 3 1 0 6 R O C K - E Z E...
-
Page 32: Operating Tips
3.4 Operating Tips • After machine is completely assembled as per assembly instructions, machine should be hooked to tractor drawbar. Jack should be raised and rotated to horizontal position. • When lowering Windrower and rock wheel, hold control until cylinder has completely contracted. This will allow wheel to float over uneven terrain. -
Page 33: Storage
3.5 Storage 3.5.1 Preparing the machine for storage: WARNING: When preparing machine for storage, use normal shutdown procedure (Section 3.2) To prepare the 3106 ROCK-EZE for storage, perform the following steps: Clean all mud, dirt, grease and other foreign material from the exterior of the machine. Wash the complete machine. -
Page 34: Section 4: General Maintenance
Section 4: General maintenance NOTE: Before performing any service or maintenance on your r 3106 ROCK-EZE, review the safety guidelines for performing service and maintenance in section 1.3 “Safety review” under the heading “WHEN PERFORMING SERVICE AND MAINTENANCE”. 4.1 Lubrication LUBRICATION INSTRUCTIONS: The operator should make a check of all grease fittings in the unit before beginning to operate it so as to become familiar with their location and the correct service schedule. - Page 35 L U B R I C A T I O N P O I N T S O F 3 1 0 6 R O C K - E Z E 3 1 0 6 R O C K - E Z E O P E R A T I N G I N S T R U C T I O N S...
- Page 36 L U B R I C A T I O N P O I N T S O F 3 1 0 6 R O C K - E Z E ITEM LOCATION QTY. TYPE LUBE HOW OFTEN ROCKBOX PIVOT PADS GREASE 8 HRS.
- Page 37 Windrower drive shaft zerks windrower drive shaft lubrication zerks Chain case oil cap and out- er windrower rotor lubrica- tion zerk outer windrower rotor lubrication zerk chain case oil cap Rock wheel bearing lubrica- tion zerk 1 of 2 lubrication zerk 3 1 0 6 R O C K - E Z E O P E R A T I N G I N S T R U C T I O N S...
- Page 38 Rock wheel frame pivot and inner windrower rotor lubri- cation zerks rock wheel frame pivot zerk 1 of 2 inner windrower rotor lu- brication zerk - lubricate several times daily kicker rotor zerks (2), 2nd Lubrication zerks for zerk is located near rear bearing the kicker rotor lubrication zerk...
-
Page 39: Axle, Wheels, Tires
4.2 Axle, wheels, tires Repack wheel bearings annually. 4.3 General appearance Clean all mud, dirt, grease and other foreign material from the exterior of the machine. Cut all twine off from around the rotor and beater. Wash the entire machine. If washing the 3106 ROCK-EZE with a high pressure washer, keep the nozzle away from the sealed bearings. -
Page 40: Appendix A: Warranty
DuraTech Industries International Inc., reserves the right to make changes in material and/or designs of this product at any time without notice. This warranty is void if DuraTech Industries International Inc. does not receive a valid warranty registration card at its office in Jamestown, ND, within 10 days from date of original purchase. -
Page 41: Appendix B: General Specifications
Appendix B: General Specifications WEIGHT Total ........................4,600 lbs. Tongue ............460 lbs. (in field mode, windrower and rock wheel up) SHIPPING DIMENSIONS (with Rock Windrower removed) Truck Freight Width ......... 7’ 10” (with left-side tire, wheel, hub and spindle removed) Tow Width ..........................9’ Length ........................ -
Page 42: Appendix C: Required For Operation
GENERAL SPECIFICATIONS CONTINUED ROCK KICKER Type ....................Rotating, Fluted Roller Fluted Roller Dimensions ..................6-7/8” x 39” Fluted Roller Drive ..................Hydraulic Motor OPTIONAL EQUIPMENT • DRAG PLATE - prevents rocks from being kicked into previously picked swath. HOPPER DUMP VALVE KIT - for use with tractors that have only 2 (two) hydraulic remote valve •... -
Page 43: Part 2: Parts Reference
3106 ROCK-EZE Serial Number AJ330106 & Up Part 2: Parts Reference 3 1 0 6 R O C K - E Z E P A R T S R E F E R E N C E... -
Page 44: Main Frame Assembly
M A I N F R A M E A S S E M B L Y S E R I A L N O . A J 3 3 0 1 0 6 T H R U 3 1 0 6 R O C K - E Z E P A R T S R E F E R E N C E... - Page 45 M A I N F R A M E A S S E M B L Y S E R I A L N O . A J 3 3 0 1 0 6 T H R U I T E M P A R T N O .
-
Page 46: Main Frame Assembly - Detail A
M A I N F R A M E A S S E M B L Y - D E T A I L A S E R I A L N O . A J 3 3 0 1 0 6 T H R U 3 1 0 6 R O C K - E Z E P A R T S R E F E R E N C E... - Page 47 M A I N F R A M E A S S E M B L Y - D E T A I L A S E R I A L N O . A J 3 3 0 1 0 6 T H R U I T E M P A R T N O .
-
Page 48: Main Frame Assembly - Detail B
M A I N F R A M E A S S E M B L Y - D E T A I L B S E R I A L N O . A J 3 3 0 1 0 6 T H R U 3 1 0 6 R O C K - E Z E P A R T S R E F E R E N C E... - Page 49 M A I N F R A M E A S S E M B L Y - D E T A I L B S E R I A L N O . A J 3 3 0 1 0 6 T H R U I T E M P A R T N O .
-
Page 50: Main Frame Assembly - Detail C
M A I N F R A M E A S S E M B L Y - D E T A I L C S E R I A L N O . A J 3 3 0 1 0 6 T H R U 3 1 0 6 R O C K - E Z E P A R T S R E F E R E N C E... - Page 51 M A I N F R A M E A S S E M B L Y - D E T A I L C S E R I A L N O . A J 3 3 0 1 0 6 T H R U I T E M P A R T N O .
-
Page 52: Main Frame Assembly - Detail D
M A I N F R A M E A S S E M B L Y - D E T A I L D S E R I A L N O . A J 3 3 0 1 0 6 T H R U 3 1 0 6 R O C K - E Z E P A R T S R E F E R E N C E... - Page 53 M A I N F R A M E A S S E M B L Y - D E T A I L D S E R I A L N O . A J 3 3 0 1 0 6 T H R U I T E M P A R T N O .
-
Page 54: Wheels And Hubs
W H E E L S A N D H U B S 3 1 0 6 R O C K - E Z E P A R T S R E F E R E N C E... - Page 55 W H E E L S A N D H U B S ITEM PART NO. QTY. DESCRIPTION 2900030 SEAL 2900029 INNER CONE 2900028 INNER CUP 2900026 HUB COMPLETE, SEALS, BEARINGS, CAP BOLTS HUB ONLY 2900025 CUP\BRG\OUTER 2900024 CONE\BRG\OUTER 5000055 WASHER 4900054 2900021...
-
Page 56: Rock Box Assembly
R O C K B O X A S S E M B L Y S E R I A L N O . A J 3 3 0 1 0 6 T H R U 3 1 0 6 R O C K - E Z E P A R T S R E F E R E N C E... - Page 57 R O C K B O X A S S E M B L Y S E R I A L N O . A J 3 3 0 1 0 6 T H R U ITEM PART NO. QTY. DESCRIPTION 1700026 BELT\PNCHD\5\39\W/3-PLY\...
-
Page 58: Lift/Rockwheel Assembly
L I F T / R O C K W H E E L A S S E M B L Y S E R I A L N O . A J 3 3 0 1 0 6 T H R U 3 1 0 6 R O C K - E Z E P A R T S R E F E R E N C E... - Page 59 L I F T / R O C K W H E E L A S S E M B L Y S E R I A L N O . A J 3 3 0 1 0 6 T H R U I T E M P A R T N O .
-
Page 60: Lift/Rockwheel Assembly Detail A
L I F T / R O C K W H E E L A S S E M B L Y D E T A I L A S E R I A L N O . A J 3 3 0 1 0 6 T H R U 3 1 0 6 R O C K - E Z E P A R T S R E F E R E N C E... - Page 61 L I F T / R O C K W H E E L A S S E M B L Y D E T A I L A S E R I A L N O . A J 3 3 0 1 0 6 T H R U I T E M P A R T N O .
-
Page 62: Lift/Rockwheel Assembly Detail B
L I F T / R O C K W H E E L A S S E M B L Y D E T A I L B S E R I A L N O . A J 3 3 0 1 0 6 T H R U 3 1 0 6 R O C K - E Z E P A R T S R E F E R E N C E... - Page 63 L I F T / R O C K W H E E L A S S E M B L Y D E T A I L B S E R I A L N O . A J 3 3 0 1 0 6 T H R U I T E M P A R T N O .
-
Page 64: Lift/Rockwheel Assembly Detail C
L I F T / R O C K W H E E L A S S E M B L Y D E T A I L C S E R I A L N O . A J 3 3 0 1 0 6 T H R U 3 1 0 6 R O C K - E Z E P A R T S R E F E R E N C E... - Page 65 L I F T / R O C K W H E E L A S S E M B L Y D E T A I L C S E R I A L N O . A J 3 3 0 1 0 6 T H R U I T E M P A R T N O .
-
Page 66: Windrower Assembly - Chain Driven End
W I N D R O W E R A S S E M B L Y - C H A I N D R I V E N E N D S E R I A L N O . A J 3 3 0 1 0 6 T H R U 3 1 0 6 R O C K - E Z E P A R T S R E F E R E N C E... - Page 67 W I N D R O W E R A S S E M B L Y - C H A I N D R I V E N E N D S E R I A L N O . A J 3 3 0 1 0 6 T H R U I T E M P A R T N O .
-
Page 68: Windrower Assembly - Undriven End
W I N D R O W E R A S S E M B L Y - U N D R I V E N E N D S E R I A L N O . A J 3 3 0 1 0 6 T H R U 3 1 0 6 R O C K - E Z E P A R T S R E F E R E N C E... - Page 69 W I N D R O W E R A S S E M B L Y - U N D R I V E N E N D S E R I A L N O . A J 3 3 0 1 0 6 T H R U I T E M P A R T N O .
-
Page 70: Hydraulic Assembly 1
H Y D R A U L I C A S S E M B L Y 1 3 1 0 6 R O C K - E Z E P A R T S R E F E R E N C E... -
Page 71: Hydraulic Assembly 2
H Y D R A U L I C A S S E M B L Y 1 S E R I A L N U M B E R A J 3 3 5 1 A N D U P ITEM PART NO. - Page 72 H O P P E R D U M P V A L V E ( O P T I O N ) 3 1 0 6 R O C K - E Z E P A R T S R E F E R E N C E...
- Page 73 H O P P E R D U M P V A L V E ( O P T I O N ) S E R I A L N O . A J 3 3 5 1 A N D ITEM PART NO.
-
Page 74: Drag Plate (Option)
D R A G P L A T E ( O P T I O N ) DRAG PLATE When using rockpicker on smooth solid terrain, windrower may cause stones to roll ahead of rock wheel. With drag plate adjusted so lower edge of plate drags, stones will be deflected, preventing them from rolling ahead. - Page 75 D R A G P L A T E ( O P T I O N ) ITEM PART NO. QTY. DESCRIPTION 6600217 Drag Plate Kit-3106 6600095 Drag Plate 6600096 Rubber Hanger 6600097 Outer Mount Strap 6600098 Outer Mount Bracket 6600099 Inner Mount Bracket 6600100...
-
Page 76: Tail Light Assembly
T A I L L I G H T A S S E M B L Y 3 1 0 6 R O C K - E Z E P A R T S R E F E R E N C E... - Page 77 T A I L L I G H T A S S E M B L Y ITEM PART NO. QTY. DESCRIPTION For serial number 3115467606 and up 4800085 BOLT\HEX\1/2X1 4800277 BOLT\HEX\1/4X1 4900001 NUT\HEX\1/2\NC 4900009 NUT\HEX\1/4\NC 5000006 WASH\LOCK\1/2 5000024 WASH\LOCK\1/4 5701058 TAILLIGHT\RED;RIGHT\LED\ASSY\4PIN 5701059...
- Page 78 A Tradition of Innovation Since 1966 3 1 0 6 R O C K - E Z E P A R T S R E F E R E N C E...
-
Page 79: Tail Light Wiring Harness
T A I L L I G H T W I R I N G H A R N E S S... -
Page 80: Decals
D E C A L S 6500020 1A 6500304 6500366 6500040 6500041 6500046 6500147 6500302 6500319 6500105 6500052 3 1 0 6 R O C K - E Z E P A R T S R E F E R E N C E... - Page 81 D E C A L S ITEM PART NO. QTY. DESCRIPTION 6500020 DECAL\LOGO\HYBSTR\SNBRS\3 6500304 DECAL\LOGO\HYBSTR\1-3/4\W/SUNBURST 6500040 DECAL\WARN\SHIELD\PROT 6500041 DECAL\WARN\PROTECTION 6500046 DECAL\LOGO\ROCK-EZE\SLTDBLACK 6500147 DECAL\INFO\HYD.CYL;SFTYSTOP 6500302 4 ft. DECAL\LOGO\STRIP\3\RD&BLK 6500319 DECAL\LOGO\3106\SLTD\BLCK 6500105 DECAL\LOGO\ROCK-EZE\RD\WHITE 6500052 DECAL\INFO\OIL;LEVEL 6500366 DECAL\SMV 6500541 DECAL\2X9\FLRSCNT\NON-REFCT 6500434 DECAL\2X9\RED\REFCT 6500435 DECAL\2X9\AMBER\REFCT 6500043 DECAL\WARN\NO;RIDERS...
- Page 82 A Tradition of Innovation Since 1966 3 1 0 6 R O C K - E Z E P A R T S R E F E R E N C E...
-
Page 83: 3106 Rock-Eze Documentation Comment Form
3106 ROCK-EZE Documentation Comment Form DuraTech Industries welcomes your comments and suggestions regarding the quality and usefulness of this manual. Your comments help us improve the documentation to better meet your needs. • Did you find any errors? • Is the information clearly presented? • Does the manual give you all the information you need to operate the equipment safely and effectively? • Are the diagrams and illustrations correct? - Page 84 A Tradition of Innovation Since 1966 3 1 0 6 R O C K - E Z E P A R T S R E F E R E N C E...
Need help?
Do you have a question about the Haybuster 3106 ROCK-EZE and is the answer not in the manual?
Questions and answers