Table of Contents
Advertisement
Advertisement
Table of Contents

Related Manuals for Guide Gear 1A-MT113


Summary of Contents for Guide Gear 1A-MT113
- Page 1 Tenderizer and Jerky Cutter Owner’s Manual WARNING: Read carefully and understand all ASSEMBLY AND OPERATION INSTRUCTIONS before operating. Failure to follow the safety rules and other basic safety precautions may result in serious personal injury. Item # 1A-MT113 READ & SAVE THESE INSTRUCTIONS...
- Page 2 Congratulations on your Guide Gear™ purchase. Take your game to the next level with field-tested Guide Gear™ products for a confident, competitive edge that strikes the perfect balance between performance and value. For future reference, please complete the owner’s record below:...
-
Page 3: Table Of Contents
Table of Contents Intended Use ............................4 Technical Specifications ........................4 Important Safety Information ......................4 Specific Operation Warnings ......................6 Main Parts of Tenderizer and Jerky Cutter ..................7 Assembly Instructions ........................8 Tenderizing Instructions ........................9 Jerky Cutting Instructions ........................9 Disassembly and Cleaning Instructions .................. -
Page 4: Intended Use
We've all got a meat mallet. And we've all ruined a steak trying to get that perfect cube pattern. Well, our Guide Gear® Tenderizer and Jerky Cutter eliminates the guesswork and inconsistency. All you need to do it feed your cut through while giving the handle a turn. And if you want it cubed, simply turn it 90 degrees and pass it through again! This tenderizer and jerky cutter is intended to break down fibers of tough cuts of meat including venison, beef and boneless pork chops. - Page 5 WARNING WORK AREA SAFETY • Inspect the work area before each use. Keep work area clean, dry, free of clutter, and well-lit. Cluttered, wet, or dark work areas can result in injury. Using the product in confined work areas may put you dangerously close to cutting tools and rotating parts. •...
-
Page 6: Specific Operation Warnings
Specific Operation Warnings WARNING • Caution sharp blades! Wear cut-resistant gloves (sold separately) when handling blades. • Do not operate unit without cover in place. The toothed rollers can pull fingers and hand into rollers and cause serious injury. Avoid contact with moving parts. Never reach into the tenderizer/cuber/jerky slicer. -
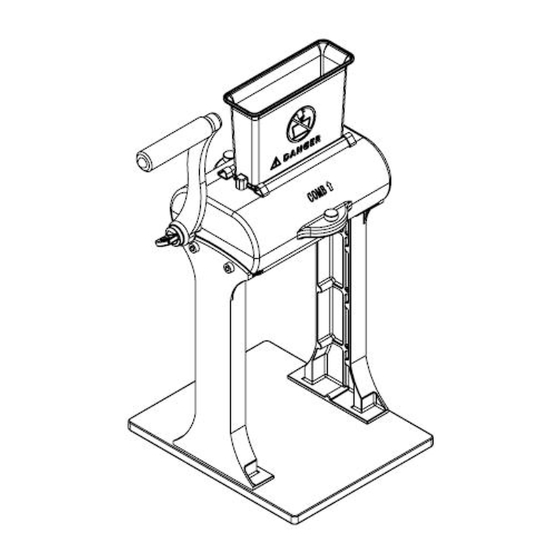
Page 7: Main Parts Of Tenderizer And Jerky Cutter
Main Parts of Tenderizer and Jerky Cutter Part Number Description Chute Stainless Steel Comb Housing Thumbscrew (2) Nylon Bushing Shaft Clip (2) Screw for Legs (4) Lower Housing C-Clamp Screw for Chute and Base (6) Allen Wrench for Leg Screws Allen Wrench for Chute &... -
Page 8: Assembly Instructions
Assembly Instructions 1. Connect the legs to the base using the provided allen wrench and screws. 2. Using an allen wrench and the screws, attach the legs to the lower housing (Figure 1). 3. Install the chute to the top housing using an allen wrench and the screws. -
Page 9: Tenderizing Instructions
Tenderizing Instructions 1. Thoroughly hand wash all parts before first and every use in warm soapy water. 2. Place the meat tenderizer and jerky cutter on a flat stable surface. 3. Attach c-clamps to surface by tightening adjusting screw. Do not over tighten. 4. -
Page 10: Disassembly And Cleaning Instructions
15. Cut meat to size which will allow it to be fed into the opening of the cover. Do not attempt to force meat into the opening. Remove gristle. It’s best to use cold meat. 16. Feed meat that is sized not more than 4” in width and 4/5” in thickness into jerky slicer. Turn hand crank in clockwise motion while feeding meat. -
Page 11: Limited Warranty
The Sportsman’s Guide and Northern Tool and Equipment Company, Inc. ("We'' or ''Us'') warrants to the original purchaser only ("You" or ''Your'') that the Guide Gear product purchased will be free from material defects in both materials and workmanship, normal wear and tear excepted, for a period of one year from date of purchase. - Page 12 Distributed by: The Sportsman’s Guide Northern Tool & Equipment Company, Inc. Burnsville, Minnesota 55306 www.sportsmansguide.com www.northerntool.com Made in COUNTRY OF ORIGIN...
Need help?
Do you have a question about the 1A-MT113 and is the answer not in the manual?
Questions and answers