
Related Manuals for Zodiac Kontiki 2


Summary of Contents for Zodiac Kontiki 2
- Page 1 Instructions for installation and use - English Hydraulic cleaner Translation of the original instructions in French More documents on: www.zodiac.com H0412700_REVB - 2018/05...
- Page 3 • Do not spray insecticide or any other chemical (inflammable or non-inflammable) in the direction of the appliance, as this may damage the body and cause a fire. • Zodiac® heat pump, filtration pump and filter appliances are compatible with the most commonly used types of pool water treatment systems.
-
Page 4: Table Of Contents
It is prohibited to distribute or modify this document in any way without authorisation from • Zodiac®. Zodiac® is constantly developing its products to improve their quality; therefore, the • information contained in this document may be modified without notice. -
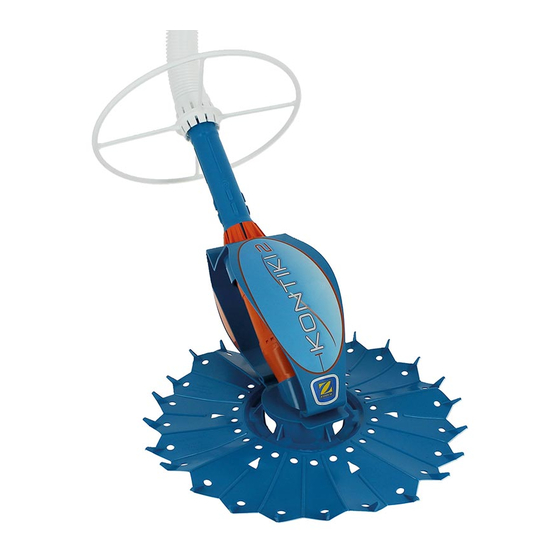
Page 5: ❶ Specifications
❶ Specifications 1.1 I Description KONTIKI 2 Cleaner body Disc Deflector wheel Adapters (x2) Hose deflectors (x2) Hoses of 1 metre (x8) Wintering bag for hoses Set of 6 1-metre hose sections Flow gauge “Cyclonic ” Leaf Catcher : Supplied... -
Page 6: I Technical Specifications And Marking
1.2 I Technical specifications and marking 1.2.1 Technical specifications KONTIKI 2 Cleaner size (L x W x h) 48 x 20 x 40 cm Package size (L x W x h) 101 x 31,5 x 33 cm Cleaner weight 1,3 kg... -
Page 7: ❷ Installation
❷ Installation 2.1 I Assembly The cleaner comes partly assembled. You only have to fit : • The disc, • The deflector wheel, And assemble the hoses. 2.1.1 The disc • Fix the disc on to the cleaner body ; position it in the groove provided. : Cleaner body : Groove : Disc... -
Page 8: I Hose Section Assembly
2.2 I Hose section assembly 2.2.1 Determine the number of sections you need • Measure the length between the suction line or the skimmer and the furthest away point of the pool (see image • Add an extra 1 metre to the length measured (see image •... -
Page 9: I Hydraulic Connections
2.3 I Hydraulic connections • Turn off the filtration pump. • Clean the skimmer basket, the filtration pump filter basket and the filter if necessary. 2.3.1 Connection to the suction line : Suction line : Adapter : Hose section 2.3.2 Connection to the skimmer •... - Page 10 2.3.3 “Cyclonic™ Leaf Catcher” connection (available as an option) • Connect the hoses using the adapters supplied with the Cyclonic Leaf Catcher (see image • Connect the Cyclonic Leaf Catcher to the hose assembly which is closest to the suction line or the skimmer (see image •...
- Page 11 2.3.4 Flow test and adjustement (available as an option) Before installing the cleaner head, test and adjust to determine the ideal flow. To do this, remove the cleaner from the hose while keeping the cleaner immersed, and replace with the flow switch (see image ).
-
Page 12: ❸ Use
❸ Use 3.1 I Operating principle The hydraulic cleaners connect to the filtration system (either to a suction line or a skimmer); they use the filtration pump’s energy to move around the pool. The wall climbing capacity varies according to the shape of the pool and the available water flow. -
Page 13: I Optimising Cleaner Performance
3.4 I Optimising cleaner performance The robot follows the pool filter pump activation cycles, sucking and cleaning the entire pool surface using random movements. The cleaner coverage rate depends on the shape of the pool and the available water flow. Adjustments may be required in some pools to optimise the coverage rate. -
Page 14: ❹ Maintenance
❹ Maintenance • The device must be cleaned regularly using clean or slightly soapy water. Do not use any solvents. • Rinse the device generously using clean water. • Never store the cleaner in direct sunlight. Store the hoses laying flat and not coiled to prevent unwanted hose memory. 4.1 I Cleaning the filtration pump basket •... -
Page 15: I Replacing The Diaphragm
4.3 I Replacing the diaphragm Before starting this operation and to avoid serious injury: • Turn off the filtration pump. • Disconnect the cleaner from the hose assembly. • Disconnect the external exhaust hose ( ) and the cartridge ( ) from the cleaner body ( ) by unscrewing the ring ) of the external exhaust hose. -
Page 16: ❺ Troubleshooting
❺ Troubleshooting • Before you contact your reseller, please carry out these few simple checks using the following tables if a problem occurs. • If the problem continues contact your reseller. 5.1 I Device behaviour • The cleaner is designed specifically for 10 to 50 m³ aboveground pools. •... - Page 20 Your retailer Modèle appareil Appliance model Numéro de série Serial number Pour plus d’informations, enregistrement produit et support client : For more information, product registration and customer support: www.zodiac.com ZODIAC® is a registered trademark of Zodiac International, S.A.S.U., used under license.
Need help?
Do you have a question about the Kontiki 2 and is the answer not in the manual?
Questions and answers