Advertisement
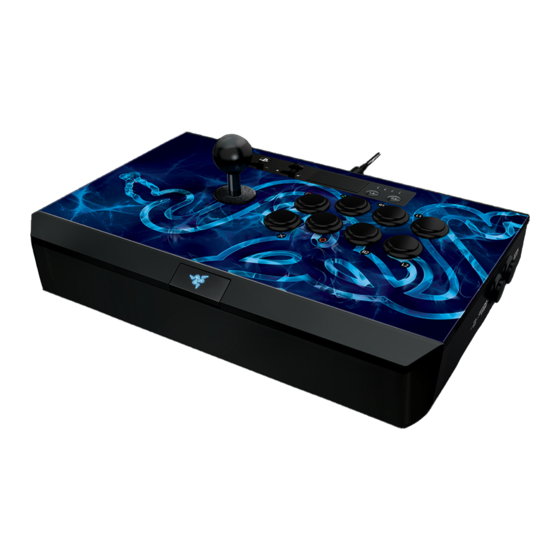
Built on years upon years of collective arcade and console gaming experience from pro
gamers and the Razer community alike, the Razer Panthera arcade stick was
engineered and refined to perfection through countless prototypes via an extensive
beta testing phase and has been crafted to allow the same advanced modification that
gamers and modders have come to love over the years. On top of having internals and
storage easily accessible at the touch of a button, you can also fully change the joystick
and all 10 buttons for complete customizability.
Featuring genuine Sanwa™ hardware and the Vewlix layout, this definitive arcade stick
for tournament-grade gaming represents the pinnacle of precision and reliability.
Forged from the fires of an arcade gaming legacy, the Razer Panthera is, in the most
primeval sense, Bred to Fight.
Advertisement

Related Manuals for Razer PANTHERA


Summary of Contents for Razer PANTHERA
- Page 1 Featuring genuine Sanwa™ hardware and the Vewlix layout, this definitive arcade stick for tournament-grade gaming represents the pinnacle of precision and reliability. Forged from the fires of an arcade gaming legacy, the Razer Panthera is, in the most primeval sense, Bred to Fight.
-
Page 2: Table Of Contents
1. PACKAGE CONTENTS / SYSTEM REQUIREMENTS ..........3 2. REGISTRATION / TECHNICAL SUPPORT ............... 4 3. DEVICE LAYOUT ....................5 4. USING YOUR RAZER PANTHERA ARCADE STICK FOR PLAYSTATION ....8 5. CUSTOMIZING YOUR RAZER PANTHERA FOR PLAYSTATION ......13 6. SAFETY AND MAINTENANCE ................17... -
Page 3: Package Contents / System Requirements
1. PACKAGE CONTENTS / SYSTEM REQUIREMENTS PACKAGE CONTENTS • Razer Panthera Arcade Stick • 3m / 9.84ft. Detachable braided cable • Flat tip and cross tip screwdriver • Ball top joystick grip SYSTEM REQUIREMENTS • PlayStation®3 / PlayStation®4 • Also compatible with PC (Windows 7 and above) •... -
Page 4: Registration / Technical Support
Visit razer.com/razerid to sign up for a Razer ID now to get a wide range of Razer benefits. For example, get real-time information on your product’s warranty status via Razer Synapse. To learn more about Razer Synapse and all its features, visit razer.com/synapse. -
Page 5: Device Layout
3. DEVICE LAYOUT A. Ball top joystick grip B. Authentic Sanwa Denshi™ joystick C. Authentic Sanwa Denshi™ action buttons D. SHARE / SELECT button E. OPTIONS / START button F. Compartment button... - Page 6 G. PS button H. Control stick switch (Left Analog Stick, Directional Pad, Right Analog Stick) I. Player indicator (PS3 only) J. PS3 / PS4 switch K. Lock / unlock switch L. Touch pad button (PS4 only) M. L3 button N. R3 button O.
- Page 7 P. Detachable cable Q. Flat tip and cross tip screwdriver...
-
Page 8: Using Your Razer Panthera Arcade Stick For Playstation
4. USING YOUR RAZER PANTHERA ARCADE STICK FOR PLAYSTATION SETTING UP THE ARCADE STICK 1. Press the Compartment Button to unlock the lid. 2. Lift the lid to access the multipurpose compartment. - Page 9 3. Take out the detachable cable with the attached breakaway cable. 4. To close and lock the lid, place both hands on the edge of the lid away from the center, and push down.
- Page 10 5. Ensure that the marking is facing up when inserting the cable. 6. Rotate the screw collar clockwise until the detachable cable is firmly connected to the Razer Panthera.
- Page 11 7. Select whether you are using a PlayStation 3 or PlayStation 4. Important Note: Use the switch before plugging the arcade stick to your console. 8. Connect the Razer Panthera to your video game console.
- Page 12 To remove the detachable cable, rotate the screw collar counterclockwise to loosen, and then gently pull the cable. USING THE LOCK / UNLOCK SWITCH Setting this switch to Lock ( ) will disable the Select / Share, Start / Options, and PS Button.
-
Page 13: Customizing Your Razer Panthera For Playstation
5. CUSTOMIZING YOUR RAZER PANTHERA FOR PLAYSTATION CAUTION! Please remove the Detachable Cable before opening the multipurpose compartment or doing any modifications to your Razer Panthera. CHANGING THE ACTION BUTTONS 1. Press the Compartment Button to unlock the lid. 2. Lift the lid to access the multipurpose compartment. - Page 14 3. Using the flathead of the screwdriver, push each of the small tabs on the Quick Disconnect (QD) wires to easily remove them from the action button. 4. While holding the action button’s fastener, push the action button out. You can use the screwdriver to push the fasteners in more easily, if needed.
- Page 15 5. Repeat steps 3 and 4 for all the buttons you want to change. 6. Insert your desired action buttons or button covers* into the slots. *not included...
- Page 16 7. Reattach the cables to the action buttons. 8. Ensure that all cables are properly connected then close the lid.
-
Page 17: Safety And Maintenance
Panthera. 1. Position the Razer Panthera directly in front of you and within easy reach. 2. Adjust the height of your chair and/or table so that the Razer Panthera is at or below elbow height. 3. Keep your feet well supported, posture straight and your shoulders relaxed. - Page 18 7. If you should experience any physical discomfort while using your Razer Panthera, such as pain, numbness, or tingling in your hands, wrists, elbows, shoulders, neck or back, please consult a qualified medical doctor immediately.
-
Page 19: Legalese
LIMITATION OF LIABILITY Razer shall in no event be liable for any lost profits, loss of information or data, special, incidental, indirect, punitive or consequential or incidental damages, arising in any way out of distribution of, sale of, resale of, use of, or inability to use the Product. In no... - Page 20 (in so far as it is invalid or unenforceable) shall be given no effect and deemed to be excluded without invalidating any of the remaining terms. Razer reserves the right to amend any term at any time without notice.
Need help?
Do you have a question about the PANTHERA and is the answer not in the manual?
Questions and answers