Table of Contents
Advertisement
Advertisement
Table of Contents

Related Manuals for HENNING MSM 12


Summary of Contents for HENNING MSM 12
- Page 1 Mobile Rope Load Meter MSM 12 Operating Instructions...
- Page 2 © Copyright 2009 by Henning GmbH, Loher Str. 4 + 30, D-58332 Schwelm Warranty This description has been drawn up by Henning GmbH to the best of their knowl- edge. All technical statements have been carefully established and checked. They correspond to the state of the art.
-
Page 3: Table Of Contents
Mobile Rope Measurement MSM 12 CONTENTS Scope of delivery ....................4 Power supply ...................... 4 Control elements ....................5 Preparations ....................... 5 Connecting the MSM12 to the computer ............5 Rope load sensors LSM ..................6 Mode of operation ..................6 Connections .................... -
Page 4: Scope Of Delivery
Mobile Rope Measurement MSM 12 List of figures Figure 1: Main display ....................9 Figure 2: Menu structure ..................10 Figure 3: Saving of the rope loads ................11 Figure 4: Assignment of the measurement ID ............11 Figure 5: Configuration menu ................... 12 Figure 6: Selection of the language ................ -
Page 5: Control Elements
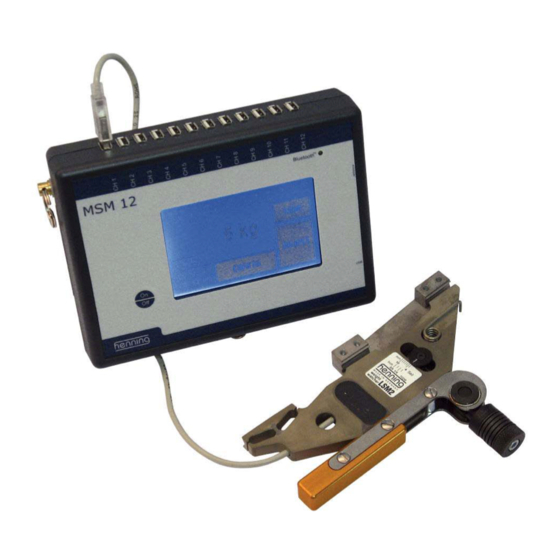
Mobile Rope Measurement MSM 12 3 Control elements Connections for rope load sensors LSM1 Aerial connection (optional) Display with touch screen USB connection On / off switch 4 Preparations Open the battery chamber on the back of the MSM12. Insert the batteries as shown on the illustration opposite. -
Page 6: Rope Load Sensors Lsm
Mobile Rope Measurement MSM 12 automatically installed by Windows XP. Otherwise, Windows will prompt you to indi- cate the storage location of the drivers. The drivers are found on the program direc- tory. 6 Rope load sensors LSM Set screw... - Page 7 Mobile Rope Measurement MSM 12 3. Connect the just installed LSM sensor to the MSM12 rope load evaluation unit with the USB cable. Step 1 Step 2 Step 3 Page 7 2.0 / 3.2009 Henning GmbH...
-
Page 8: Operation
In order to switch on the MSM12 mobile rope load meter please press the on/off switch for minimum 3 seconds. The display now shows the Henning logo. After a short time the display switches to the main display. The MSM12 is now ready for op- eration. -
Page 9: Figure 1: Main Display
Mobile Rope Measurement MSM 12 Individual weight Selected sensor display type Selected suspen- sion ratio Total weight Max. single load Min. single load Max. deviation Date / time Battery voltage Figure 1: Main display Die The individual weight display shows the measured load of each connected rope load sensor. -
Page 10: Menu
Mobile Rope Measurement MSM 12 The voltage display shows the instantaneous voltage of the battery or the accumu- lator. 7.4 Menu Figure 2 shows the menu structure of the mobile rope load meter MSM12. Main display Save Configuration Select language... -
Page 11: Save Current Rope Loads
By means of the free of charge PC software the measurements can be read from the load meter and be added in the form of PDF files or printouts to the elevator docu- mentation. (Download of the software under http://www.henning-gmbh.de). ... -
Page 12: Configuration
Mobile Rope Measurement MSM 12 7.4.2 Configuration The configuration menu is represented in Figure 5. If you want to leave this menu, press the ESC button. Figure 5: Configuration menu 7.4.2.1 Select language Under the menu item „Language“ you have the possibility to switch between the lan- guages German and English. -
Page 13: Figure 7: Selection Of The Sensor Type
Mobile Rope Measurement MSM 12 7.4.2.2 Select sensor type For the WeightWatcher mobile system three different sensor types for different rope diameters are available: - LSM1 diameter 6mm – 16mm - LSM2 diameter 4mm – 10mm - LSM-XL diameter 16mm – 24mm In order to enable the load meter to work correctly with the different sensors, the user must select the sensor used. -
Page 14: Figure 8: Suspension Ratio Setting
Mobile Rope Measurement MSM 12 Figure 8: Suspension ratio setting 7.4.2.4 Set date / time Under this menu item you can set the internal real time clock of the mobile rope load meter MSM12. The current time and the date are stored together with each storage of the measured values, so that later you can recognize when these measurements have been carried out. -
Page 15: Figure 10: Delete Storage
Mobile Rope Measurement MSM 12 7.4.2.5 Delete storage Figure 10: Delete storage Press YES in order to delete the total measurement data storage. When pressing the NO button you leave this menu item without deleting the storage. Attention: After deleting the measurement data storage all data stored here (rope loads and rope load wizard records) is irretrievably lost. -
Page 16: Rope Load Wizard
Mobile Rope Measurement MSM 12 7.4.2.7 Set display units The rope loads and total weights can be displayed in two different units. The unit kilogram or tons respectively is preset. Alternatively you may change to the output in the English weight unit pound and here you can select between short tons and long tons. -
Page 17: Figure 14: Storage Of The Rope Load Setting
Mobile Rope Measurement MSM 12 In figure 13 you see the connected sensors – in this case 6 sensors. The evaluation unit has determined rope 2 as the reference rope. (during the total adjustment proce- dure channel 2 will never display a deviation; If you adjust rope 2 this has on the dis- play only effects on the other measuring channels). -
Page 18: Carrying-Out Of Measurements
Mobile Rope Measurement MSM 12 8 Carrying-out of measurements 8.1 Installation position of the sensors in the rope 8.1.1 General conditions The sensors must be mounted with a minimum distance of 200 mm to the cable joint as a not vertically running rope can distort the precision of the measured results. -
Page 19: Rope Adjustment
Mobile Rope Measurement MSM 12 8.2 Rope adjustment On principle, take care that the sensors are mounted in that section of the rope in which the rope exhibits a maximum length without intermediate deflections or traction sheaves, as the ropes during stoppage cannot or only slightly balance between the rope sections. - Page 20 Mobile Rope Measurement MSM 12 2:1 Suspension Page 20 2.0 / 3.2009 Henning GmbH...
-
Page 21: Weight Measurement
Mobile Rope Measurement MSM 12 8.3 Weight measurement Due to heavy friction of the car or the counterweight in the rail guides the measuring result can be negatively influenced. In such a case it is better to de- termine the weight during a constant travel. This effect is found particularly frequently in the case of rucksack guides. -
Page 22: Bluetooth Pairing
Mobile Rope Measurement MSM 12 9.2 Bluetooth pairing In order to use the wireless connection between the MSM12 and the computer the MSM12 must be paired with the computer. Here the pairing procedure under Win- dows XP with Service Pack 2 is described. For other operating systems the adjust- ments should be made correspondingly. - Page 23 Mobile Rope Measurement MSM 12 Highlight the newly found MSM12 and click [Continue >] Select the option , [Use the PIN from the documentation] enter the PIN 0000 and click . [Continue >]. To terminate the installation click . [Finish]...
-
Page 24: Technical Data
Mobile Rope Measurement MSM 12 10 Technical Data Part number: 455 100 Dimensions L x W x H: 190 mm x 138 mm x 46 mm Weight: 650 g (incl. batteries) Interfaces: 1 x USB1.1 for the connection to a PC...
Need help?
Do you have a question about the MSM 12 and is the answer not in the manual?
Questions and answers
how is the cost? and the scheduling