Nouvag Vacuson 60 Operation Manual
Medical suction pumps
Hide thumbs
Also See for Vacuson 60:
- Operation manual (84 pages) ,
- Instructions for use manual (24 pages)

Related Manuals for Nouvag Vacuson 60


Summary of Contents for Nouvag Vacuson 60
- Page 1 Vacuson 40/60 Operation Manual Medical Suction Pumps EN: Subject to change. Pictures and technical data may slightly differ due to consistent further development.
-
Page 2: Table Of Contents
Vacuson 40/60 Table of contents 1 Product description 2 Intended use and operation Contraindications Technical data, Vacuson 40/60 Ambient conditions Warranty coverage 2 Explanation of symbols 3 Safety information 5 ... -
Page 3: Product Description
Cases described in the relevant literature must be taken into account. Technical data, Vacuson 40/60 Vacuson 40 Vacuson 60 Voltage: 115 V~at 60 Hz; 230 V~at 50 Hz 115 V~at 60 Hz; 230 V~at 50 Hz Power consumption: max. -
Page 4: Ambient Conditions
800 – 1060 hPa Warranty coverage Purchasing a Vacuson 40 or Vacuson 60 suction pump entitles you to a 1-year warranty. If you return the warranty card for registration within four weeks of the date of purchase, warranty coverage will be extend- ed for a further 6 month. -
Page 5: Explanation Of Symbols
Vacuson 40/60 Explanation of symbols Important information Autoclavable at 135°C Warning Suitable for thermal disinfection Date of manufacturing Protective ground Manufacturer Observe the instructions for use Type BF applied part is the filling tube Electrical and electronic devices that have with connected instruments reached the end of their service life comprise hazardous waste and may not be disposed of... -
Page 6: Safety Information
Repairs may only be performed by authorized NOUVAG service technicians. During use The device is not sterile on delivery. All steriliz- At the choosing of the instrument the operator able parts must be sterilized before use (refer has to make sure it’s biocompatible, according to... -
Page 7: Scope Of Delivery
4246 Bacteria filter for suction pump, Ø 64 mm, PTFE, hydrophobe, disposable ------------------------------------------ 10 31997 Operating instructions on CD-ROM --------------------------------------------------------------------------------------------- 1 Vacuson 60 set (REF 4237-115 V/4237-230 V) 4280 Control unit Vacuson 60 ----------------------------------------------------------------------------------------------------------- 1 15012 ON/OFF-pneumatic pedal to switch the device on and off ---------------------------------------------------------------- 1... -
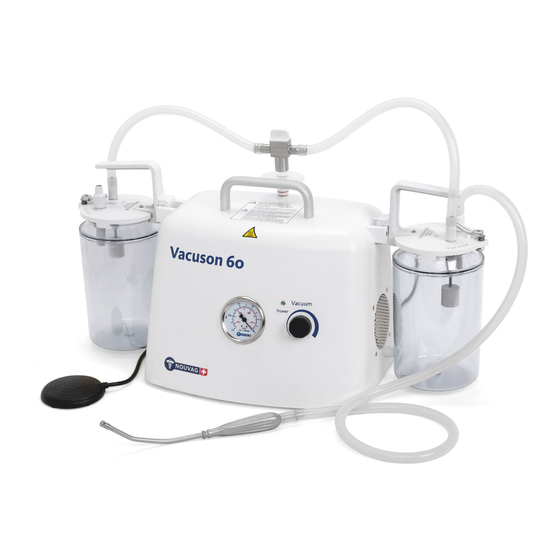
Page 8: Device Overview
24 25 13. Secretion jar mount 14. Ready indication, LED 15. Manometer 16. ON/OFF pneumatic pedal Rear view of Vacuson 60 17. Vacuum regulator (VACUUM) 18. Ventilation intake 19. Potential equalization 20. Port for pneumatic ON/OFF-pedal 21. Air exhaust port (EXHAUST) 22. -
Page 9: Startup
Vacuson 40/60 Startup Device setup Installations-Layout Place the Vacuson 40/60 suction pump and all required accessories and instruments on an even, non-slip surface and make sure you have good access to all controls. The installation of the device in close proximity to other devices is prohibited due to EMC – please see section 3.1 and the manufacturer’s EMC declaration in the appendix of this manual. -
Page 10: Preparation Of Secretion Jars
Vacuson 40/60 Preparation of secretion jars 1. Hold open secretion jars (2 or 5 liter) or MONOKIT-jar available. Press jar lid with turn and tilting lever in open-position firmly onto the jar (the latch of the locking system is in open-position). Latch in open- position Turn and tilting lever in... -
Page 11: Preparing The Monokit Secretion Jar System
Vacuson 40/60 Preparing the MONOKIT secretion jar system 1. Hold ready MONOKIT secretion jar with disposable inlay pouch and mounting bracket. 2. Insert the disposable inlay pouch into the MONOKIT secretion jar and make sure the tube connector is on the lid. -
Page 12: Device Preparation
Vacuson 40/60 Device preparation 1. Prior to use all sterilizable parts (Tubes, Cannulas, Cannula handlebar, char lid and bottles) must be steri- lized. 2. Attach secretion jars with mounted and locked lid to the device. 3. Lay the pneumatic pedal on the floor and plug the connection tube into the port for the pneumatic pedal. 4. - Page 13 Vacuson 40/60 5. Attach the short connection tube (400 mm) on one end with the bacteria filter and the other end with the narrow connector (VACUUM) of the jar lid. 6. Attach the filling tube (1700 mm) on one end with the angled connector (optional REF 28535) and the other end of the tube with the instrument.
- Page 14 Vacuson 40/60 9. Screw suction cannula (optional) onto the cannula handlebar (Vacuson 60, Liposuction) and hang it back in- to the quiver. 10. Connect the device socket with the wall socket, using the devices power cord. Before switching on, make sure that the power supply of the device matches the country’s specific ser-...
-
Page 15: Operation
Vacuson 40/60 Operation Switching device on and off (Mains switch) Use the power switch “I/O”, at the rear of the device, to switch the device on and off. The standby is signalized by the LED status light at front of the device. The device can be switched off at any time, irrespective of any procedure for device switch-off. -
Page 16: Emptying Secretion Jar
Vacuson 40/60 Emptying secretion jar The jar lid of the secretion jar is equipped with an overflow protection system to prevent the vacuum system from being flooded by secretion fluids at high filling levels of the secretion jar. Therefor a float gauge is responsible. At high filling levels of the secretion jar and the resulting locking of the overflow protection system the secretion jar has to be emptied or replaced by another secretion jar. -
Page 17: Cleaning, Disinfection And Sterilization
● If sterilized material is not used immediately, the material packaging must be labeled with the sterilization date. ● Nouvag AG recommends including a sterility indicator. Control unit and pneumatic pedal Control unit and pneumatic pedal do not come into contact with the patient. -
Page 18: Cannulas And Cannula Handlebar
The effectiveness of the sterilization instructions provided above for reprocessing this medical product has been validated by Nouvag AG. The user is responsible for ensuring that the sterilization procedure performed achieves the required results. This requires validation and routine monitoring of the procedure. The staff member who completes the procedure bears sole responsibility for any deviation on his part from the instructions provided. -
Page 19: Maintenance
The service manual, wiring diagrams, and descriptions are available upon request from Manufacturer. NOUVAG AG offers a safety inspection service for its customers. Addresses can be found in the appendix of this operation manual under “Service centers”. For further information please contact our technical ser- vice department. -
Page 20: Bacteria Filter
Vacuson 40/60 Bacteria filter A periodical replacement of the bacteria filter is recommended after 8 hours of use, but definitely after it came into contact with foam or infectious material. For reordering refer to chapter 11 to retrieve the article number. -
Page 21: Disassembly Of The Overflow Protection System
Vacuson 40/60 Disassembly of the Overflow Protection System 1. Unscrew threaded Overflow Protection connector. 2. Remove seal from inside connector (O-Ring acc. picture). 3. Clean Overflow Protection System and float gauge. 4. Install new seal (O-Ring acc. picture). 5. Reasseble of Overflow Protection connector. Function control after reassembly: 6. -
Page 22: Seals And Tubes
Vacuson 40/60 Seals and tubes To insure proper function of the Suction Pump, all tubes and seals must be periodically checked, and re- placed after at most 250 sterilization cycles or five years of operation. Only when in perfect order can suffi- cient vacuum be built up. -
Page 23: Malfunction And Troubleshooting
Vacuson 40/60 Malfunction and troubleshooting Malfunction Cause Solution Reference in manual Device is not operational Pump is not switched on Switch main switch “I/O” 7.1 Switching device on and off to “I” No connection to electricity- Connect power cord to 6.4 Device preparation supply electricity-supply... -
Page 24: Accessories And Spare Parts
MONOKIT, 2 liter inlay jar, sterilisable------------------------------------------------------------------------------------------------- 6036 MONOKIT, mounting bracket for suspending the Monokit system ------------------------------------------------------------ 4037 Bacteria filter for all NOUVAG Vacuson suction pumps, disposable, hydrophobe -----------------------------------------4246 Secretion jar lid with overflow protection system for 2 and 5 liter secretion jars, complete ------------------------------ 4058... -
Page 25: Information On Disposal
Vacuson 40/60 Information on disposal When disposing of the device, device parts and accessories, the regulations prescribed by law must be ob- served. Do not dispose of devices with household waste! To ensure environmental protection, old devices can be returned to the dealer or manufacturer. Motors that have reached the end of their service life may not be disposed of with household waste.
Need help?
Do you have a question about the Vacuson 60 and is the answer not in the manual?
Questions and answers