Table of Contents
Advertisement
Advertisement
Table of Contents

Related Manuals for Kent Scientific CODA


Summary of Contents for Kent Scientific CODA
- Page 1 Non-Invasive Blood Pressure System Owner's Manual For High Throughput...
-
Page 2: Table Of Contents
Table of Contents Part 1: CODA System User’s Guide ystem Requirements – 1 ncluded Equipment – 2 he CODA Controller – 3 etting Started – 4 Install the CODA Software – 4 Install the CODA System Hardware – 5 Connect Your Animals to the CODA System – 6 sing the CODA Software – 8 Terminology – 8 User Interface – 8 Setting Up and Running Experiments – 9 While Your Experiment Runs – 15 Status Codes – 16 Monitoring Experiments – 17 Replacing a Cuff Bladder – 17 Sample Displays – 18 Running More Sessions of an Existing Experiment – 19 Part 2: Software Reference ile Menu – 20 File > New > Experiment (Experiment Wizard) – 20 File > New > Session (Session Wizard) – 20 File > Open (Experiment Manager) – 20 File > Exit – 23 ools Menu – 24 Tools > Device Manager – 24 Tools> Experiment Manager – 26 Tools > User and Animal Manager – 26 Tools > Backup/Restore – 26 elp Menu – 26 Part 3: Theory of Operation oncepts of Non-Invasive Blood Pressure: Tail Cuff Method – 27 Part 4: General Information arranty, Guarantee and Contact Information – 32 ystem Specifications – 33 leaning and Decontamination – 34 roubleshooting – 35 Quick Start Guide – 36 Cuff Testing Instructions – 38... -
Page 3: Part 1: Coda System User's Guide
System Requirements To run the CODA Software, you will need: £ a computer running Windows® 7, 8 or 10—64 bit with: § 2.0GHz or higher processor § 2GB RAM § 2 USB ports § CD-ROM § video card at least 1024 x 768 resolution § internet connection NOTE £ a CODA Controller connected to the computer by USB This Owner’s Manual is for users running CODA £ a mouse or touchpad software and using a Coda High Throughput £ at least one of these CODA Systems: Controller. § CODA Monitor — for one animal at a time CODA High Throughput — for 2, 4, 6 or 8 animals at a § time Our email newsletter will keep you up to date on any software updates. Sign up at or contact Kent Scientific at 888-572-8887. -
Page 4: Included Equipment
Included Equipment Your CODA System will include different equipment, depending upon exactly what you have ordered. You also have the option of ordering a laptop with pre-installed CODA software from Kent Scientific. CODA Systems include: £ High Throughput CODA Controller with capability of up to 8 Channels—1 £ Power supply—1 £ CODA Controller stand—1 £ Occlusion Cuff Kit(s) —1 kit of 2 cuffs per Channel £ VPR Cuff Kit(s) —1 kit of at least 1 cuff per Channel £ Cuff replacement bladders —12 per cuff £ Replacement O-Rings or Caps—1 pair per cuff £ Rodent Holders —1 per Channel £ Animal Warming Platform uuuu —1 for 1 to 4 channels, 2 for 5 to 8 Channels £ CODA Cover –1 for each Animal Warming Platform £ Infrared Thermometer—1 Each Cuff Kit will be sized for either Mouse or Rat according to your order specification. See page 38 for Cuff Testing Instructions. Rodent Holder size will match your order specification. Each Animal Warming Platform holds up to 4 animal holders. uuuu... -
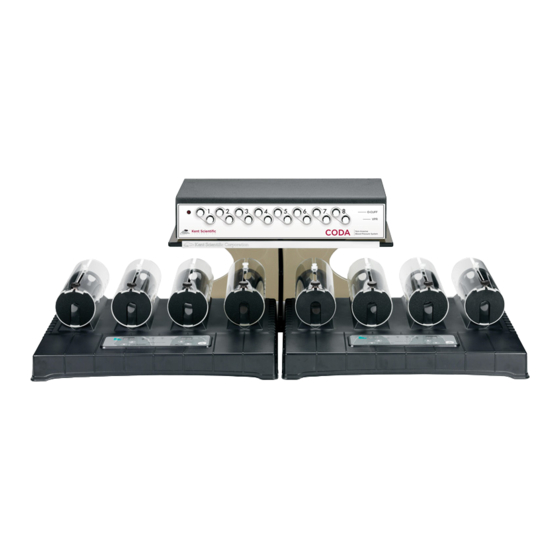
Page 5: The Coda Controller
The CODA Controller These pictures show the CODA High Throughput Controller. Front Panel Occlusion cuff port connectors VPR cuff port connectors Rear Panel Diagnostic port Power supply connector USB port for computer connection Power On/Off switch... -
Page 6: Getting Started
Getting Started Four steps are required to prepare your CODA System for use: Step 1: Install the CODA software. See instructions below. Step 2: Install the CODA System hardware. See page 5. Step 3: Configure your experiment using the CODA software. See page 9. Step 4: Connect your animals to the CODA System. See page 6. Before you begin your experiment, we recommend training your animal Skip Step 1 if… to use the holders in three or four fifteen minute sessions. …you have purchased the optional laptop from Kent along with your Step 1: Install the CODA Software CODA System. In that To install your CODA software: case, the CODA software 1. Close all open applications on your PC. is already installed. Insert the CODA software disk into the CD drive of your PC. Navigate to the CD drive and run setup.exe. Follow the on-screen directions to install your CODA software. If your PC does not have a CD drive, please call Kent Scientific. Regional and Language Settings You will need to adjust some of your Regional and Language settings if you are installing the CODA software onto a computer purchased outside the United States or if you see this or a similar error during installation: 1. Open the Windows Control Panel and select Regional and Language Options 2. At the tab, select the language setting that most closely matches Regional Options your location—for example, —and click... -
Page 7: Install The Coda System Hardware
Step 2: Install the CODA System Hardware To install your CODA hardware: Choose an appropriate location. Proper temperature is essential for accurate NIBP measurements. The room should be at or above 26°C. A room that is too cool will prevent an animal from thermoregulating, resulting in reduced tail blood flow, which makes accurate reading difficult. Keep in mind that cold steel tables or air conditioning vents can affect room temperature. Plug the CODA Controller into a standard wall outlet. Connect the Controller to a USB port of your computer. Remove the caps from the Controller VPR ports you intend to use. See page 3. They should be put back in place when the system is not in use. Attach a VPR Cuff to each VPR port. Repeat steps 4 and 5 for the O-Cuff port(s). Power the Controller on. Set up the Animal Warming Platform by plugging it into a standard wall outlet. This will cause it to come on automatically. Using the Animal Warming Platform Each Animal Warming Platform accommodates up to four animals. Your CODA System may include one or two Warming Platforms, depending upon the size of your Controller. Begin warming on all four channels by pressing the button. Press it again to stop START/STOP warming. All controls apply to all four channels; channels cannot be controlled independently. The Platform will turn off automatically after 1 hour, shown as in the time selection area. Use the and buttons on the right side of the DOWN Platform to change the time for automatic shut-off in When warming is active, increments of half an hour. The available range is to the green LED light (zero to nine and a half hours). Note that setting the associated with a time to stops warming on all four channels. channel will flash when that channel reaches Three temperature levels are available: the set temperature. -
Page 8: Connect Your Animals To The Coda System
Step 3: Configure Your Experiment The CODA software will lead you through the necessary steps to configure your experiments. See Setting Up and Running Experiments beginning on page 9 for details. Step 4: Connect Your Animals to the CODA System Before you begin your experiment, we recommend training your animal to use the holder in three or four fifteen minute sessions. Set the Animal Warming Platform to level 3 by pressing the IMPORTANT button to go up from the default level of 2. When you use the holder, ensure that the animal’s Temporarily cover the Warming Platform with the CODA Cover head is not turned and its to retain the warmth. body is not compressed in any way. Visually inspect all cuff bladders and replace any bladder that is starting to yellow or crack. Place the animal in the holder, if you are using it: i. Remove the rear gate of the animal holder. ii. Slide the nose cone close to the front of the holder and tighten the thumb nut. iii. Place the animal into the holder. Allow the animal to enter the holder freely, using as little force as possible to get the animal into the holder. iv. Make sure that the tail of the animal extends out of the rear of the holder. v. Replace the rear gate on the holder and tighten the thumb nut. vi. Remove the Cover from the Animal Warming Platform and place the animal holder in the V groove on the Platform. vii. Adjust the nose cone so that the animal’s movement is limited and the animal appears comfortable. Ensure that the animal cannot turn around inside the holder and lock the nose cone in place by positioning the nut in the groove. 5. Place the cuffs on the animal, following the same procedure if you are or are not using a holder: i. Slide the Occlusion Cuff up near to the base of the animal’s tail. It should slide freely, but fit closely when not pressurized. If you encounter resistance while sliding the cuff up the tail,... - Page 9 ii. Slide the VPR cuff up the tail, with the larger diameter end first, until you reach the Occlusion Cuff. If you feel resistance while sliding the VPR Cuff up the tail, do not force it into position. Simply use a cuff one size larger. Tail swelling can be sensed on any part of the tail as long as there is a sufficient portion of the tail in the VPR Cuff. iii. Secure the Occlusion Cuff tubing inside the groove located in back of the black fastener on top of the holder. This will assist in keeping the cuff in position. To maintain the position of the VPR Cuff, secure the VPR Cuff tubing inside the groove located in back of the black fastener on top of the holder. Before you start measurements, lift the CODA cover and measure the animal’s tail temperature by pointing the infrared thermometer at the tail’s base. The temperature should be between 32 and 35°C. Do not start the experiment If the temperature is not at least 32°C. Make sure the entire length of the animal’s tail rests on the warming surface. You can use the CODA Cover over the tail to help maintain optimal temperature for measuring blood pressure. See Replacing a Cuff Bladder on page 17 for information about changing a leaking bladder.
-
Page 10: Using The Coda Software
Using the CODA Software Terminology The CODA Software uses these terms: – any person involved in CODA experiments, such as a researcher or scientist £ User – the main person associated with a given experiment £ Key User – any animal associated with experiments £ Animal – the sensitivity level of an animal, either (higher) or (lower) £ Animal Type Mouse – a group of individual assigned to a £ Animal Group Animals User –a single performance of a measurement £ Cycle – a group of in the same £ Cycles Experiment one or more of in a single £ Session —... -
Page 11: Setting Up And Running Experiments
Setting Up and Running Experiments To run an experiment, you must go through this software sequence: Select the CODA device(s) to use. Create or add to your lists of , if necessary. Users Create the and run a of that Once you have created an Experiment Session Experiment. experiment, you can return to it later to run new sessions. Running Multiple Experiments You may create as many as you’d like and open for them whenever Experiments Sessions you need to. However, only one at a time may be running on a given Experiment Controller and in a given instance of the CODA software. Open multiple instances of the CODA Software to run multiple sessions simultaneously, assigning the Experiment appropriate CODA Controllers to each instance of the software. See page 24 for more. Select CODA Devices When you open the CODA Software, the Device Manager appears. Click to Use All Displayed Devices proceed using the detected CODA device(s). If you do not want to use all the detected devices, highlight those you do not want to use and click . To change your selections while you are running the Remove CODA software, simply open the Device Manager and modify your choices. - Page 12 To open the User and Animal Manager: Tools > User and Animal Manager At All Tabs: • Click , then type to add. • Click an entry, then to delete. There are three tabs in the User and Animal Manager: • Click an entry twice and type to edit. Users: Enter the names of any for the you £ Users Experiment will create. Animals: Enter the for your and assign them to an , which is a £ Animals Experiment Animal Type sensitivity level, either or Mouse...
- Page 13 Animal Groups: Create one or more groupings of to accommodate the way your £ Animals Users are associated with . Specify a name for an and any Animals Experiments Animal Group descriptive information you'd like. A dropdown box lets you assign a to the group. Click User when you are finished. Make sure that the group you just created is highlighted before you make any selections from the list. The CODA software requires that you create at least one . You can put all your Animal Group s into a single group, or you can break your animals into groupings to be associated with Animal individual . An individual can be assigned to more than one group if multiple Users Animal Users will be working with some of the same animals. About Deleting Users or Animals A deleted entry that has never been part of any CODA experiment is removed from the database. A deleted entry that has been part of an experiment is marked inactive but remains in the database so it will be available to the CODA software for generating reports. You can reactivate a deleted entry by adding it again with the same name. Create and Run an Experiment Before you can run an , you must create it, giving it a name and assigning Users and Animals Experiment to it. Once you have created an , you can return to it at any time for additional sessions.
- Page 14 To begin creating a new , open the Experiment Experiment Wizard File > New > Experiment If the choice of the menu is grayed, File check that your CODA device is connected, turned on and The Experiment Wizard is a series of four screens. To create an communicating. See successfully and save it, you must enter the required Experiment page 24 for more. information on all four screens and start the Experiment. If you do not end the Experiment Wizard by pressing to begin a running your Start , your information will not be saved. Experiment Experiment Wizard: Screen 1 At Screen 1 of the Experiment Wizard: Name your £ Experiment. Type any combination of up to 50 letters, numbers, symbols and spaces in the Experiment Name field. Assign a £ Key User.
- Page 15 Experiment Wizard Screen 2 At Screen 2 of the Experiment Wizard: Name your £ Session. Type any combination of up to 50 letters, numbers, symbols and spaces in the field. Session Name Specify details about the and for the £ Sets Cycles Session. is made up of a number of of . Indicate how many make up the Session Sets Cycles Sets Session how long to pause between , how many make up each , how long to pause Sets Cycles between , and how many to run at the beginning of the . Defaults: Cycle Acclimation Cycles Session , 30sec between , 10 , 5sec between , 5...
- Page 16 Experiment Wizard Screen 3 At Screen 3 of the Experiment Wizard: Assign individual to CODA channels. £ Animals Select Animals and click to add them to the next open channel. You can choose from one or more groups. To use , either in addition to or instead Animals Animals of those currently listed on the left side of the screen, you will need to display the from Animals one or more additional . Begin by choosing a from the dropdown Animal Groups User Select User list. Then choose a group associated with that . A list of any unassigned in that group User Animals will appear. Select and assign individual as above. Animals If the you need are not in any of your , click to open the User Animals Animal Groups...
-
Page 17: While Your Experiment Runs
Experiment Wizard Screen 4 At Screen 4 of the Experiment Wizard: £ Start the Experiment. § Ensure that all your are in place. See Connect Your Animal to the CODA System on Animals page 6. § Cap off any unused channels. § Click to start making measurements and collecting data. Start IMPORTANT! If you do not press at this screen, your setup data will be lost. You will Start have to create this again when you are ready to run it. Experiment While Your Experiment Runs Once your begins running, the screen will display real-time data about your measurements. Experiment This can either be in the form of a graph or text, depending upon how you have set up your Session Along the top of the screen you will see: buttons for controlling the and on the left, on the right £ Cycle—Resume Pause Stop and Close button £... -
Page 18: Status Codes
The left side of the screen displays the , if you have turned it on. For each , it shows you: Run Log Cycle the type of — or part of a £ Cycle Acclimation Cycle the blood pressure for each £ Animal a validity code, either or an error code £ the rate and volume of the pressure reading (meaningful only if the validity code is £ The current is highlighted. Cycle Status Codes Code Meaning Possible Solution Tail volume is less than the Raise tail temperature to 32°C to 35°C by FAIL_TAIL_VOLUME minimum acceptable value of increasing the warming level and covering the tail. 15ul. Ensure animal is snug in the holder and does not The time between the diastolic have room to move. TOO_SHORT and the systolic is too short. Raise tail temperature to 32°C to 35°C by increasing the warming level and covering the tail. -
Page 19: Monitoring Experiments
Simple Report Monitoring Experiments The graphical displays provide a valuable method for monitoring your Experiments for potential problems. See Sample Displays on If the blue line drops sharply instead of gradually at the • page 18. beginning of the cycle, you probably have a leak in the VPR Cuff bladder. • If the red line drops precipitously, you probably have a leak in the O-Cuff. If you suspect a leak: • Pause the experiment, change the bladder in the cuff with the suspected leak and continue. If the problem persists, pause the experiment, remove the cuff, place the white cap on the • channel and continue. Then: § If the display line returns to normal, you need a new cuff. § If the problem persists with the cap on, the leak is internal. In that case, please contact Kent Scientific immediately for customer service. For more information, see Cuff Testing Instructions on page 38. Replacing a Cuff Bladder Bladders in both the O-Cuffs and VPR Cuffs will require periodic replacement. Replacement bladders are included with your CODA System and more are available by request. Use only fresh Kent Scientific pre- measured cuff bladder replacements. Other materials or replacement bladders could seriously affect blood pressure readings. Remove the external rubber washers (O-rings) that hold the bladder on the cuff at each end. Slide the old bladder out through either end of the cuff and discard. Insert the new bladder inside the cuff. Fold the new bladder over each end of the cuff. Secure the bladder to the cuff by sliding the O-ring over the ends of the cuff toward the middle of the cuff. Be careful not to over stretch the bladder material. The cuff bladder in the occlusion cuff should be wrinkle-free. Ideally, the bladder in the VPR cuff should be loose enough to not hamper the expansion of the tail yet still allow maximum contact with the animal’s tail. Properly installed cuff bladders ensure accurate and consistent blood pressure measurements. -
Page 20: Sample Displays
Sample Displays VPR Cuff Leaks Sample display showing a leaking VPR cuff. The top channel shows a nearly horizontal blue line, indicating no leak in the VPR cuff. The bottom channel shows a sharp drop at the beginning of the cycle, indicating a probable VPR cuff leak. Notice the red line for the O-Cuff drops smoothly indicating no leak in the O-Cuff. O-Cuff Leaks Sample display for O-Cuff leak. For both channels, the red line drops precipitously at the beginning of the cycle indicating probable O-Cuff leaks. Notice that the blue line for the VPR cuff remains close to horizontal indicating no leak in the VPR cuff. O-Cuff Tests ing Good O-Cuff Showing O-Cuff Leak... -
Page 21: Running More Sessions Of An Existing Experiment
Running More Sessions of an Existing Experiment Once you have created an and have run one of it, you can return to the for Experiment Session Experiment additional . You have your choice of starting a new with settings pre-filled to match an Sessions Session existing , or starting from scratch, which prefills the settings with the default values only. Session To begin a new of an existing Session Experiment File > New > Session New Session Wizard: Screen 1 At Screen 1 of the New Session Wizard: Select the you want to continue by highlighting an existing from the list. £ Experiment Experiment Decide how to define the new £ Session To use an existing as a template for the new one, highlight a from the list, click Session Session •... -
Page 22: Part 2: Software Reference
Part 2: Software Reference This section describes the function of each CODA menu item and icon. File Menu The File Menu contains four choices: and Open Exit £ File > New > Experiment Opens the Experiment Wizard This four-screen wizard leads you through the process of creating a new and Experiment beginning to run it. See page 11 for more. £ File > New > Session Opens the New Session Wizard This four-screen wizard lets you design and run a new of an existing . See page Session Experiment 19 for more. £ File > Open Opens the Experiment Manager The Experiment Manager lets you view information and reports about any of your existing and add comments. You can also delete or entire Experiments Cycles Sessions Experiments... - Page 23 The list of available and appears on the left side of the screen. Choose the Experiments Sessions and you want to view. Experiment Session The box at the top left of the display area shows the basic experiment Experiment Information information. In the field, you can edit existing comments or add new ones. Experiment Comments The top right of the display area contains . None of it can be edited. Session Information In the section, data is displayed for each channel. Click any heading, such Measurement Information or to sort by that item. Check or uncheck or to change Diastolic Channel, Regular Cycle Accepted the status of a measurement. In the area: Measurement Display pages through the that make up the Cycles Session...
- Page 24 § Click on a column header and drag it to change the column display order. § The default data sorting order is by . You can choose to sort by any other Animal column(s) as well. Double-click on a particular column header to cycle its sort setting through none—ascending—descending—none. opens the print dialog box. § Print exports the report data in Excel format and stores it in the location you § Export to Excel specify. displays a complete report for the selected . A dialog box will appear at Full Report Session • which you can select the data to be displayed. Make your selections, click and wait Finish for the report to appear. The screen that displays the report contains these buttons and fields: ages through the displayed Report. § tops the report before it is fully loaded. § efreshes the Report. § rints the Report. § isplays the Report in print view. Click once to activate and again to return to § ordinary screen view.
-
Page 25: File > Exit
§ Page Setup saves the Report in Excel, PDF or Word format. § sets the zoom level for viewing. § searches the Report. § At the bottom of the Experiment Manager display area is a graph displaying all channels used during the current . Click on a channel in the display to see the Session Measurement Information graph for that channel. saves the current graph as an image in a variety of formats or as a csv, txt or xml file. • copies the current graph to the clipboard as an image. • copies the current graph to the clipboard as a csv file. • opens the current graph in its own window. • Important! Be sure to click or to save your changes. Save Save & Close £ File > Exit Exits the CODA Software. -
Page 26: Tools Menu
Tools Menu The Tools menu contains four choices: , and Device Manager Experiment Manager User and Animal Manager Backup/Restore. £ Tools > Device Manager Opens the Device Manager This is the same Device Manager that opens automatically each time you start the CODA Software. You can open it at any time to test your CODA devices or to identify and use another CODA device. The right side of the Device Manager displays information about the detected CODA hardware: shows how many channels are available on the named device and which numbers Channels • have been assigned to those channels. Example: means there are six total Channels 1-6 (6) channels available on this device and they will be called channels 1 through 6. is the serial number of the device. • is the version number of the device firmware. This is not the same as the version Version • number of the CODA software, which can be found at Help > About shows the communications protocol (generally ) and Communication Settings Serial_Over_USB •... - Page 27 During each test, the box will display a graph of pressure against time, the Device Test name of the current test, the initial and final pressure, and the actual percent variation. All test results are logged in the field underneath the list of test choices. If there are more results than fit into the space, a scroll bar appears. As the tests progress, either a check mark for success or an x for failure will appear in the box next to each test you have chosen. stops a test in progress. Close the dialog box with the in the upper right Cancel test • corner. For more about interpreting tests, see page 18. removes the highlighted device from the list of devices available to this instance of Remove • the CODA software. A removed device will return to the list the next time you open Device Manager or click Search searches for available CODA devices. Any time you add or remove CODA devices Search • with the CODA software open, click to add them into the Device Manager. Search runs a brief test cycle for the selected device. Highlight one device from those Identify • listed before you click . Before a device cycles, you will see a dialog box showing the Identify serial number of the device. By noting which device cycles next, you can associate a serial number with it. closes the Device Manager and indicates that you plan to use the Use all displayed devices •...
-
Page 28: Tools> Experiment Manager
£ Tools > Experiment Manager Opens the Experiment Manager The Experiment Manager lets you view information and reports about any of your existing and add comments. You can also delete or entire . For a Experiments Cycles Sessions Experiments full description, see on page 20. File > Open £ Tools > User and Animal Manager Opens the User and Animal Manager The User and Animal Manager lets you create a database of people and animals for use in setting up experiments. For a full description, see Create a List of Users and Animals on page 9. £ Tools > Backup/Restore Creates CODA backup files or restores CODA data from a previously saved version. This selection opens the dialog box, which contains two buttons: Backup/Restore leads to a box at which you select the location for your backup files. Note that this Backup • will create a large number of files, so it is a good idea to save each backup in a folder of its own. leads to a box that lets you choose a set of backup files to be restored. This will Restore • result in the loss of any data currently stored by CODA and will replace it with the data from your backup. It cannot be undone. If you want to look at a past saved version of your CODA data without losing the current data, back up the current data first (see Backup above) and then restore the older version. When you are finished, restore the last backup you made. -
Page 29: Part 3: Theory Of Operation
Part 3: Theory of Operation Concepts of Non-Invasive Blood Pressure: Tail-Cuff Method Over the past 35 years, research scientists have attempted to measure blood pressure in mice and rats non-invasively with varying degrees of success. The ability to measure systolic and diastolic blood pressure accurately and non-invasively, in addition to measuring heart rate and other blood flow parameters in rodents, is of great clinical value to the researcher. Invasive Blood Pressure Direct blood pressure, an invasive surgical procedure, is the gold standard for comparing the accuracy of non-invasive blood pressure technologies. Direct blood pressure should be obtained on the rodent’s carotid artery for comparing to non-invasive blood pressure. “Validation in Awake Rats of a Tail Cuff Method for Measuring Systolic Pressure”, Bunag, R.D., Journal of Applied Physiology, Vol 34, Pgs 279- 282, 1973. Radiotelemetry, a highly invasive surgical procedure, is a very reliable blood pressure technology and is also used to compare the accuracy of non-invasive blood pressure technologies. Telemetry involves the implantation of radio transmitters in the rodent’s body. This technique is well validated and has excellent correlation with direct blood pressure. The advantage of implantable radio telemetry is the ability to continuously measure blood pressure in free moving laboratory animals. The disadvantages of radiotelemetry are: (1) morbidity associated with the initial surgical implantation of the transmitter; (2) morbidity associated with surgery required to replace batteries which are known to be short-lived; (3) increase in the animal’s level of stress, especially mice, in relationship to the large, heavy transmitters (2004, ATLA, 4thWorld Congress, Einstein, Billing, Singh and Chin); (4) abnormal behavior due to the animal’s inability to have social interaction stemming from the current technology’s requirement for the implanted animal to be isolated, one animal per cage; (5) inability to perform high throughput screening; (6) high cost of the initial equipment set-up and of the transmitters that require frequent factory maintenance; (7) cost of material and human resources relating to ongoing surgeries; and (8) the lack of a competitive market resulting in high product and servicing costs. Non-Invasive Blood Pressure The non-invasive blood pressure methodology consists of using a tail-cuff placed on the tail to occlude the blood flow. Upon deflation of the cuff, one of several types of non-invasive blood pressure sensors, placed distal to the occlusion cuff, can be used to monitor the blood pressure. There are three types of non-invasive blood pressure sensor technologies: photoplethysmography, piezoplethysmography and Volume Pressure Recording. Each method uses an occlusion tail-cuff as part of the procedure. Photoplethysmography The first and oldest methodology is Photoplethysmography (PPG), a light-based technology. The purpose is to record the first appearance of the pulse while deflating the occlusion cuff or the disappearance of pulses upon inflation of the occlusion cuff. Photoplethysmography uses an... - Page 30 incandescent or LED light source to record the pulse signal wave. This light-based plethysmographic method uses the light source to illuminate a small spot on the tail and attempts to record the pulse. Photoplethysmography (PPG) is relatively inaccurate since the readings are based solely on the amplitude of a single pulse and can measure only imprecisely the systolic blood pressure and the heart beat. There are many limitations to a light-based technology, such as: (1) over-saturation of the blood pressure signal by ambient light; (2) extreme sensitivity to the rodent’s movement (motion artifact); and (3) the difficulty in obtaining adequate blood pressure signals in dark skinned rodents (Pigmentation Differentiation). Light-based sensors also cause tail burns from close contact and prolonged exposure. Diastolic blood pressure cannot be measured by photoplethysmography since the technology records only the first appearance of the pulse. If the diastolic blood pressure is displayed on the photoplethysmographic instrumentation, it is only an estimation that is calculated by a software algorithm rather than a true measurement. Additional variability and inaccuracy occurs in PPG devices that rely on obtaining blood pressure readings during occlusion cuff inflation. Occlusion cuff length is also another source of variability and inaccuracy. Occlusion cuff length is inversely related to the accuracy of the blood pressure. Long cuffs, predominant in most photoplethysmographic devices, record lower than the actual blood pressure measurements. These limitations severely compromise the consistency, dependability and accuracy of the non-invasive blood pressure measurements obtained by devices that use light-based/LED photoplethysmographic technology. The photoplethysmography method correlates poorly with direct blood pressure measurements and is the least recommended sensor technology for non-invasive blood pressure in rodents, especially mice. Piezoplethysmography The second non-invasive blood pressure sensor technology is piezoplethysmography. Piezoplethys- mography and photoplethysmography require the same first appearance of a pulse in the tail to record the systolic blood pressure and heart rate. Both plethysmographic methods have similar clinical limitations. Whereas photoplethysmography uses a light source to attempt to record the pulse signal, piezoplethysmography uses piezoelectric ceramic crystals to do the same. From a technical point of view, piezoplethysmography is far more sensitive than photoplethysmography since the signal from the sensor is the rate of change of the pulse rather than just the pulse amplitude. Therefore, even extremely small mice with high frequency pulses will generate a sufficient signal to be detected with simple amplifiers. Piezoelectric sensors are more accurate than light-based/LED sensors but the same plethysmographic limitations continue to produce inaccuracies in blood pressure measurements. On a positive note, the skin pigment of the rodent is not a measurement issue with piezoplethysmography as with photo- plethysmography. Although piezoplethysmography is better than photoplethysmography, both non-invasive tail-cuff blood pressure technologies correlate poorly with direct blood pressure measurements.
- Page 31 Volume Pressure Recording The third sensor technology is Volume Pressure Recording (VPR), the technology used by the CODA System. The Volume Pressure Recording sensor uses a specially designed differential pressure transducer to non-invasively measure the blood volume in the tail. Volume Pressure Recording will actually measure six blood-pressure parameters simultaneously: systolic blood pressure, diastolic blood pressure, mean blood pressure, heart pulse rate, tail blood volume and tail blood flow. Since Volume Pressure Recording uses a volumetric method to measure the blood flow and blood volume in the tail, there are no measurement artifacts related to ambient light. Movement artifact is also greatly reduced. In addition, Volume Pressure Recording is not dependent on the animal’s skin pigmentation. Dark-skinned animals have no negative effect on Volume Pressure Recording measurements. Very small, 10-gram C57/BL6 black mice are easily measured by the Volume Pressure Recording method. Special attention is afforded to the length of the occlusion cuff with Volume Pressure Recording in order to derive the most accurate blood pressure readings. Volume Pressure Recording is the most reliable, consistent and accurate method to non-invasively measure the blood pressure in animals ranging from mice as small as 10 grams to rats over than 950 grams. In an independent clinical validation study conducted in 2003 at Yale University, New Haven, Connecticut, Volume Pressure Recording correlated 99 percent with direct blood pressure: “Volume Pressure Recording is excellent. It is very accurate and dependable. We performed experiments on temperature-controlled, adult rats and the non-invasive blood pressure measurements showed almost perfect correlation with invasive blood pressure measurements. We are very pleased with the results.” Numerous published research papers are available validating the accuracy, reliability and consistency of Volume Pressure Recording. See the Clinical Bibliography section. Rodent Holders The ideal animal holder should comfortably restrain the animal, create a low-stress environment and allow the researcher to observe the animal’s behavior constantly. A trained rat or mouse can comfortably and quietly remain in the holder for several hours. It is very beneficial to incorporate a darkened nose cone into the rodent holder to limit the animal’s view and reduce the level of animal stress. The animal’s nose will protrude through the front of the nose cone allowing for comfortable breathing. The tail of the animal should be fully extended and exit through the rear hatch opening of the holder. The correct size animal holder is essential for proper blood pressure measurements. If the holder is too small for the animal, the limited lateral space will not allow the animal to breathe in a relaxed fashion. The animal will compensate by elongating its body, thereby creating a breathing artifact. A breathing artifact will cause excessive tail motion and undesirable blood pressure readings.
- Page 32 Animal Body Temperature A non-invasive blood pressure system should be designed to comfortably warm the animal, reduce the animal’s stress and enhance blood flow to the tail. The rodent’s core body temperature is very important for accurate and consistent blood pressure measurements. The animal must have adequate blood flow in the tail to acquire a blood pressure signal. Thermo-regulation is the method by which the animal reduces its core body temperature, dissipates heat through its tail and generates tail blood flow. Anesthetized animals may have a lower body temperature than awake animals, so additional care must be administered to maintain the animal’s proper core body temperature. An infrared warming blanket or a re-circulating water pump with a warm water blanket is the preferred method to maintain the animal’s proper core body temperature. The animal should be warm and comfortable but never hot. Extreme care must be exercised never to overheat the animal. Warming devices such as hot air heating chambers, heat lamps or heating platforms that apply direct heat to the animal’s feet are not advisable to maintain the animal’s core body temperature. These heating devices will overheat the animal and increase the animal’s respiratory rate, thereby increasing the animal’s stress level. These conditions will elicit poor thermo- regulatory responses and create inconsistent and inaccurate blood pressure readings. Environmental Temperature The proper room temperature is essential for accurate blood pressure measurements. The room temperature should be at or above 26°C. If the room temperature is too cool, such as below 22°C, the animal will not thermo-regulate, tail blood flow will be reduced and it may be difficult to obtain blood pressure signals. A cold steel table or a nearby air conditioning duct are undesirable during animal testing. Animal Preparation The animal should be placed in the holder at least 10 to 15 minutes prior to obtaining pressure measurements. Acclimated animals should provide faster BP measurements than non-acclimated animals. Proper animal handling is critical to consistent and accurate blood pressure measurements. A nervous, stressed animal may have diminished circulation in the tail. Most rodents will quickly adapt to new conditions and feel comfortable in small, dark and confined spaces. Training is not necessary to obtain accurate blood pressure readings, however, some researchers prefer training sessions. Rodents can easily be trained in approximately three days, 15- minutes each day, before beginning your experiment. The animal should be allowed to enter the holder freely. After the animal is in the holder, adjust the nose cone so the animal is comfortable but not able to move excessively. The animal should never have its head bent sideways or its body compressed against the back hatch. The animal’s temperature may be monitored throughout the experiment. Conclusion Tail-cuff non-invasive blood pressure measurements can be accurate, consistent and reproducible when studying awake and anesthetized mice and rats. In addition, multiple animal testing is very cost-effective...
- Page 33 for large scale, high throughput screening. Care must be exercised to properly handle the animals. Training the animals and monitoring the animal’s temperature may also be beneficial. The volumetric pressure recording method provides the highest degree of correlation with telemetry and direct blood pressure and is clearly the preferred tail-cuff sensor technology. Non-invasive blood pressure devices that utilize Volume Pressure Recording are a valuable tool in research and will continue to be beneficial in many study protocols. The main advantages are: (1) they require no surgery; (2) they are significantly less expensive than other blood pressure equipment, such as telemetry; (3) they can screen for systolic and diastolic BP changes over time in large numbers of animals; and (4) they provide the researcher with the ability to obtain accurate and consistent blood pressure measurements over time in long-term studies.
-
Page 34: Part 4: General Information
Part 4 – General Information Thank you for purchasing a CODA Non-Invasive Blood Pressure (NIBP) System. We truly appreciate your business. We strongly advise that you read and study this Owner’s Manual to appreciate fully all the features, benefits, and capabilities of the CODA System. This product is not designed, intended or authorized for use in human applications. Contact Information Kent Scientific Corporation Toll-Free: 888-5RATTUS (888-572-8887) 1116 Litchfield Street Outside US: 860-626-1172 Torrington, Connecticut 06790 Fax: 860-626-1179 E-mail: sales@kentscientific.com Internet: www.kentscientific.com Disclaimer Kent Scientific Corporation makes no representations or warranties, expressed, statutory or implied, regarding the fitness or merchantability of the components of this system for any particular purpose. Further, Kent Scientific Corporation is not liable for any damages, including but not limited to, lost profits, lost savings, or other incidental or consequential damages arising from ownership or use of these products, or for any delay in the performance of its obligations under the warranty due to causes beyond its control. In no case shall Kent Scientific Corporation's financial obligation extend beyond the cost of or replacement of the Kent product in question. Kent Scientific Corporation also reserves the right to make any improvements or modifications to these products described in this manual at any time, without notice of these changes. All brand and product names used in this manual are the trademarks of their respective owners. Product Warranty The CODA System has a one (1) year warranty including all parts and labor charges. This warranty does not cover damage by any cause including, but not limited to, any malfunction, defect or failure caused by or resulting from unauthorized service or parts, improper maintenance, operation contrary to furnished instructions, shipping or transit accidents, modifications or repair by the user, harsh environments, misuse, neglect, abuse, accident, incorrect line voltage, fire, flood, other natural disasters, or normal wear and tear. Changes or modifications not approved by Kent Scientific Corporation could void the warranty. The foregoing is in lieu of all other expressed warranties. Kent Scientific Corporation does not assume or authorize any party to assume for it any other obligation or liability. Satisfaction Guarantee Should you experience difficulty with the CODA System, our Technical Support Group will assist you in trouble-shooting and determining if the product needs to be returned to our facility. We will issue you a Return Manufacturer Authorization (RMA) number before the product is shipped back for repair. It is at the discretion of the manufacturer to replace or repair a defective part or product. Please call Customer Service (see numbers above) to obtain a Return Manufacturer Authorization number and a Decontamination Verification Form. Shipments without a RMA number will not be accepted. Prior to... -
Page 35: System Specifications
System Specifications CODA Controller Voltage 18 VDC, 1.67 amps Current Draw 500mA Max. O-Cuff Pressure 300mmHg (factory set at 250mmHg) Max. VPR Cuff Pressure 200mmHg Connection Dimensions 20.3cmW x 8.9cmH x 19.1cmD Weight 3.5kg Power Supply Input 100 to 240 V Output 18 VDC, 1.67 amps... -
Page 36: Cleaning And Decontamination
Cleaning and Decontamination Do not use any alcohol or abrasive detergents unless specifically instructed otherwise. CODA Controller: Position the Controller away from areas of potential contamination. Should the controller become soiled, gently spot clean with a damp wipe or towel. Never use liquids directly on the controller box. CODA Platform, Animal Warming Platform and Animal Holders: Clean gently with a germicidal or antiseptic soap and water. Do not use organic solvents or concentrated alcohols. Occlusion and VPR Cuffs: Rinse gently with water or clean gently with a germicidal or antiseptic soap and water. Do not use organic solvents or concentrated alcohols. -
Page 37: Troubleshooting
Troubleshooting If you are having difficulty with your CODA system, or would simply like to view additional information about using it, you can refer to material in these sections: £ Quick Start Guide Reproduced here for your convenience £ Cuff Testing Instructions How to test for possible leaks £ Calibration Verification Kit Instructions What to do if you suspect your system to be out of calibration £ Return Procedure Information about returning your controller for replacement or repair... - Page 38 CODA Quick Start Guide 08/11/14 Check that the CODA system is connected properly to a suitable computer: • The connection must be via USB cable. • CODA software version 4.0 or later supports either 32 bit or 64 bit computers. • CODA software 3.0 or earlier supports only 32 bit computers which must run Windows 7 or XP. Set the warming platform to level 3. The default level is 2; press the UP button to go to level 3. Temporarily cover the warming platform with the CODA cover to retain the warmth. Check all cuff bladders and replace any bladder that is starting to yellow or crack. Place the animal into the holder. Move the nose cone close enough to the back of the holder to prevent the animal from turning around. You can adjust the nose cone after you place the back of the holder onto the animal. Make sure the animal is snug in the holder and cover the animal’s tail area with the CODA cover. Place an O-Cuff on the animal’s tail and slide it upward, positioning it as close to the tail base as possible without using force. If the cuff begins to feel tight at about ¾ of the way toward the tail base, try an O-Cuff one size up, if available. A cuff that fits properly will slide freely but fit closely when not pressurized. If no cuff is available that fits your animal properly, please contact Kent Scientific. Repeat step 6 with a VPR cuff. The VPR cuff should slide easily behind the O-Cuff and should be placed close to the O-Cuff but does not need to touch it. Note: Needing to size up the O-Cuff in step 6 does not necessarily mean you need to do the same with the VPR cuff. Set up the CODA software to perform 5 acclimation cycles and 20 regular cycles with a deflation time set to 20 seconds. Before you start measurements, lift the CODA cover and measure the animal’s tail temperature by pointing the infrared thermometer at the tail’s base. The temperature should be between 32 and 35°C. Do not start the experiment If the temperature is not at least 32°C. During the experiment, watch the display on the computer screen. If the blue line drops sharply instead of gradually at the beginning of the cycle, you probably have a leak in the VPR cuff bladder. If the red line drops precipitously, you probably have a leak in the O-Cuff. See Sample Displays below. • Pause the experiment, change the bladder in the cuff with the suspected leak and continue. If the problem persists, pause the experiment, remove the cuff, place the white cap on the •...
- Page 39 Sample Displays VPR Cuff Leaks Sample display showing a leaking VPR cuff. The top channel shows a nearly horizontal blue line, indicating no leak in the VPR cuff. The bottom channel shows a sharp drop at the beginning of the cycle, indicating a probable VPR cuff leak. Notice the red line for the O-Cuff drops smoothly indicating no leak in the O-Cuff. O-Cuff Leaks Sample display for O-Cuff leak. For both channels, the red line drops precipitously at the beginning of the cycle indicating probable O-Cuff leaks. Notice that the blue line for the VPR cuff remains close to horizontal indicating no leak in the VPR cuff. O-Cuff Tests Showing Good O-Cuff Showing O-Cuff Leak ...
- Page 40 CODA Cuff Testing Instructions Place caps tightly on all ports. Set-up a 20-cycle mock experiment using all available channels. Run the experiment. Look for these PASS or FAIL conditions: PASS—The red line steps down the graph at a 45° angle and the blue line runs flat, straight across the length of the graph. FAIL— The red line drops to the bottom of the graph or does not step down and the blue line loses or gains altitude drastically OR the pump continues running with no signal on the graph until an error message appears. If you detect any FAIL conditions, contact Customer Service for further troubleshooting assistance. Otherwise, proceed to the next step. Pause the experiment. Remove the cap from the Channel 1 O-Cuff port and connect an Occlusion Cuff. Continue the experiment. Look for these PASS or FAIL conditions: PASS—The red line steps down the graph at a 45° angle. FAIL— The red line drops to the bottom of the graph or does not step down OR the pump continues running with no signal on the graph until an error message appears. If you detect any FAIL conditions, check for cracks in the cuff body and/or tubing. If there are no visible cracks, replace the bladder and re-test. If there are visible cracks, call Customer Service to purchase a replacement. Otherwise, proceed to the next step. Pause the experiment. Replace the cap on the O-Cuff port. Remove the cap from the Channel 1 VPR port and connect a VPR Cuff. Continue the experiment. Look for these PASS or FAIL conditions: PASS—The blue line shows a gradual dip and runs across the length of the graph. FAIL— The blue line loses or gains altitude drastically OR the pump continues running with no signal on the graph until an error message appears. If you detect any FAIL conditions, check for cracks in the cuff body and/or tubing. If there are no visible cracks, replace the bladder and re-test. If there are visible cracks, call Customer Service to purchase a replacement. Check additional cuffs using this same procedure on the Channel 1 O-Cuff and VPR ports. Check the rest of the channels using the outlined procedure with a set of known good cuffs.
- Page 41 Calibration Verification Kit Instructions Ordinarily, these instructions accompany the CODA Calibration Verification Kit. You can order this Kit from Kent Scientific or can use your own manometer and suitable tubing with fitting and follow these instructions. Contents 1 manometer 1 length of tubing with fitting Instructions Start a test experiment, including one session with at least three cycles for each channel to be tested. Make sure all channels (ports) are closed. Before running the experiment, connect the tubing attached to the manometer to the O-cuff channel you are testing. Make sure all other channels are closed, using the caps included with the system. Confirm that the thumb valve is closed on the manometer. Start the experiment. Initially, the manometer will pressurize to at least 250mmHg. The pressure should then bleed incrementally, reaching 0mmHg in about 15 seconds. Remove the manometer tubing from the O-cuff and completely close the O-cuff port using the caps included with the system. Connect the manometer tubing to the VPR port of the channel you are testing. On the next complete measurement, the manometer should pressurize to at least 200mmHg, drop immediately to 0mmHg and re-pressurize to approximately 30mmHg. The pressure should hold at 30mmHg for a few seconds and then drop to 0mmHg. Note: For multi-channel systems, testing the O-cuff on Channel 1 tests all of the O-cuff ports since they are connected internally. You should, however, test each individual VPR port independently. Results If your results in steps 5 and 8 are within the expected range, your CODA system is set to the manufacturer’s suggested calibration guidelines. If you see channel, pressure or timing parameters different from those mentioned in steps 5 or 8, your CODA system may need re-calibrating. Please contact your local Kent Scientific representative.
-
Page 42: Return Procedure
Return Procedure Should you experience difficulty with the CODA System, our Technical Support Group will assist you in trouble-shooting and determining if the product needs to be returned to our facility. If a return is necessary, we will issue you a Return Manufacturer Authorization (RMA) number before the product is shipped back for repair. It is at the discretion of the manufacturer to replace or repair a defective part or product. Please call Customer Service (see page 32 for numbers) to obtain a Return Manufacturer Authorization number and a Kent Scientific Decontamination Form. Shipments without a RMA number will not be accepted. Prior to shipment, please clean and decontaminate the product of any chemical, biological or isotopic contamination. Please include a completed and signed Kent Scientific Decontamination Form with the shipment. See page 34 for cleaning instructions. Please see CODA Pre-Return Procedure on the next page.
Need help?
Do you have a question about the CODA and is the answer not in the manual?
Questions and answers