Table of Contents
Advertisement
Advertisement
Table of Contents

Related Manuals for Kent Scientific CODA


Summary of Contents for Kent Scientific CODA
- Page 1 CODA Noninvasive ™ Blood Pressure System User’s Guide for High Throughput Systems...
- Page 2 CODA Noninvasive ™ Blood Pressure System User’s Guide for High Throughput Systems ©2020 Kent Scientific Corporation, Documentation Version 3.0 and Software 4.2...
-
Page 3: Table Of Contents
Configure Settings ............... 8 Connect the Animal ..............10 CODA Tips ..................13 Diagnostic Procedures / Troubleshooting CODA Cuff & Bladder Maintenance ........14 Device Tests and Other Diagnostic Procedures ....14 Improving Your Data ..............17 CODA Error Messages ..............18 Cleaning and Decontamination ..........19 General Information Contact .................. -
Page 4: Introduction
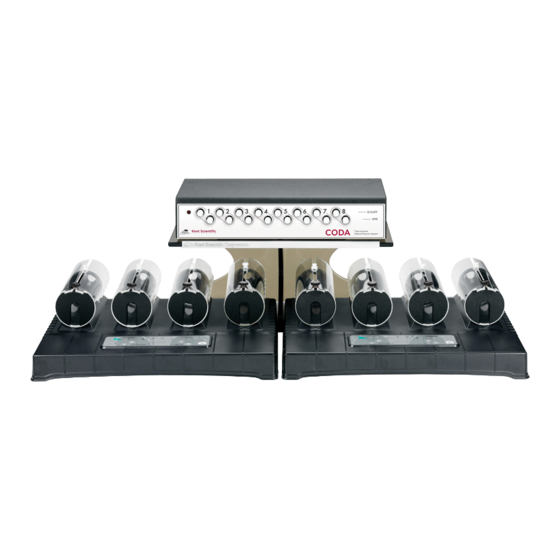
Introduction The CODA is not designed, intended, or authorized for use in human applications. System Components Front Controller Panel Rear Controller Panel... -
Page 5: About The Coda Noninvasive Blood Pressure System
About the CODA Noninvasive Blood Pressure System The Method An occlusion tail cuff is inflated to momentarily impede blood flow to an animal’s tail. The cuff is deflated slowly and a second tail cuff, incorporating Volume Pressure Recording (VPR) technology, measures the physiological characteristics of the returning blood flow. -
Page 6: Coda Pc Software
CODA PC Software The CODA PC software controls the system and allows you to set up, run, and monitor blood pressure from a desktop or laptop computer. Software System Requirements Operating System: Windows® 7, 64 bit Windows® 8, 64 bit Windows®... -
Page 7: Using The Coda Software
Using the CODA Software Open the CODA Software and select the CODA device. o When you open the CODA Software, the Device Manager appears. Click Use All Displayed Devices to proceed using the detected CODA. Device Manager Screen: 2. - Page 8 User and Animal Manager Screen 1: User and Animal Manager Screen 2:...
- Page 9 User and Animal Manager Screen 3: 3. Create a new Experiment, and run a new Session of that experiment. Once you have created an experiment, you can return to it later to add additional sessions. o Before you can run an experiment, you must create it by giving it a name and assigning Users and Animals.
-
Page 10: Best Data Practices
Best Data Practices • Kent Scientific strongly recommends that you back up your database regularly, and also Export your sessions to a PDF or .csv file after every run. • Take extra care when deleting records, including Animals, Users, Experiments, or Sessions. -
Page 11: Using The Coda
Cuffs: Attach the VPR cuffs to the white VPR ports. 2. Attach the Occlusion cuff to the black O-Cuff ports. 3. Power on the CODA Warming Platform. Configure Settings Warming Platform Settings Press the Up and Down buttons to select a warming level. - Page 12 4. Allow empty holders to pre-warm while configuring software settings. CODA Software Settings Open the CODA software. 2. Select the CODA device, then click File > New > Experiment or File > New > Session. 3. Enter session settings: Experiment Wizard Screen 1:...
-
Page 13: Connect The Animal
Connect the Animals Once software settings are configured, restrain animals by placing them in holders or inducing anesthesia. If you are using the holders: a. Remove the rear hatch of the animal holder. b. Adjust the nose cone to the front of the holder and tighten the screw. c. - Page 14 • Slide the VPR cuff up the tail, with the larger diameter end first.
- Page 15 Do not force the cuff onto the tail. The VPR cuff does not need to reach the O-cuff. Measurements can be detected from any part of the tail as long as a sufficient portion of the tail is inside the VPR cuff. 4.
-
Page 16: Coda Tips
If training is required, we recommend three to four 15-minute training sessions in the days prior to beginning your study. • When you use the CODA in anesthetized animals, induce slowly and at the lowest possible dose to minimize the depressant effects of the anesthetic agents. -
Page 17: Diagnostic Procedures / Troubleshooting
CODA Cuff and Bladder Maintenance Bladders in both the O-Cuffs and VPR cuffs require periodic replacement. Replacement bladders are included with your CODA Cuff Kit. Bladder shelf life is approximately a year. Use only fresh Kent Scientific pre-measured cuff-bladder replacements. Other materials or replacement bladders could seriously affect the accuracy of your CODA system. - Page 18 To test the cuffs for leaks: 1) Remove the cuffs, and place all of the caps very tightly on each of the channels. 2) Connect the first set of cuffs to be tested on Channel 1, leaving all other channels capped. 3) Set up a new experiment as if you were measuring animals.
- Page 19 Examples of Cuff Leaks:...
-
Page 20: Improving Your Data
Improving your Data Problem Possible Cause Solutions Measurements are Tail temperature is too low. • Ensure that the base of the tail measures at significantly lower least 32°C. Increase warming if necessary. than expected. Cuffs are wrong size. • Ensure that the cuffs are not too loose or too tight on the tail. -
Page 21: Coda Error Messages
Pop-Up Error Messages: Error Text When It Appears Solutions No CODA Device was In Device Manager, • Be sure that the CODA is connected and found after examining immediately after powered on. all available serial launching CODA software. • Confirm that the CODA is plugged in with ports. -
Page 22: Cleaning And Decontamination
Cleaning and Decontamination CODA Controller: Position the controller away from areas of potential contamination or excessive dust particles. Should the controller become soiled, gently spot clean with a damp wipe or towel. -
Page 23: General Information
General Information Thank you for purchasing a CODA Noninvasive Blood Pressure System. We truly appreciate your business. We strongly advise that you read and study this Owner’s Manual to appreciate the features, benefits, and capabilities of the CODA Noninvasive Blood Pressure System. -
Page 24: Satisfaction Guarantee
Satisfaction Guarantee Should you experience difficulty with the CODA, our Technical Support Group will assist you in trouble-shooting and determining if the product needs to be returned to our facility. We will issue you a Return Manufacturer Authorization (RMA) number before the product is shipped back for repair. - Page 25 ±3.6% of reading or ± 2°C, whichever is greater Units Centigrade or Fahrenheit Emissivity Fixed at 0.95 4:1 (1” target diameter at 4” distance) Distance/Target Ration Battery 2x CR2032, included CODA is a registered trademark of Kent Scientific Corporation. Windows is a registered trademark of Microsoft Corporation.
-
Page 26: Index
Index accepted readings ....... 7 holders......... 9, 10, 19 anesthetic .........13, 17 leaks .......... 14, 18 anesthetized animals ....9, 13 manager ........ 4-6, 18 animal groups ........4 minimum volume ......9 animal holder ....10, 13, 19 nose cone ........ 10, 13 animals .....4, 6, 7, 9, 10, 12-15 occlusion ...... - Page 27 1116 Litchfield Street Torrington, Connecticut 06790 Local: 860-626-1172 Toll-Free: 888-572-8887...
Need help?
Do you have a question about the CODA and is the answer not in the manual?
Questions and answers