Advertisement
Table of Contents
- 1 Table of Contents
- 2 Introduction
- 3 Main Valve
- 4 Pilot Maintenance
- 5 Functional Testing of Complete Assembly of Main Valve and Pilot
- 6 Storage and Handling
- 7 Trouble Shooting
- 8 Main Valve Spare Parts and Repair Kits
- 9 Pilot Spare Parts and Repair Kits
- 10 Accessories, Options and Accessory Repair Kit
- 11 Lubricants and Sealants for Series 9300
- Download this manual
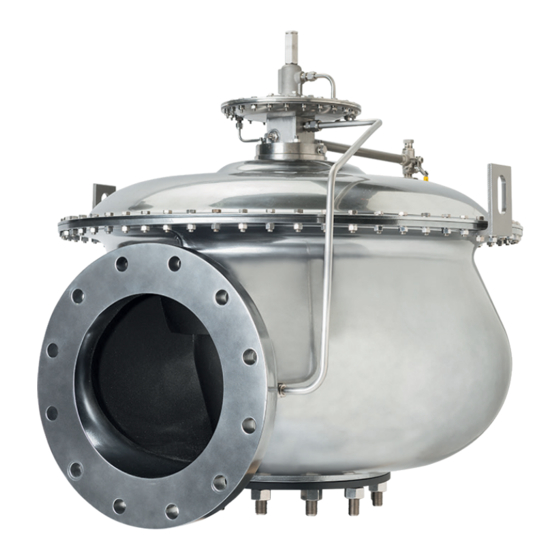
Anderson Greenwood SerieS 9300 Pilot oPerated Safety relief ValVeS
InstallatIon and MaIntenance InstructIons
Before installation these instructions must be fully read and understood
tAble of contents
1
introduction .................................................. 2
2
Main valve .................................................... 3
3
Pilot maintenance ...................................... 14
4
assembly of main valve and pilot .............. 27
5
Storage and handling ................................ 29
6
trouble shooting ........................................ 30
7
8
Pilot spare parts and repair kits ............... 31
9
accessory repair kit ................................... 32
for anderson Greenwood Series 9300 Pilot
operated Safety relief Valves (PoSrV).
the intent of these instructions is to acquaint
the user with the storage, installation and
operation of this product. Please read these
instructions carefully before installation.
sAfety PrecAutions
When the safety valve is under pressure
never place any part of your body near
the outlet/exhaust of the valve.
The valve outlet and any separate drains should
be piped or vented to a safe location.
Always wear proper safety gear to protect hands,
head, eyes, ears, etc. anytime you are near
pressurized valves.
Never attempt to remove the safety valve from
a system that is pressurized.
Never make adjustments to or perform
maintenance on the safety valve while in service
unless the valve is isolated from the system
pressure. If not properly isolated from the system
pressure, the safety valve may inadvertently open
resulting in serious injury.
Remove the safety valve prior to performing any
pressure testing of the system.
The safety of lives and property often depends on
the proper operation of the safety valve. The valve
must be maintained according to appropriate
instructions and must be periodically tested and
reconditioned to ensure correct function.
Emerson.com/FinalControl
wArninG
The protection and safety of equipment, property
and personnel depends on the proper operation
of the safety valves described in this manual.
All Emerson safety valves should be kept in proper
working condition in accordance with the
manufacturer's written instructions. Periodic
testing and maintenance by the user of this
equipment is essential for reliable and safe valve
operation.
All installation, maintenance, adjustment,
repair and testing performed on safety valves
should be done by qualified technicians having
the necessary skills and training adequate to
perform such work. All applicable Codes and
Standards, governing regulations and authorities
should be adhered to when performing safety
valve repair. No repair, assembly, adjustment or
testing performed by other than Emerson or its
authorized assemblers and representatives shall
be covered by the warranty extended by Emerson
to its customers. The user should use only original,
factory supplied OEM parts in any maintenance or
repair activity involving this product.
This Maintenance Manual is provided as a general
guide for the repair and maintenance of the safety
valves described herein. It is not possible to
describe all configurations or variations with such
equipment. The user is advised to contact Emerson
or its authorized assemblers and representatives
for assistance in situations that are not adequately
covered or described in this manual.
Before removing a safety valve for maintenance,
ensure that the system pressure has been fully
depressurized. If an isolation block valve is used
ensure that any trapped fluid between the block
valve and the safety valve is safely vented.
Before disassembling the safety valve ensure that the
valve has been decontaminated from any harmful
gasses or fluids and that it is at a safe temperature
range for handling. Fluids can be trapped in
the dome space of pilot operated safety valves. Before
installation, the Installation and Operational Safety
Instructions should be fully read and understood.
These Instructions may
be requested from the factory or are available at
www.valves.emerson.com.
© 2017 Emerson. All rights reserved.
storAGe And HAndlinG
Pressure/vacuum relief valve performance may
be adversely affected if the valve is stored for
an extended period without proper protection.
rough handling and dirt may damage, deform,
or cause misalignment of valve parts and
may alter the pressure setting and adversely
affect valve performance and seat tightness.
it is recommended that the valve be stored in
the original shipping container in a warehouse
or at a minimum on a dry surface with a
protective covering until installation. inlet and
outlet protectors should remain in place until
the valve is ready to be installed in the system.
engineering doc. #05.9040.275 rev.d
VcioM-06024-us 15/01
Advertisement
Table of Contents

Related Manuals for Emerson Anderson Greenwood 9300 Series


Summary of Contents for Emerson Anderson Greenwood 9300 Series
-
Page 1: Table Of Contents
Main valve ............ 3 of the safety valves described in this manual. be adversely affected if the valve is stored for All Emerson safety valves should be kept in proper Pilot maintenance ........14 an extended period without proper protection. functional testing of complete... -
Page 2: Introduction
Series 9300 Pressure relief Valves: • 9390P - Positive pressure relief valve www.valves.emerson.com • 9390C - Positive and negative pressure relief valve • 9309V - Negative pressure relief valve Weighted-loaded and spring operated valves... -
Page 3: Main Valve
Anderson Greenwood SerieS 9300 Pilot oPerated Safety relief ValVeS InstallatIon and MaIntenance InstructIons 1.5 size/Pressure rAnGes of series 9300 Pressure/VAcuuM relief VAlVes Materials Al, cs, ss Main valve soft goods Ptfe diaphragm seat and seals Pilot soft goods elastomer or all Ptfe Soft goods Set pressure range 4”... - Page 4 Anderson Greenwood SerieS 9300 Pilot oPerated Safety relief ValVeS InstallatIon and MaIntenance InstructIons 2.3 Main valve dual chamber diaphragm 10. on valve sizes 6” and larger, remove disassembly (refer to figure 2) diaphragm assembly (150, 160a, 170a) and 1. remove the pilot and tubing from shaft (320) from lower case (280a).
- Page 5 Anderson Greenwood SerieS 9300 Pilot oPerated Safety relief ValVeS InstallatIon and MaIntenance InstructIons MAin VAlVe PArts item description Body Screw - nozzle retainer Screw - seat (used with item 130 seat plate assembly option 1) Clamp band - seat (used in place of item 120 and 130 seat plate assembly option 2) Nut, lock (used with item 120 seat plate assembly option 1) retainer seat Plate - main pressure...
- Page 6 Anderson Greenwood SerieS 9300 Pilot oPerated Safety relief ValVeS InstallatIon and MaIntenance InstructIons 170/175 700/710 See detail C Seat plate assembly (low and high pressure aluminum) (high pressure stainless steel) See detail d See detail e 810/820 internal pressure pickup not included with remote pressure sense Seat plate assembly (low pressure stainless steel) See detail d...
- Page 7 Anderson Greenwood SerieS 9300 Pilot oPerated Safety relief ValVeS InstallatIon and MaIntenance InstructIons 170B/175B 160B 210B 620B See detail a 280B dome port 500a 170a/170B 700/710 See detail C See detail B 620a 160a 280a See detail d Seat plate assembly See detail e 810/820 fiGUre 2...
- Page 8 Anderson Greenwood SerieS 9300 Pilot oPerated Safety relief ValVeS InstallatIon and MaIntenance InstructIons 500B detail “d” detail “A” and “b” assembled Single chamber diaphragm 520B 160B 250* 590B 170B 175B retaining wire for assembly and disassembly 520a detail “A” auxiliary diaphragm chamber assembly 260* 160a 170a...
- Page 9 Anderson Greenwood SerieS 9300 Pilot oPerated Safety relief ValVeS InstallatIon and MaIntenance InstructIons 2.4 Main valve seat disassembly and wArninG 8. Punch out the remaining seat screw holes replacement (bolted) (refer to figure 4, detail No lapping or machining of seat plate allowed. and install the screws (120) and nuts (130) d, and figure 5, detail e) and tighten.
- Page 10 Anderson Greenwood SerieS 9300 Pilot oPerated Safety relief ValVeS InstallatIon and MaIntenance InstructIons 2” inlet size 3” thru 12” inlet size Aluminum internals 2” inlet size 3” thru 12” inlet size low pressure stainless steel internals 2” inlet size 3” thru 12” inlet size High pressure stainless steel internals fiGUre 5, detail e Main valve seat plate assembly (internal pressure sense shown)
- Page 11 Anderson Greenwood SerieS 9300 Pilot oPerated Safety relief ValVeS InstallatIon and MaIntenance InstructIons 2.5 Main valve seat disassembly and 2.6 diaphragm replacement note: on single chamber valves with high replacement (banded) (refer to figure 4, 2.6.1 Single chamber diaphragm replacement pressure stainless steel internals, an outer detail d and figure 5, detail e) (See Figure 3, detail D)
- Page 12 Anderson Greenwood SerieS 9300 Pilot oPerated Safety relief ValVeS InstallatIon and MaIntenance InstructIons cAution 2.6.2 Dual chamber diaphragm replacement 3. if the upper and lower nozzle gaskets (630) are to be replaced, install Ptfe gasketing. (See Figure 3, detail A, B, C) When tightening jam nut be careful not to damage 1.
-
Page 13: Pilot Maintenance
Anderson Greenwood SerieS 9300 Pilot oPerated Safety relief ValVeS InstallatIon and MaIntenance InstructIons 2.8 reassembly of main valve single chamber 9. install Ptfe gasket material to upper main (19), feedback diaphragm (38), gasket (15), diaphragm case (220) (See figure 6) and lower auxiliary feedback diaphragm plate (14) and gasket (15). - Page 14 Anderson Greenwood SerieS 9300 Pilot oPerated Safety relief ValVeS InstallatIon and MaIntenance InstructIons fiGUre 7 detail C 54/10 detail a Pilot inlet pressure inlet ½ NPt detail d detail B auxiliary dome Pressure connection ½ NPt actuator ¾ NPt connection exhaust ports (front and back) with vent screen item 29 PArts...
- Page 15 Anderson Greenwood SerieS 9300 Pilot oPerated Safety relief ValVeS InstallatIon and MaIntenance InstructIons PArts item description Bolt Plate, diaphragm support Gasket, diaphragm case Washer, lock diaphragm, feedback Vent diaphragm, sense ferrule, tubing retainer, dome tubing detail A Bushing remote vacuum sense ⅜”...
- Page 16 Anderson Greenwood SerieS 9300 Pilot oPerated Safety relief ValVeS InstallatIon and MaIntenance InstructIons 7. install the spool (36) with spindle (24) in the 93t and 91 pilot in that it uses elastomer the body (1). Position the spool (36) to seat, seals and diaphragms. engage the anti-rotation groove pin (21).
- Page 17 Anderson Greenwood SerieS 9300 Pilot oPerated Safety relief ValVeS InstallatIon and MaIntenance InstructIons 13. remove blowdown bushing (390) and 8. on Series 91 and 93t pilots, slide the hex blowdown seal (630) from body (100). nut (300), flat washer (290), seal retainer note: the blowdown screw retainer (380) (280), and seal boost tube (590) on to the is a loose fit on the blowdown adjustment...
- Page 18 Anderson Greenwood SerieS 9300 Pilot oPerated Safety relief ValVeS InstallatIon and MaIntenance InstructIons Pilot PArts (fiGures 9, 10, 11) item description item description Body Washer - shim (for stack height only) Nozzle diaphragm - spindle Spacer - hex diaphragm - sense/boost Spacer - boost diaphragm - sense (93t only) Spacer sense...
- Page 19 Anderson Greenwood SerieS 9300 Pilot oPerated Safety relief ValVeS InstallatIon and MaIntenance InstructIons See detail B See detail a figure 13 figure 13 160 150 exhaust See figure 7 or 8 to main valve dome to process View A - A fiGUre 9 Series 93 and 93t pressure pilot (below 15 psig)
- Page 20 Anderson Greenwood SerieS 9300 Pilot oPerated Safety relief ValVeS InstallatIon and MaIntenance InstructIons See detail a figure 13 View A - A fiGUre 10 Series 91 and 93 pressure pilot (above 15 psig)
- Page 21 Anderson Greenwood SerieS 9300 Pilot oPerated Safety relief ValVeS InstallatIon and MaIntenance InstructIons to process to process See detail a See detail B Main valve dome fiGUre 11 Series 93 vacuum pilot...
- Page 22 Anderson Greenwood SerieS 9300 Pilot oPerated Safety relief ValVeS InstallatIon and MaIntenance InstructIons detail A detail A Series 93 - pressure Series 91 - pressure above 15 psig above 15 psig detail A detail A Series 93 - pressure Series 93t - pressure below 15 psig and vacuum below 15 psig fiGUre 12...
- Page 23 Anderson Greenwood SerieS 9300 Pilot oPerated Safety relief ValVeS InstallatIon and MaIntenance InstructIons detail b detail b Series 93 pilot - pressure Series 93 pilot - pressure below 15 psig and vacuum below 15 psig fiGUre 13...
- Page 24 Anderson Greenwood SerieS 9300 Pilot oPerated Safety relief ValVeS InstallatIon and MaIntenance InstructIons 3.5 Pilot adjustment for non-flowing 3.5.2 Reseat pressure modulating pilots (series 400b) reseat is defined as that supply pressure when the pilot may be set separate from the main the dome pressure is 75% of the supply pressure.
- Page 25 Anderson Greenwood SerieS 9300 Pilot oPerated Safety relief ValVeS InstallatIon and MaIntenance InstructIons Set pressure adjustment test pilot ½” Pipe (min) Supply pressure gauge Vent accumulator .25 ft [.007 m reseat pressure adjustment Supply pressure Supply port (½” NPt) dome pressure gauge Positive pressure pilot Vacuum set adjustment test pilot...
- Page 26 Anderson Greenwood SerieS 9300 Pilot oPerated Safety relief ValVeS InstallatIon and MaIntenance InstructIons 3.6 Pilot adjustment for flowing modulating or note: if the blowdown adjusting screw has snap action pilots (series 91, 93, and 93t pilots) been removed or turned to either extreme, the pilot may be set separate from the main positioning it midway will aid in obtaining valve provided there is access to a pilot test...
-
Page 27: Functional Testing Of Complete Assembly Of Main Valve And Pilot
Anderson Greenwood SerieS 9300 Pilot oPerated Safety relief ValVeS InstallatIon and MaIntenance InstructIons 4 functionAl testinG of coMPlete AsseMbly of MAin VAlVe And Pilot 4.1 General assemble the pilot to the main valve, and install remaining tubing and accessories. the complete valve assembly should be leak tested for internal and external leaks using a pressure equal to 30% and 90% of set. - Page 28 Anderson Greenwood SerieS 9300 Pilot oPerated Safety relief ValVeS InstallatIon and MaIntenance InstructIons Pressure regulator w/ test gauge or manometer field test valve “a” Vent valve “C” Block valve “B” Compressed nitrogen remote sense connection (to tank) fiGUre 15 4.3 field test instructions for flowing 5.
-
Page 29: Storage And Handling
Anderson Greenwood SerieS 9300 Pilot oPerated Safety relief ValVeS InstallatIon and MaIntenance InstructIons 5 storAGe And HAndlinG Valves should be placed on wooden pallets or other blocking materials to keep them off Because cleanliness is essential to the floor or in a location where dirt and other the satisfactory operation and tightness of forms of contamination are kept to a minimum. -
Page 30: Trouble Shooting
Anderson Greenwood SerieS 9300 Pilot oPerated Safety relief ValVeS InstallatIon and MaIntenance InstructIons 6 trouble sHootinG Problem Possible cause resolution 1. Valve opens below set 1. improper installation of sense line 1. Verify if sense line is installed properly 2. Plugged sense line 2. -
Page 31: Pilot Spare Parts And Repair Kits
Anderson Greenwood SerieS 9300 Pilot oPerated Safety relief ValVeS InstallatIon and MaIntenance InstructIons 8 Pilot sPAre PArts And rePAir kits 8.1 - 91 Pilot rePAir kit (04.4744.XXX) Pilot type Pressure kit type Material Pressure 91 Pilot 15 - 50 psig Soft goods Ptfe/Stainless 8.2 - 93 Pilot rePAir kit (06.0235.XXX) -
Page 32: Accessories, Options And Accessory Repair Kit
Shaft assembly and diaphragm assembly jam nut threads loctite Sliding seals Ptfe and elastomers dow corning 33, #05.1500.012 Pipe fittings and vents threads Ptfe tape and dow corning 33, #05.1500.012 1. for oxygen service use Krytoc 240aC © 2017 Emerson. All rights reserved.
Need help?
Do you have a question about the Anderson Greenwood 9300 Series and is the answer not in the manual?
Questions and answers