Advertisement
Owner's Manual & Safety Instructions
Owner's Manual & Safety Instructions
Save This Manual
Save This Manual
operating, inspection, maintenance and cleaning procedures. Write the product's serial number in the
inspection, maintenance and cleaning procedures. Write the product's serial number in the back of the manual
back of the manual near the assembly diagram (or month and year of purchase if product has no number).
near the assembly diagram (or month and year of purchase if product has no number). Keep this manual and
Keep this manual and the receipt in a safe and dry place for future reference.
the receipt in a safe and dry place for future reference.
Email our technical support at: productsupport@harborfreight.com
When unpacking, make sure that the product is intact
When unpacking, make sure that the product is intact
and undamaged. If any parts are missing or broken,
and undamaged. If any parts are missing or broken,
please call 1-888-866-5797 as soon as possible.
please call 1-888-866-5797 as soon as possible.
©
Copyright
2016 by Harbor Freight Tools
©
Copyright
2016 by Harbor Freight Tools
No portion of this manual or any artwork contained herein may be reproduced in
No portion of this manual or any artwork contained herein may be reproduced in
any shape or form without the express written consent of Harbor Freight Tools.
any shape or form without the express written consent of Harbor Freight Tools.
Diagrams within this manual may not be drawn proportionally. Due to continuing
Diagrams within this manual may not be drawn proportionally. Due to continuing
improvements, actual product may differ slightly from the product described herein.
improvements, actual product may differ slightly from the product described herein.
Tools required for assembly and service may not be included.
Tools required for assembly and service may not be included.
Keep this manual for the safety warnings and precautions, assembly,
Keep this manual for the safety warnings and precautions, assembly, operating,
Visit our website at: http://www.harborfreight.com
®
. All rights reserved.
®
. All rights reserved.
Read this material before using this product.
Read this material before using this product.
Failure to do so can result in serious injury.
Failure to do so can result in serious injury.
SAVE THIS MANUAL.
SAVE THIS MANUAL.
REV 16a
ITEM 62849
Advertisement
Table of Contents

Related Manuals for Maddox MA10-1


Summary of Contents for Maddox MA10-1
- Page 1 Owner’s Manual & Safety Instructions Owner’s Manual & Safety Instructions Save This Manual Save This Manual Keep this manual for the safety warnings and precautions, assembly, Keep this manual for the safety warnings and precautions, assembly, operating, operating, inspection, maintenance and cleaning procedures. Write the product’s serial number in the inspection, maintenance and cleaning procedures.
-
Page 2: Important Safety Information
WARNING SYMBOLS AND DEFINITIONS This is the safety alert symbol. It is used to alert you to potential personal injury hazards. Obey all safety messages that follow this symbol to avoid possible injury or death. Indicates a hazardous situation which, if not avoided, will result in death or serious injury. - Page 3 15. Do not use the Ball Joint Kit to compress 18. Read and understand all instructions and safety springs or any other item that could precautions as outlined in the manufacturer’s manual disengage and cause a potential hazard. for the vehicle you are servicing. Use the vehicle manufacturer’s recommended ball joint press points.
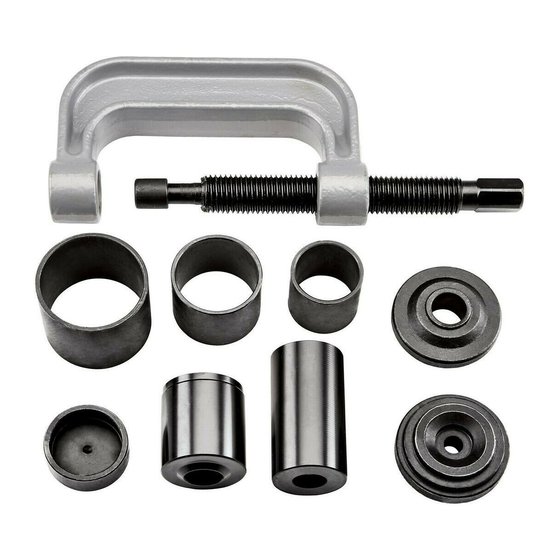
- Page 4 To Install a Ball Joint Ball Joint 1. Clean the vehicle’s control arm, and coat the inside Press (1) diameter of the control arm with a light lubricant. Installation 2. Insert the replacement ball joint as straight Adapter (6) as possible into the vehicle’s control arm. 3.
- Page 5 To Disassemble / Assemble a “U” Joint Jackscrew (2) 1. To disassemble a “U” joint, remove any external and/or internal lock rings. 2. Position the Ball Joint Press around the Ball Joint drive shaft yoke and tighten the Jackscrew until Press (1) the first bearing is removed.
-
Page 6: Cleaning, Maintenance, And Lubrication
Cleaning, Maintenance, and Lubrication Do not perform any inspection, maintenance or cleaning procedures when the Ball Joint Kit is under a load. 1. BEFORE EACH USE, inspect the general condition 2. PERIODICALLY, use a premium quality of the Ball Joint Kit. Check for misalignment or and light weight machine oil to lubricate binding of moving parts, cracked or broken parts, the threads of the Jackscrew. - Page 7 Parts List & Diagram Part Description Part Description Ball Joint Press Removal Adapter (1.148″ L x 1/2″ I.D. x 3″ O.D.) Jackscrew Installing Cup Receiving Tube (3.676″ L x 1-3/4″ I.D. x 2″ O.D.) (2-1/4″ L x 2.723″ I.D. x 3″ O.D.) Receiving Cup Receiving Tube (2-1/2″...
-
Page 8: Limited 90-Day Warranty
Limited 90 Day Warranty Harbor Freight Tools Co. makes every effort to assure that its products meet high quality and durability standards, and warrants to the original purchaser that this product is free from defects in materials and workmanship for the period of 90 days from the date of purchase.
Need help?
Do you have a question about the MA10-1 and is the answer not in the manual?
Questions and answers