Table of Contents
Advertisement
Quick Links
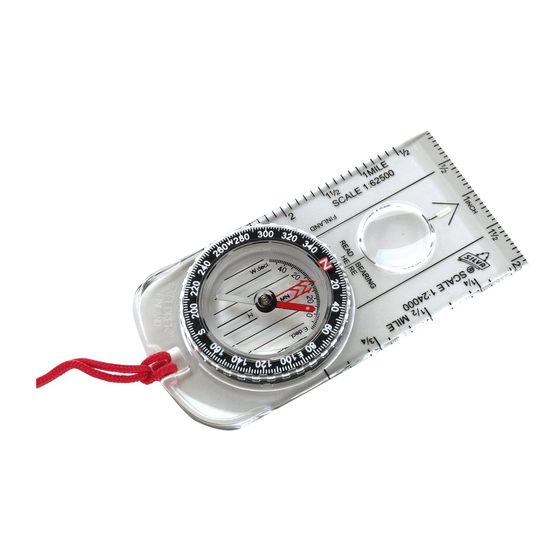
NOTE: Always check compass function prior to using it
in the field.
Be aware that exposing your compass to articles with iron
content (a magnetic field) can cause the red end of the
needle to align with South, a condition called reverse polar-
ity. Something as simple as being placed next to a pair of
scissors or knife for a length of time, microwaves, high
tension wires, stereo speakers, magnets, etc. can cause
this problem.
Find Your Way Without a Map:
Find a heading (field bearing.)
1. Select a landmark along the route you want to travel. Hold
the compass level and point the Direction of Travel Arrow
at the landmark.
2. Find your heading to the landmark by turning the compass
dial until the "N" aligns with the red end of the Needle. Read
your heading in degrees at the Index Line.
3. Keep the Needle aligned with the "N"; look up; sight on your
landmark and walk to it. Repeat this procedure until you
reach your destination.
When you know your heading:
1. If you've been given a heading in degrees to travel, turn the
Dial so that the heading is set at the Index Line. Hold the
compass level in front of you with the Direction of Travel
Arrow pointing straight ahead.
2. Turn your body until the red end of the Needle is aligned with
the "N" on the dial. You now face your direction of travel.
3. Pick out a landmark in line with your heading and move
toward it. Repeat this procedure until you reach your
destination.
Find Your Way Back:
1. To return to your starting point, "backtrack" by pointing the
Direction of Travel Arrow towards you and align the red end of
the Needle with the "N" on the compass Dial.
2. Pick out a landmark on which to guide and move to it.
Re-align Needle with the "N" on the Dial and select a new
landmark. Repeat this procedure until you return to your
origin.
Find Your Bearings with a Mirror:
1. Set the dial to the desired degree reading.
2. Without changing the dial, move the compass so that the
orienting arrow lines up with the magnetic needle.
3. Hold the compass at eye level and adjust the cover to a
50º—70º opening. The mirror should reflect a top view
of the compass dial. While looking in the mirror, move
your sighting eye sideways until you see the sighting line
intersect one of the two luminous points. Without changing
the relationship between compass and eye, pivot yourself
and compass together until you see, in the mirror, that the
C O M P A S S I N F O R M AT I O N F O R M O S T M O D E L S
I N F O R M AT I O N S P O U R L E S B O U S S O L E S P O U R L A P L U PA R T D E S M O D E L E S
orienting arrow is lined up with the magnetic needle and the
red end of needle is between the luminous points.
4. Your direction or objective will now lie straight beyond the
sight.
NOTE: Be sure to keep the base plate level so magnetic
needle can turn freely. When sighting uphill or downhill,
lower the sighting eye in relation to the compass.
NOTE: A greater than 70º cover opening will increase the par-
allax effect and could cause as much as a 5º reading error
NOTE: Should such need arise, the mirror feature also func-
tions as a signaling device.
Allow for Declination When Using a Map:
When the paralleling method of declination adjustment with
pre-drawn Magnetic North lines is not available, the
DECLINATION SCALE gives a fast, sure method for compen-
sating for the difference between True North and Magnetic
North.
1. Take your heading from the map by placing the Base Plate
edge of the compass along your desired line of travel. The
Direction of Travel Arrow points to your destination.
2. Turn the compass Dial so that the Orienting Arrow and
Orienting Lines are parallel to the map side margins. Your
Map Heading can be read at the Index Line on the Dial.
3. Hold the compass level, turn your body until the Compass
Needle aligns with the Orienting Arrow. You are facing your
Map Heading. Now turn yourself slightly until the Needle
offsets against the DECLINATION SCALE to the appropriate
degrees for your area. You now face your Magnetic Heading.
Sight ahead to a landmark and walk to it. Repeat this pro-
cess until you reach your destination.
Ignore Declination:
If declination is slight in your location; if you are not referenc-
ing a map or if accuracy is not critical; you may use the
compass without declination allowance.
Find Your Exact Position:
1. To locate your position, choose two landmarks and find them
on your map. Label them L1 and L2.
2. Point the Direction of Travel Arrow toward a landmark
(L1) and rotate the compass Dial until the Red end of the
Needle points to "N" on the dial. Read the heading at the
Index Line.
3. Place the compass on your map with Base Plate edge touch-
ing the landmark (L1) and pivot it until the Orienting Arrow
or Orienting Lines align with the Magnetic North lines. Draw
a line from the landmark (L1) along the side of the Base
Plate across the map.
4. Repeat this process with the second landmark (L2). Where
the lines intersect is your location.
Notez: Vérifiez toujours le bon fonctionnement de la boussole avant de
l'utiliser sur le terrain.
Ayez conscience que le fait d'exposer la boussole à des articles contenant
du fer (un champ magnétique) peut faire que l'extrémité rouge de
l'aiguille s'aligne sur le Sud, une situation appelée polarité inversée. Le
problème peut avoir été causé par quelque chose d'aussi simple que
le fait d'avoir rangé la boussole près d'une paire de ciseaux ou d'un
couteau pendant un certain temps ou près d'un micro-ondes, de fils à
haute tension, de haut-parleurs stéréo, d'aimants, etc.
Trouvez votre chemin sans carte :
Trouvez une direction (orientez-vous).
1. Choisissez un point de repère sur la route que vous voulez parcourir. Tenez
la boussole plate et orientez la Flèche de Direction de Parcours dans la
direction du point de repère.
2. Déterminez la direction vers votre point de repère en tournant le cad-
ran de la boussole jusqu'à ce que le "N" soit sur la même ligne que
l'extrêmité rouge de l'Aiguille. Déterminez votre direction en degrés à
la Ligne d'Orientation.
3. Gardez l'Aiguille alignée sur le "N". Relevez la tête et marchez vers votre
point de repère.Répétez ce procédé jusqu'à ce que vous ayez atteint
votre destination.
Si vous connaissez la direction.
1. Si la direction de votre route vous a été donnée en degré, tournez le
cadran de manière à aligner la direction sur la Ligne d'Orientation. Tenez
la boussole plate devant vous avec la Flèche de Direction de Parcours
dirigée droit de vant vous.
2. Tournez vous jusqu'à ce que l'extrémité rouge de l'Aiguille soit alignée
avec le "N" sur le cadran. La direction de votre parcours est maintenant
devant vous.
3. Choisissez maintenant un point de repère droit devant vous et marchez
vers lui. Répétez ce procédé jusqu'à ce que vous ayez atteint votre
destination.
Trouver votre chemin de retour
1. Pour revenir à votre point de départ, "revenez sur vos pas" en dirigeant
la Flèche de Direction du Parcours vers vous et alignez l'extrémité rouge
de l'Aiguille avec le "N" sur le cadran de la boussole.
2. Choisissez un point de repère pour vous guider et marchez dans sa direc-
tion. Alignez de nouveau l'Aiguille sur le "N" et choisissez un nouveau
point de repère. Recommencez ce procédé jusqu'à ce que vous soyez
revenu à votre point de départ.
Trouvez votre orientation avec un miroir :
1. Ajustez le cadran aux degrés désirés.
2. Sans changer le cadran, tournez la boussole de manière à ce que les
lignes de la Flèche d'Orientation soit sur la même ligne que l'Aiguille
Aimantée et que l'extémité rouge de l'Aiguille se trouve entre les deux
points lumineux.
3. Mettez la boussole au niveau de l'œil et ajustez le couvercle à une
ouverture de 50º à 70º. Vous devriez voir la reflexion du dessus du
cadran de la boussole. Tout en regardant dans le miroir, faites aller votre
œil sur le côté jusqu'à ce que vous voyez que la ligne de visée coupe
un des deux points lumineux. Sans changer la relation entre l'œil et la
boussole, tournez vous ainsi que la boussole jusqu'à ce que vous voyez
dans le miroir que la Flèche d'Orientation est sur la même ligne que
l'Aiguille Aimantée.
4. Votre direction ou objectif se trouvera droit devant vous.
Notez : Faites bien attention de garder la plaque de base horizontale pour
que l'Aiguille Aimantée se déplace aisément. Si vous visez dans une
montée ou une descente, baissez l'œil en relation avec la boussole.
Notez : Une ouverture du couvercle de plus de 70º augmentera l'effet de
parallaxe et pourra causer une erreur de visée allant jusqu'à 5º.
Notez : En cas de nécessité le miroir pourra être employé comme dispositif
de signalisation.
Tenez en considération la déclinaison lorsque vous employez une
carte :
Quand il n'y a pas de lignes du Nord Magnétique déjà tracées selon la
méthode d'ajustement de la déclinaison , l'Echelle de Déclinaison fournit
une méthode sûre et rapide pour compenser la différence entre le Nord
Géographique et le Nord Magnétique.
1. Déterminez votre direction sur la carte en plaçant le côté de la Plaque de
Base de la boussole le long de la ligne que vous désirez parcourir. La
Flèche de Direction de Parcours pointe vers votre destination.
2. Tournez le Cadran de la boussole pour que la Flèche d'Orientation et les
Lignes d'Orientation soient parallèles aux marges des côtés de la carte.
La Direction de votre Carte peut être déterminée à la Ligne d'Orientation
sur le Cadran.
3. Tenez votre boussole plate. Tournez-vous jusqu'à ce que l'Aiguille de la
Boussole soit sur la même ligne que la Flèche d'Orientaion. La direc-
tion de votre carte est droit devant vous. Tournez-vous maintenant un
tout petit peu jussqu'à ce que l'Aiguille se déplace vers l'ECHELLE DE
DECLINAISON aux degrés appropriés à votre région. Votre Direction
Magnétique est maintenant droit devant vous. Décidez d'un point de
repère et marchez dans sa direction. Répétez ce procédé jusqu'à ce que
vous ayez atteint votre destination.
Ignorez la déclinaison :
Si la déclinaison est peu importante dans votre région; si vous ne faites
pas le relêvement d'une carte ou si la précision n'est pas cruciale; vous
pouvez employer une boussole sans tenir compte de la déclinaison.
Trouvez votre Position Exacte :
1. Pour déterminer votre position, choisissez deux points de repère et
trouvez-les sur votre carte. Appelez-les L1 et L2.
2. Orientez la Flèche de Direction de Parcours vers le point de repère (L1) et
tournez la boussole jusqu'à ce que l'extrémité rouge de l'Aiguille pointe
vers "N" sur le Cadran. Relevez la direction sur la Ligne d'Orientation.
3. Placez la boussole sur votre carte de manière à ce que le côté de la
Plaque de Base touche le point de repère (L1) et faites-la pivoter jusqu'à
ce que la Flèche d'Orientation et les Lignes d'Orientation soient sur la
même ligne que les lignes du Nord Magnétique. Tracez une ligne du point
de repère (L1) le long du côté de la Plaque de Base à travers la carte.
4. Recommencez ce procédé avec le second point de repère (L2). Votre
position se trouve là où les lignes se croisent.
Advertisement
Table of Contents

Related Manuals for Silva EXPLORER 203


Summary of Contents for Silva EXPLORER 203
- Page 1 C O M P A S S I N F O R M AT I O N F O R M O S T M O D E L S I N F O R M AT I O N S P O U R L E S B O U S S O L E S P O U R L A P L U PA R T D E S M O D E L E S Notez: Vérifiez toujours le bon fonctionnement de la boussole avant de boussole, tournez vous ainsi que la boussole jusqu'à...
- Page 2 Trouvez votre chemin à l'aide d'une carte Where True and Magnetic North are in the same direction, the declina- Le système Silva : tion is zero. At any point west of that line, your compass needle will point 1. PLAQuE DE BASE 1.
Need help?
Do you have a question about the EXPLORER 203 and is the answer not in the manual?
Questions and answers