Advertisement
Table of Contents
This addendum accompanies the StarSense
AutoAlign manual. Refer to this addendum
to setup StarSense on your Sky-Watcher
mount, including camera attachment and
cabling to the relay box.
Once StarSense is setup on your mount, re-
fer to the StarSense AutoAlign manual for all
other functions which you will access in the
hand control.
SYSTEM REQUIREMENTS
• SynScan compatible Sky-Watcher mount,
such as the EQ6
• Cable used to connect your SynScan hand
control to the mount
• Sky-Watcher compatible dovetail base for
finder scope (will be used to attach the
StarSense camera)
The StarSense hand control replaces the
SynScan hand control.
Keep your SynScan cable, since this will be
used to connect the relay box to the mount.
PARTS LIST
• StarSense camera
• StarSense hand control
• Relay box
• Large camera bracket
(preinstalled on camera)
• Small camera bracket
• 6-pin cable, StarSense camera to auxiliary
port relay box
• 4 mm Allen Wrench
• 2 thumbscrews for large camera bracket
FOR SKY-WATCHER MOUNTS
Model # 94006
ASSEMBLY
ATTACHING THE STARSENSE CAMERA TO
YOUR TELESCOPE
Most Sky-Watcher telescopes fit the small
camera bracket. So you will need to remove
the large camera bracket on StarSense.
To change from the pre-installed Large Camera
Bracket to the Small Camera Bracket:
1. Slightly loosen the socket head screw using
the included 4 mm Allen wrench. Do not
remove the screw entirely.
2. Remove the lens shroud by unthreading it.
3. Slide the bracket off the front of the camera.
Be careful not to lose the two orange rings.
4. Slide the new bracket onto the camera
and screw the lens shroud back on. Make
sure each of the two orange rings are
placed in front of and behind the bracket
so they function as washers.
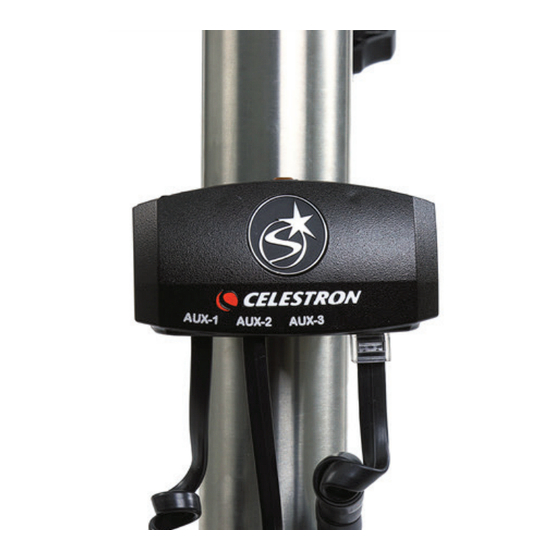
CONNECTING STARSENSE TO YOUR MOUNT
1. Secure the interface box to the tripod leg
of your mount using the strap with the hook
and loop fasteners.
2. Plug the 8-pin SynScan cable from the
Interface Box to your mount. This is the cable
that came with your Sky-Watcher mount
that is normally used for your SynScan
hand control.
3. Plug the included 6-pin cable from the Star
Sense camera to the Interface Box.
4. Plug your StarSense hand control into
the Interface Box.
5. Power the mount on as normal and begin
using StarSense.
Turn the mount on, and StarSense will
boot up. It will take several seconds for the
camera to respond, then the hand control
will display "StarSense Auto Press ALIGN
to begin".
Advertisement
Table of Contents

Related Manuals for Celestron StarSense AutoAlign 94006


Summary of Contents for Celestron StarSense AutoAlign 94006
-
Page 1: System Requirements
FOR SKY-WATCHER MOUNTS Model # 94006 This addendum accompanies the StarSense ASSEMBLY 4. Slide the new bracket onto the camera AutoAlign manual. Refer to this addendum and screw the lens shroud back on. Make to setup StarSense on your Sky-Watcher sure each of the two orange rings are ATTACHING THE STARSENSE CAMERA TO mount, including camera attachment and... - Page 2 MENU TELESCOPE SETUP ALIGN MODE to and from the factory of Celestron, and If warranty problems arise, or if you need shall be required to prepay such costs. assistance in After your setup is complete, refer to the...
Need help?
Do you have a question about the StarSense AutoAlign 94006 and is the answer not in the manual?
Questions and answers