
Subscribe to Our Youtube Channel
Related Manuals for Lectrotab ALC-1


Summary of Contents for Lectrotab ALC-1
- Page 1 ELECTROMECHANICAL TRIM TAB SYSTEMS Automatic Leveling Control Manual Linear Devices Corporation www.lectrotab.com dba Lectrotab Phone: 804-368-8428 11126 Air Park Road, Suite G Fax: 804-368-8438 Ashland, VA 23005...
-
Page 2: Table Of Contents
Table of Contents • Introduction………………………………………….3 • Safety…………………………………………….…..…3 • How Do Trim Tabs Work………………………..4 • Operational Overview……………………………5 • Display Panel Installation…………………..….6 • Wiring Connections……………………………….7 • Display Control Calibration ALC-1…….…….8 • Display Settings/Operation..…………………..9 • Troubleshooting……………………..……………..10 • Specifications….……………………..……………..10 • Wiring to Upgrade Other Brands.…………..11... -
Page 3: Introduction
Introduction Lectrotab introduces an automatic leveling control system to maintain the boat on a level plane and ensure a comfortable ride. If sea conditions change, adjustments in boat speed occur, or passengers move about the boat, the automatic leveling control system utilizes built in sensors to correct the attitude of the boat to maintain the proper level. -
Page 4: How Do Trim Tabs Work
How Do Trim Tabs Work Boaters will enjoy many performance and efficiency benefits by adding Lectrotab trim tabs. Lectrotab trim tabs improve fuel efficiency, increase boat speed, accelerate shallow water planing, eliminate porpoising, and enhance the overall boating experience with a more comfortable ride. -
Page 5: Operational Overview
Control configured for 20 foot or larger boats: The auto leveling control system may be configured for boats larger than 20 feet to effectively maintain the correct boat level. For vessels over 50’ please contact Lectrotab for correct matching of ALC control to actuators and tabs. -
Page 6: Display Panel Installation
Display Panel Installation ALC-1 For ALC-1 (single actuator, single station display only) • Mounting Display Panel: The ALC incorporates sensors that measure the boat’s movement. The ALC display panel must be mounted on a flat surface which is perpendicular to a straight plane from stern to bow with the rear of display facing the bow in a vertical mounting or top of display facing bow in a flat mounting. -
Page 7: Wiring Connections
• Wiring Display Panel: Refer to wiring diagram as shown below for the ALC-1 wiring connections. The red (+12vdc or +24vdc) wire from the boat’s fuse panel and black battery negative wires should be a minimum size of 14 AWG (2.5mm²). -
Page 8: Display Control Calibration Alc-1
This information is automatically acquired and stored in memory during calibration. Turn battery selector switch ON to apply supply voltage to ALC-1 display. If optional terminal 7 is used, turn the ignition key to the run position to activate the control. -
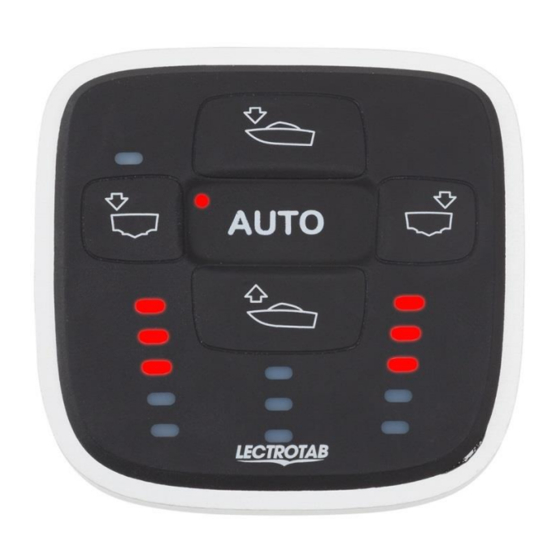
Page 9: Display Settings/Operation
ALC-1 Display Settings and Operation • Automatic Control Setting and Operation: After the installation, calibration and verification have been completed, take the boat for a test drive and store the correct level or attitude as described below. Operate the boat at a typical cruising speed (not maximum speed). Manually adjust the trim tabs until the desired boat level or attitude is attained. -
Page 10: Troubleshooting
ALC-1 Troubleshooting • Error Code: If the ALC control senses a fault, an LED indicator will show a quick repetitive flash. See display below for flashing LED error code. Quick flashing LED indicates trim tab actuators are not connected properly (see wiring... -
Page 11: Wiring To Upgrade Other Brands
ALC-1 Wiring Connection to Other Brands For ALC-1 (single actuator/tab, single station display only) • Bennett Refit Wiring: Refer to wiring diagram as shown below for the Bennett wiring connections. The Orange or Orange with Yellow stripe , removed from the Bennett control switch, should be connected from the boat’s fuse panel (+12vdc or +24vdc) and connected to terminal #1 on green connector.
Need help?
Do you have a question about the ALC-1 and is the answer not in the manual?
Questions and answers