Table of Contents
Advertisement
Quick Links
Advertisement
Table of Contents

Subscribe to Our Youtube Channel
Related Manuals for SOL paragliders X lIght


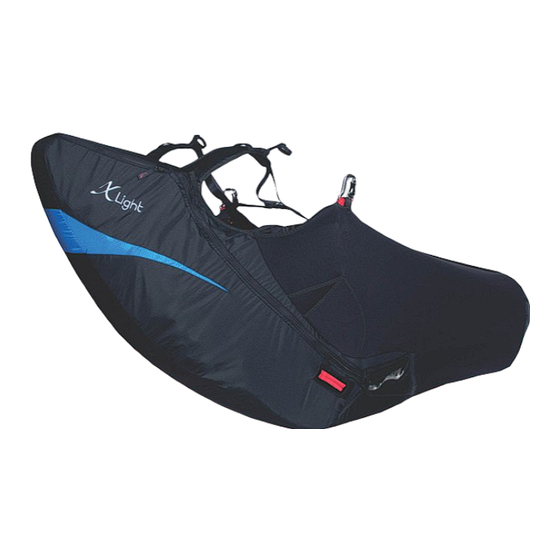
Summary of Contents for SOL paragliders X lIght
- Page 1 Manual Manual Version Version 10/2012 04/2014...
-
Page 2: Table Of Contents
WELCOME TO THE TEAM! ....................... 4 RECOMMENDATIONS ..........................4 ABOUT ............................5 PHILOSOPHY ............................6 INTRODUCTION ............................. 6 TECHNICAL INNOVATIONS ........................7 ADJUSTMENTS AND INSTALLATIONS ..................... 8 ........................8 ACK PROTECTOR INSTALLATION ´ ..........................9 ARABINERS INSTALLATION ........................... 9 CCELERATOR INSTALLATION ....................... - Page 3 ........................27 EFERENCE IGHT X EIGHT ............................... 28 ..............................28 EGEND FINAL WORDS ............................29 WARRANTY ............................30 /100 ......................30 WARRANTY YEARS HOURS ............................. 30 ARRANTY ERMS ......................... 30 ARRANTY REQUISITES ....................... 31 ARRANTY OVER...
-
Page 4: Welcome To The S O Lteam
WELCOME TO THE TEAM! Thank you for selecting a harness. You have just acquired a high quality product, manufactured under one of the most demanding industry standards worldwide. We trust your will bring you many great life memories you will cherish forever. We would like you to read this manual carefully and thoroughly. -
Page 5: About S Ol
About Founded in 1991, after six months of research and many visits to several manufacturing facilities and suppliers, began its production in partnership with the European brands Condor, Comet and Nova, and became autonomous in 1999 with its own testing and development centers. From the beginning has adopted the philosophy of utilizing certified designs, manufactured with imported materials of the highest quality by specialized and skilled-... -
Page 6: Philosophy
Philosophy 's philosophy is to introduce products that are considerably better than current ones, in order to guarantee significant advancements in four aspects: Safety, Performance, Ease of Operation and Innovation. Safety: The new product has to offer a level of safety that is at par or better than the one it is replacing. -
Page 7: Technical Innovations
Technical innovations • Accelerator pulley • Removable place for instruments • Front pocket for water compartment (8l through an aperture you can pull a tube or front reserve • Adjustable (38-54 cm) quick “hook P-Lock" for the chest • V-Front lock •... -
Page 8: Adjustments And Installations
Adjustments and installations -Harness provide a variety of adjustment possibilities, so that the pilot is able to find his/her ideal flying position. The first adjustment must be done in a simulator where you can be hanging in order to make the adjustments. It may be necessary to take a few testing flights until the ideal setting is achieved, but the pilot will be rewarded with amazing comfortable flights. -
Page 9: Carabiners´installation
Carabiners´installation Attention Carabiners: Pay attention at each installed carabiner of the permission and/or other references of the producer. You have to look out regularly for thin fissures and/or mal-function. The carabiner has to close always 100%. If you choose to change the carabiners (even made of steel) at least each 5 years or after 250 flight hours you are making a wise decision. -
Page 10: Reserve Parachute Installation
Reserve parachute installation Visualize the details of how to execute the reserve parachute installation. The purpose of this illustration is to help you understand the process. If necessary, you should ask for professional help to make sure it is properly installed. - Page 11 Attention Image 6 and 10: Pull the bridles firmly to stop an involuntary opening, this avoids a dangerous friction in the event of a reserve opening. -Harness features a reserve parachute installation system with easy access at the moment of grab and throw, by possessing an activator which has a shorter connection.
-
Page 12: Reserve Compartment
Reserve compartment The reserve parachute compartment on your harness was designed for most of the parachutes in the market. In any case, you must install, simulate and perform all testing, so that you will not have any surprises in case you need to activate it. Any questions concerning its operation must be dealt with during the installation and setting of the harness before the first flight. -
Page 13: Harness Adjustment For Flight
Harness adjustment for flight Before the first flight, we suggest the pilot simulate his/her flying position hanging the harness on a harness tester, sitting on Harness and trying to find the best position adjustment. This simulation becomes more realistic if the back pocket is filled with objects the pilot would normally carry during flight. -
Page 14: Harness Adjustment
Harness adjustment Visualize the details of how to adjust the for flight: Lateral adjustments Front adjustments... -
Page 15: Security System
Security system To avoid starting with open leg strap locks. Attention The leg setting cannot be too tight, to avoid jeopardizing good movement. Make sure the setting is symmetric. Shoulder adjustment Attention The adjustable chest strap is fixed on the shoulder strap. This is for your comfort and safety. -
Page 16: Carabiners Opening
Carabiners opening The chest strap is responsible for the carabiners opening, depending of the paragliders size. Depending on the paraglider size, there is a measurement of the carabiners opening to which the paraglider was designed and tested. With paragliders you must fly within these measurements. -
Page 17: Leg Cover Adjustment
Leg cover adjustment Your harness is composed by a leg cover and a main part which s is composed by a leg cover and a main part which s is composed by a leg cover and a main part which adjustment details must be carefully observed. -
Page 18: Leg Cover Closing
Leg cover closing Your leg cover is composed by 2 closing points: • A/B are closing the above part of the cover. C is closing the second point. We advise that at the moment of taking off • and landing this one is open to make easy running, entrance and exit. -
Page 19: Reserve Installation In The Front Compartment (Optional)
Reserve Installation in the front compartment (optional) -
Page 20: Use Of The Front Ballast Compartment (Optional)
Attention If you install a front reserve you can not take ballast with you If you install a front reserve you can not take ballast with you Use of the front ballast compartment Use of the front ballast compartment (optional) Retrievable compartment for Retrievable compartment for 8L ballast. -
Page 21: Pockets
Pockets harness feature a large rear, two lateral and bellow the seat pockets. harness feature a large rear, two lateral and bellow the seat pockets. harness feature a large rear, two lateral and bellow the seat pockets. These pockets were designed in such way that pockets were designed in such way that they will keep its contents from falling they will keep its contents from falling accidentally during flight. -
Page 22: Final Check
Final check Before you begin flying with your new Harness, make sure to perform the following inspection in detail: • All pockets are closed? • The reserve parachute handle is in the correct position? • Each hook (chest / leg) is connected and closed? •... -
Page 23: Water Landing
Water landing Usually safety courses are taught over water, or a poorly calculated landing may force you to land in the water. In this event, you must be careful since the protector at the first moment will act as a floating device, therefore forcing your head into the water and you could be in danger of drowning. -
Page 24: Maintenance, Repair And Cleaning
Maintenance, repair and cleaning Storing the equipment Maintenance Your Harness has to be sent regularly to the manufacturer or an authorized repair facility, in order that a professional inspection be performed. A new licensed harness has to be sent for inspection after two years. All other inspections have to be made once a year. -
Page 25: Pulleys
Pulleys It is important you keep pulleys lubricated because in case they do not work may consume the speedy handle or axle, apply paraffin or lubricant spray, read carefully about the lubricant to avoid spots and fabric consume. Do not apply on the sewing lines. -
Page 26: Lagerung
Lagerung Das Gurtzeug sollte nicht lange im Kofferraum des Autos oder unter extremer Sonne liegen, da zu große Hitze sich auf die Materialien und/oder Funktionssicherheit auswirken kann. Sonneneinwirkung respektive die ultraviolette Strahlung zerstört zudem die Molekularstruktur des Materials. Eine Lagerung nahe Feuer und/oder scharfkantiger Gegenstände solltest Du vermeiden. -
Page 27: Technical Data
Technical Data Maximum pilot weight allowed: 120 kg/120dkN. The harness is a light flight equipment. Reference Hight x Weight Attention This table is only a reference. Speak with your seller or flight shool to know your exactly harness size. -
Page 28: Data
Data xlight 12cm Legend English Français Português Deutsch 12 cm Back protector 12cm Potection dorsale 12cm Protetor Dorsal 12cm Rücken Protektor 12cm 18 cm Back protector 18cm Potection dorsale 18cm Protetor Dorsal 18cm Rücken Protektor 18cm Airbag Cygnus Airbag Cygnus Airbag Cygnus Airbag Cygnus Side protector... -
Page 29: Final Words
Final words Safety is the major theme of our sport. In order to fly safely, pilots must train, study, practice and be alert to the dangers around us. In order to achieve excellent safety levels, we must fly regularly as much as possible, don't go beyond our limitations and avoid exposing ourselves to unnecessary dangers. -
Page 30: Warranty
3. This warranty is defined as repair or substitution of the defective harness parts determined by the producer. Warranty Pre-requisites 1. A three-copied filled-out form: One copy to be sent to SOL Paragliders within 30 days after purchase; one copy to the sales person and one copy to the purchaser. -
Page 31: This Warranty Does Not Cover
4. Any damage caused by inadequate operation of the harness. 5. A harness that may have been subjected of any alteration from the original design and without proper permission from SOL Paragliders. 6. Damages caused by inappropriate transport, storage or settings of the harness.
Need help?
Do you have a question about the X lIght and is the answer not in the manual?
Questions and answers