
Related Manuals for BraunAbility Turny


Summary of Contents for BraunAbility Turny
- Page 1 Turny Seat lift Turny HD Turny Orbit 4 Bruksanvisning 20 User manual 36 Gebrauchsanweisung 52 Instructions d’utilisation 68 Instrucciones de uso 84 Istruzioni per l’uso...
- Page 4 Förvara därför manualen så att den lätt återfinns vid behov. Har du frågor kring din anpassning vänligen kontakta din installatör. Vill du veta mer om oss och vårt utbud av bilanpassningslösningar besök www.braunability.eu. Än en gång, tack för ditt förtroende!
- Page 5 Turny Säkerhet Säkerhetsåtgärder Handhavande Handkontrollen Manövrera ut och in Nödmanövrering Höj upp Turny Orbit/HD Vrid in Turny Orbit Skötselanvisning Felsökare Teknisk specifikation Introduktion för användare ”Product certificate” längst bak i manualen.
- Page 6 Turny Säkerhet Säkerhetsåtgärder...
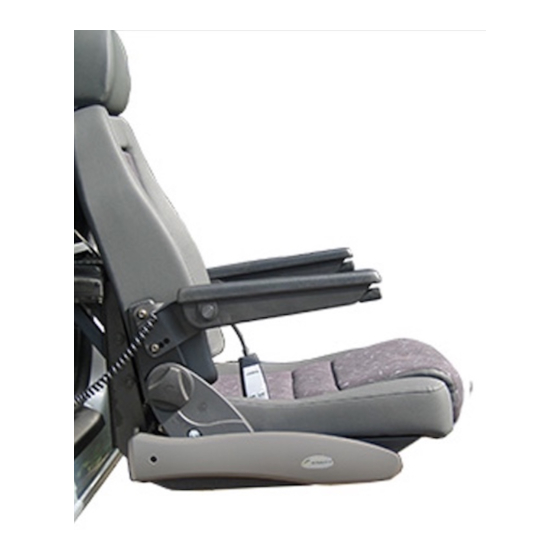
- Page 7 Turny Att resa sig upp Turny kan användas som reshjälp när en brukare ställer sig upp om en medhjälpare samtidigt kör sätet försiktigt uppåt, se illustration. Överflytt till och från rullstol En överflytt mellan bilsäte och rullstol, eller vice versa, blir lättare om flytten sker till ett lägre säte.
- Page 8 För att köra upp och vrida in Orbit, eller upp HD, håll den högra knappen nedtryckt. För att avbryta rörelsen, släpp knappen. När den gröna dioden lyser konstant är Turny i säkert läge för bilkörning. När den gröna dioden blinkar är Turny inte i säkert läge för bilkörning.
- Page 9 Turny Handkontrollens meddelanden vid normal drift. Indikering Orsak Ingen diod lyser Tändningen på fordonet är aktiverad och/eller dörren är stäng. Turny kan inte manövreras. Grön blinkar långsamt Strömsparläge. Grön lyser Invriden i ändläge. Turny är i säkert läge för bilkörning.
- Page 10 Turny Manövrera ut och in Vrid ut Sänk ner Turny Orbit Turny HD Ta tag i sätet. Dra frigöringsspaken uppåt och vrid ut Sänk ner sätet till önskad höjd. sätet till låst ändläge.
- Page 11 Turny Höj upp Vrid in Turny Orbit Turny HD Ta tag i sätet. Dra frigöringsspaken uppåt och vrid in sätet till låst ändläge. När handkontrollens gröna diod lyser konstant är Turny i säkert läge för bilkörning.
- Page 12 Turny Nödmanövrering Höj upp Turny Orbit/HD Alternativ A - lätt men långsamt Ta veven som sitter på plåten bakom ryggstödet. Stick in veven genom sexkantshålet i Turnys bakre del och veva sätet hela vägen in. 2 cm...
- Page 13 Turny Alternativ B - tungt men snabbt Avlägsna de två hårnålssprintarna bakom sätet. Lyft och därefter tryck sätet hela vägen in. Var handfast men försiktig.
- Page 14 Turny Vrid in Turny Orbit Använd den gula frigöringsspaken som sitter framtill Tryck ner och skjut spaken åt sidan för att frigöra på Turny. sätet. Skjut spaken till höger på en högermodell och till vänster på en vänstermodell.
- Page 15 Turny Vrid sätet hela vägen in. Skjut därefter tillbaka spaken till utgångsläget för att låsa sätets position.
- Page 16 Turny Skötselanvisning Vid behov ..............Dammsug Turny varsamt. Använd inga vätskor. 1 ggr / år ..............Kontakta din installatör för bokning av service. Vid demontering kontakta alltid din installatör.
- Page 17 Övre gränsläge trasigt, konstant påverkat. Kontakta din installatör. 6 Röda blink Maxgräns för manövrering har uppnåtts, Kontakta din installatör. 180 sekunder. Växlande röd och grön Övre gränsläge är ej påverkat och max Kontakta din installatör. utvriden är ej är påverkad. Turny kan inte manövreras.
-
Page 18: Teknisk Specifikation
Turny Teknisk specifikation Ovanifrån, utvriden åt höger. Längd- och breddmått visar Turny utan kåpor och tillbehör. 590 mm 165 mm Bakifrån, utvriden åt höger. 475 mm A / Vridvinkel Längd ......................590 mm HD ......................78° - 105° Bredd ......................475 mm Orbit ....................... 68° - 97°... - Page 19 Turny Introduktion för användare BraunAbility Europe AB vill att du som användare skall känna dig trygg och bekväm med din nya produkt. Därför har din installatör till uppgift att gå igenom följande med dig / Säkerhet Handhavande Nödmanövrering Om frågor kring produkten skulle uppstå vid ett senare tillfälle är du givetvis välkommen att kontakta din installatör igen.
- Page 20 If you have any questions about your adaptation, please contact your installation engineer. If you want to know more about us and our range of car adaptation solutions visit www.braunability.eu. Once again, thank you for placing your confidence in our products!
- Page 21 Turny Safety Safety measures Operation Hand control Manoeuvring outwards and inwards Emergency-mode operation Raise Turny Orbit/HD Rotate the Turny Orbit inwards Care instructions Troubleshooting Technical specification Introduction for users “Product certificate” at the end of the manual.
- Page 22 Turny Safety Safety measures...
- Page 23 Turny Getting up Turny can be used as a lifting aid for the user, if at the same a helper carefully moves the seat upwards, see illustration. Transferring to and from wheelchair A transfer between car seat and wheelchair, or vice versa, becomes easier if the transfer is made from a higher to a lower position.
-
Page 24: Operation
In order to raise and rotate Orbit inwards, or raise HD, keep the right-hand button in. To interrupt the movement, release the button. When the green LED is constantly lit, Turny is in a safe position for driving. When the green LED is blinking, Turny is not in a safe position for driving. - Page 25 Rotated inwards to end position. Turny is in a safe position for driving. Green LED blinks Not rotated inwards to end position. Turny is not in a safe position for driving. Red LED lit End position reached and cannot be further lowered.
- Page 26 Turny Manoeuvring outwards and inwards Rotate outwards Lower Turny Orbit Turny HD Grip the seat. Pull the release lever upwards and Lower the seat to the desired height. rotate the seat outwards to its locked end position.
- Page 27 Raise Rotate inwards Turny Orbit Turny HD Grip the seat. Pull the release lever upwards and rotate the seat inwards to its locked end position. When the green LED is constantly lit, Turny is in a safe position for driving.
- Page 28 Raise Turny Orbit/HD Option A - easy but slow Take out the crank affixed to the plate behind the back support. Insert the crank behind the hexagonal keyhole at the Turny’ s rear section and fully crank the seat in. 2 cm...
- Page 29 Turny Option B - difficult but quick Remove the two cotter pins behind the seat. Lift and then push the chair all the way in. Be firm but careful.
- Page 30 Turny Rotate the Turny Orbit inwards Use the yellow release lever at the front of the Turny. Depress and push the lever to the side to release the seat. Push the lever to the right on a right model and...
- Page 31 Turny Rotate the seat fully in. Then move the lever to its original position to lock the seat in position.
-
Page 32: Care Instructions
Turny Care instructions If necessary ..............Carefully vacuum the Turny. Do not use any liquids. Once a year ..............Contact your installer to book the annual service. Always contact your dealer for disassembly. -
Page 33: Troubleshooting
Power supply fuse(s) and cable(s) are intact. For interrupted. further help contact your installer. 1 Red blink Power surge or pinch protection. Turny Check for obstacle(s) in the way. stops with small amount of reverse Reactive Turny. movement. -
Page 34: Technical Specification
Turny Technical specification From above, rotated out towards the right. The length and width dimen- sions show Turny without covers or accessories. 590 mm 165 mm From the back, rotated out to- 475 mm wards the right. A / Rotation angle Length .....................590 mm... - Page 35 Turny Introduction for users BraunAbility Europe AB would like you, as a user, to feel secure and comfortable with your new product. For that reason, it is your installer’ s duty to go through the following with you / Safety...
- Page 36 Bedarf leicht auffindbar ist. Sollten Sie Fragen zu Ihrer Umrüstung haben, dann setzen Sie sich bitte mit Ihrem Fachhändler/Monteur in Verbindung. Wenn Sie mehr über uns und unser Angebot an Fahrzeuganpassungslösungen erfahren möchten, besuchen Sie www.braunability.eu. Nochmals – vielen Dank für Ihr Vertrauen!
- Page 37 Turny Sicherheit Sicherheitsmaßnahmen Handhabung Handbedienung Herein- und Herausmanövrieren Notbetrieb Anheben des Turny Orbit/HD Hereindrehen des Turny Orbit Pflegeanleitung Fehlersuche Technische Daten Einweisung des Benutzers “Product certificate” hinten im Handbuch.
- Page 38 Turny Sicherheit Sicherheitsmaßnahmen...
- Page 39 Turny Aufrichten Das Turny lässt sich als Aufrichthilfe verwenden, wenn sich der Benutzer hinstellt, während ein Helfer gleichzeitig den Sitz vorsichtig hochfährt, siehe Abbildung. Überführen zum und vom Rollstuhl Ein Überführen zwischen Fahrzeugsitz und Rollstuhl bzw. umgekehrt geht leichter, wenn es auf einen niedrigeren Sitz erfolgt.
- Page 40 Zum Anheben und Hereindrehen der Modelle Orbit bzw. HD halten Sie die rechte Taste gedrückt. Zur Unterbrechung der Bewegung lassen Sie die Taste los. Wenn die grüne Diode mit Dauerlicht leuchtet, sitzt das Turny transportsicher im Fahrzeug. Wenn die grüne Diode blinkt, sitzt das Turny NICHT transportsicher im Fahrzeug.
- Page 41 Turny Mitteilungen auf der Handbedienung bei Normalbetrieb Mitteilung Ursache Keine Diode leuchtet Der Motor des Fahrzeugs ist eingeschaltet und/oder die Tür ist geschlossen. Das Turny lässt sich nicht manövrieren. Die grüne Diode blinkt Stromsparfunktion. langsam. Die grüne Diode leuchtet Bis in Endposition hereingedreht. Das Turny sitzt transportsicher im Fahrzeug.
- Page 42 Turny Herein- und Herausmanövrieren Herausdrehen Absenken Tury Orbit Turny HD Den Sitz ergreifen. Den Entriegelungshebel hoch- Den Sitz auf die gewünschte Höhe absenken. und den Sitz herausziehen, bis er in der Endposition einrastet.
- Page 43 Turny Anheben Nach innen drehen Tury Orbit Turny HD Den Sitz ergreifen. Den Entriegelungshebel hochziehen und den Sitz hereindrehen, bis er in der Endposition einrastet. Wenn die grüne Diode der Handbedienung mit Dauerlicht leuchtet, sitzt das Turny transportsicher im Fahrzeug.
- Page 44 Turny Notbetrieb Anheben des Turny Orbit/HD Optionen A - leicht aber langsam Die am Blech hinter der Rückenlehne befindliche Kurbel nehmen, in die Sechskantöffnung im hinteren Teil des Turny stecken und den Sitz komplett nach innen drehen. 2 cm...
- Page 45 Turny Optionen B - schwer aber schnell Die beiden Haarnadelstifte hinter dem Sitz herausnehmen. Den Sitz anheben und dann ganz reindrücken. Kräftig zupacken, aber vorsichtig sein!
- Page 46 Turny Hereindrehen des Turny Orbit Den gelben Entriegelungshebel vorn am Turny herun- Nach rechts bei Rechtsmodellen und nach links bei terdrücken und zum Entriegeln des Sitzes seitwärts Linksmodellen. umlegen.
- Page 47 Turny Den Sitz ganz nach innen drehen. Dann den Hebel wieder in die Ausgangsposition bringen, damit der Sitz in dieser Position verriegelt wird.
- Page 48 Turny Pflegeanleitung Bei Bedarf ..............Das Turny vorsichtig mit einem Staubsauger reinigen. Keine Flüssigkeiten verwenden. Einmal jährlich ............Wenden Sie sich zwecks Service an Ihren Monteur. Zur Demontage setzen Sie sich bitte immer mit Ihrem Fachhändler/Monteur in Verbindung.
-
Page 49: Fehlersuche
Kabel überprüfen. Ihren Monteur Stromzufuhr ist unterbrochen. kontaktieren. 1 Rote Diode blinkt Überstrom- bzw. Klemmschutz. Das Turny Nachsehen, ob dem Turny etwas in bleibt stehen und fährt etwas zurück. den Weg gekommen ist. Das Turny erneut aktivieren. 2 Rote Diode blinkt Potentiometer defekt oder Ihren Monteur kontaktieren. -
Page 50: Technische Daten
Turny Technische Daten Draufsicht, nach rechts herausgedreht. Längen- und Breitenmaß gelten für Turny ohne Ab- deckungen und Zubehör. 590 mm 165 mm Rückwärtige Ansicht, nach 475 mm rechts herausgedreht. A / Drehwinkel Länge......................590 mm HD ......................78° - 105° Breite ......................475 mm Orbit ....................... - Page 51 Turny Einweisung des Benutzers Es ist BraunAbility Europe AB ausdrücklicher Wunsch, dass Sie als Benutzer sich sicher und bequem mit Ihrem neuen Produkt fühlen. Deshalb ist Ihr Monteur verpflichtet, Sie über folgende Punkte zu informieren / Sicherheit Handhabung Notbetrieb Sollten zu einem späteren Zeitpunkt Fragen zum Produkt auftauchen, dürfen Sie sich selbstverständlich auch dann gern wieder an Ihren Fachhändler/Monteur wenden.
- Page 52 Si vous avez des questions concernant votre adaptation, n’hésitez pas à contacter votre installateur. Si vous souhaitez en savoir plus sur nous et notre gamme de solutions d’adaptation automobile, visitez le site www.braunability.eu. Et merci encore pour votre confiance!
- Page 53 Mesures de sécurité Utilisation Télécommande Manœuvre de pivotement vers l'extérieur et vers l'intérieur Manœuvre d’urgence Lever Turny Orbit/HD Pivotez Turny Orbit vers l'intérieur Instructions de maintenance Recherche des pannes Caractéristiques techniques Introduction pour l’utilisateur “Product certificate” à la fin du manuel.
-
Page 54: Mesures De Sécurité
Veillez à ce que la diode verte de la télécommande soit allumée en perma- nence avant de partir. Ceci indique que Turny est en mode de sécurité pour nence avant de partir. Ceci indique que Turny est en mode de sécurité pour le déplacement en voiture. - Page 55 Turny Se redresser Turny peut être utilisé pour aider l’utilisateur à se redresser, si un assistant déplace en même temps et avec prudence le siège vers le haut, voir l’illustration. Transfert vers et depuis un fauteuil roulant Un transfert entre le siège de la voiture et un fauteuil rou- lant, ou l’inverse, est facilité...
- Page 56 Pour interrompre le mouvement, relâchez le bouton. Quand la diode verte est allumée en permanence, Turny est en mode de sécurité pour le déplacement en voiture. Quand la diode verte clignote, Turny n'est pas en mode de sécurité pour le déplace- ment en voiture. •...
- Page 57 Pivoté vers l'intérieur en position de butée. Turny est en mode de sécurité pour le déplacement en voiture. Voyant vert clignotant Non pivoté vers l'intérieur en position de butée. Turny n'est pas en mode de sécurité pour le déplacement en voiture. Voyant rouge allumé...
- Page 58 Turny Manœuvre de pivotement vers l'extérieur et vers l'intérieur Pivoter vers l’extérieur Abaisser Turny Orbit Turny HD Saisissez le siège. Tirez le levier de libération vers le Abaissez le siège jusqu’à la position souhaitée. haut et faites pivoter le siège vers l’extérieur jusqu’en...
- Page 59 Saisissez le siège. Tirez le levier de libération vers le haut et faites pivoter le siège vers l’intérieur jusqu’en position de butée verrouillée. Quand la diode verte de la télécom- mande est allumée en permanence, Turny est en mode de sécurité pour le déplacement en voiture.
- Page 60 Saisissez la manivelle qui est placée sur la plaque derrière le dossier. En- gagez la manivelle dans le trou hexagonal situé dans la partie arrière de Turny et faites tourner la manivelle jusqu’à ce que le siège soit entière- ment rentré.
- Page 61 Turny Options B - dur mais rapide Retirez les deux goupilles beta derrière le siège. Levez puis poussez sur le siège jusqu’à ce qu’il entre complètement dans la voiture. Soyez ferme mais prudent.
- Page 62 Turny Pivotez Turny Orbit vers l'intérieur Utilisez le levier de libération jaune placé sur l’avant de Pressez le levier vers le bas et poussez-le vers le côté Turny. pour libérer le siège. Poussez le levier vers la droite sur un...
- Page 63 Turny Faites pivoter le siège jusqu’à ce qu’il entre entièrement dans le véhicule. Repoussez ensuite le levier jusqu’à la position initiale pour verrouiller la position du siège.
-
Page 64: Instructions De Maintenance
Turny Instructions de maintenance Au besoin ..............Passez Turny à l’aspirateur avec précaution. N’utilisez pas de liquides. 1 fois/an ................ Contactez votre installateur pour la maintenance. Pour le démontage, contactez toujours votre installateur. -
Page 65: Recherche De Pannes
La limite maximale pour la manœuvre, 180 Contactez votre installateur. secondes, a été atteinte. Alternativement rouge et La butée supérieure n'est pas actionnée et Contactez votre installateur. vert la butée de position maximale pivotée vers l'extérieur n'est pas actionnée. Turny ne peut pas être manœuvré. -
Page 66: Caractéristiques Techniques
Caractéristiques techniques Données techniques Depuis le haut, mouvement de sortie vers la droite. La longueur et la largeur indiquées correspondent à Turny sans cache ni accessoire. 590 mm 165 mm Depuis l’arrière, mouvement de 475 mm sortie vers la droite. - Page 67 Turny Introduction pour l’utilisateur BraunAbility Europe AB souhaite que vous vous sentiez, en tant qu’utilisateur, en sécurité et à l’aise avec votre nouveau produit. Votre installateur va donc parcourir les chapitres suivants avec vous / Sécurité Utilisation Manœuvre d’urgence Si vous deviez ultérieurement avoir des questions sur le produit, n’hésitez pas à...
- Page 68 Si tiene alguna pregunta sobre su adaptación le pedimos que se ponga en contacto con el instalador local. Si desea saber más sobre nosotros y nuestra gama de solu- ciones de adaptación para automóviles, visite www.braunability.eu. Una vez más, ¡muchas gracias por su confianza!
- Page 69 Medidas de seguridad Mando de control Maniobrar hacia fuera y hacia dentro Manejo de emergencia Subir el Turny Orbit/HD Girar el Turny Orbit hacia dentro Instrucciones de mantenimiento Localización de fallos Especificaciones técnicas Introducción para usuarios “Product certificate” al final del manual.
-
Page 70: Medidas De Seguridad
Asegurarse de que nada pueda quedar atascado o aprisionado cuando se Asegurarse de que nada pueda quedar atascado o aprisionado cuando se maniobra el Turny. Asegurarse de que el cable en el mando de control esté maniobra el Turny. Asegurarse de que el cable en el mando de control esté... - Page 71 Un traslado entre el asiento del automóvil y una silla de rue- das, o viceversa, será más fácil si el movimiento se produce a un asiento más bajo. Ajustando el Turny en altura, se puede lograr una condición óptima para el traslado.
-
Page 72: Mando De Control
Parar subir y girar hacia dentro el Orbit, o subir el HD, mantener presionado el botón derecho. Para interrumpir el movimiento, soltar el botón. Cuando el diodo verde brilla de forma constante, el Turny está en modo seguro para conducir el vehículo. - Page 73 Girado hacia dentro, hasta la posición límite. El Turny está en modo seguro para conducir el vehículo. El verde parpadea No está girado hacia dentro, hasta la posición límite. El Turny no está en modo seguro para conducir el vehículo. El rojo brilla Han llegado a la posición límite inferior y no se puede bajar más.
- Page 74 Turny Maniobrar hacia fuera y hacia dentro Girar hacia fuera Bajar Turny Orbit Turny HD Asir el asiento. Mover la palanca de desconexión hacia Bajar el asiento a la altura deseada. arriba y girar el asiento hacia fuera, hasta la posición...
- Page 75 Asir el asiento. Mover la palanca de desconexión hacia arriba y girar el asiento hacia dentro, hasta la posición límite bloqueada. Cuando el diodo verde del mando de control brilla de forma constante, el Turny está en modo seguro para conducir el vehículo.
- Page 76 Opciones A - fácil pero lenta Coger la manivela que está montada en la chapa detrás del respal- do. Insertar la manivela a través del orificio hexagonal en la parte trasera del Turny y girar hasta que el asiento quede totalmente introducido. 2 cm...
- Page 77 Turny Opciones B - pesada pero rápida Retirar los dos pasadores de horquilla detrás del asiento. Subir y después empujar el asiento para introducirlo por completo. Proceder de una manera firme pero cuidadosa.
- Page 78 Turny Girar el Turny Orbit hacia dentro Utilizar la palanca de desconexión amarilla situada en Presionar hacia abajo y deslizar hacia el costado para la parte delantera de Turny. liberar el asiento. Deslizar la palanca hacia la derecha en un modelo del lado derecho y hacia la izquierda en...
- Page 79 Turny Girar el asiento hasta que quede completamente introducido. Después, empujar la palanca a su posición original para blo- quear la posición del asiento.
-
Page 80: Instrucciones De Mantenimiento
Turny Instrucciones de mantenimiento Si es necesario ............Aspirar el Turny con cuidado. No usar ningún tipo de líquido. 1 vez por año ............Contactar con el instalador local para reservar el servicio. Para el desmontaje contactar siempre con el distribuidor local. -
Page 81: Localización De Fallos
1 Parpadeo rojo Sobreintensidad o protección contra Comprobar que no haya ningún obstáculo aprisionamientos. El Turny se detiene y para el movimiento del Turny. Volver a retrocede un poco. activar el Turny. 2 Parpadeos rojos Potenciómetro defectuoso o interrupción. -
Page 82: Especificaciones Técnicas
Turny Especificaciones técnicas Desde arriba, girado hacia fuera y hacia la derecha. La medida de longitud y anchura muestra el Turny sin cubiertas y accesorios. 590 mm 165 mm Desde atrás, girado hacia fuera y 475 mm hacia la derecha. - Page 83 Turny Introducción para usuarios BraunAbility Europe AB quiere que usted, como usuario, se sienta seguro y cómodo con su nuevo producto. Por eso, el instalador local debe repasar lo siguiente con el usuario / Seguridad Manejo de emergencia Si en una etapa posterior surgiesen preguntas en cuanto al producto el usuario puede volver a contactarse con el distribuidor local.
- Page 84 Conservare quindi il manuale a portata di mano per qualsiasi evenienza. Per qualsiasi domanda sulla vostra soluzione personalizzata, rivolgetevi all’installatore. Se vuoi saperne di più su di noi e sulla nostra gamma di soluzioni di adattamento per auto, visita www.braunability.eu. Di nuovo, grazie per la fiducia accordataci!
- Page 85 Turny Sicurezza Misure di sicurezza Pulsantiera Manovre di ingresso e uscita Azionamento di emergenza Sollevare Turny Orbit/HD Rotazione verso l'interno di Turny Orbit Istruzioni di manutenzione Ricerca dei guasti Specificazioni tecniche Introduzione per utenti “Product certificate” alla fine del manuale.
-
Page 86: Misure Di Sicurezza
Assicurarsi che il LED verde sulla pulsantiera sia acceso con luce costante prima di fare partire il veicolo. La luce verde indica che Turny è in posizione prima di fare partire il veicolo. La luce verde indica che Turny è in posizione sicura per la guida. - Page 87 Turny Alzarsi È possibile utilizzare Turny come ausilio per alzarsi, se un assistente contemporaneamente sposta con cautela il sedile verso l’alto, come mostrato in figura. Trasferimento da e verso la sedia a rotelle Un trasferimento tra il sedile dell’auto e la sedia a rotelle o viceversa è...
- Page 88 Per interrompere il movimento, rilasciare il pulsante. Quando il LED verde è acceso con luce fissa, Turny si trova in posizione sicura per la guida. Quando il LED verde lampeggia, Turny non si trova in posizione sicura per la guida.
- Page 89 Messaggi sulla pulsantiera durante il funzionamento normale Messaggio Causa Nessun LED acceso L'accensione del veicolo è inserita e/o la portiera è chiusa. Non è possibile manovrare Turny. Luce verde lampeggia lenta- Modalità di risparmio di energia. mente Luce verde accesa Posizione completamente rotata verso l'interno.
- Page 90 Turny Manovre di ingresso e uscita Rotazione verso l’esterno Movimento verso il basso Turny Orbit Tury HD Afferrare il sedile. Tirare la leva di sblocco verso l’alto Abbassare il sedile all’altezza desiderata. e ruotare il sedile verso l’esterno fino al finecorsa.
- Page 91 Turny Orbit Tury HD Afferrare il sedile. Tirare la leva di sblocco verso l’alto e ruotare il sedile fino al finecorsa. Quando il LED verde della pulsantiera è acceso con luce fissa, Turny si trova in posizione sicura per la guida.
- Page 92 Opzioni A - leggero ma lento Prendere la manovella che si trova sulla piastra dietro allo schienale. Inserire la manovella nel foro esagonale sul lato posteriore di Turny e azionare la manovella fino a quando il sedile è completamente all’interno.
- Page 93 Turny Opzioni B - pesante ma veloce Rimuovere i perni ad ago dal retro del sedile. Sollevare e poi premere il sedile fino in fondo. Agire con decisione ma facendo attenzione.
- Page 94 Turny Rotazione verso l'interno di Turny Orbit Utilizzare la leva di sblocco gialla che si trova sul lato Premere la leva verso il basso e di lato per sganciare il sedile. anteriore di Turny. Per I modelli di sedile destro, premere la leva verso destra;...
- Page 95 Turny Ruotare il sedile completamente verso l’interno. Spin- gere poi la leva nella posizione iniziale per bloccare la posizione del sedile.
-
Page 96: Istruzioni Di Manutenzione
Turny Istruzioni di manutenzione All’occorrenza ............Pulire Turny con l’aspirapolvere manuale. Non usare liquidi 1 volta all’anno ............Contattare l’installatore per prenotare la manutenzione. Per l’eventuale smontaggio, rivolgersi sempre all’installatore. -
Page 97: Ricerca Dei Guasti
1 lampeggiamento rosso Protezione anti schiacciamento o termica Controllare che non ci siano ostacoli al Turny si ferma e torna un po' indietro. movimento di Turny. Riattivare Turny. 2 lampeggiamenti rossi Il potenziometro è guasto o c'è... -
Page 98: Specificazioni Tecniche
Turny Specificazioni tecniche Da sopra, ruotato verso l’esterno a destra. Le misure di larghezza e lung- hezza visualizzano Turny senza coperchio e accessori. 590 mm 165 mm Da dietro, ruotato verso l’ester- 475 mm no a destra. A / Angolo di rotazione Lunghezza ....................590 mm... - Page 99 Turny Introduzione per utenti L’obbiettivo di BraunAbility Europe AB è che l’utente si senta sicuro e a suo agio con il prodotto; a questo scopo, l’installatore ha il compito di esaminare i seguenti capitoli con voi / Sicurezza Azionamento di emergenza Se sorgessero eventuali domande in futuro, vi preghiamo di contattare nuovamente l’installatore.
-
Page 102: Product Certificate
E-mail: info @braunability.eu FMVSS 201, FMVSS 207 www.braunability.eu FMVSS 208, FMVSS 209 FMVSS 210, FMVSS 225 FMVSS 302 Declares that the product / BraunAbility Europe AB, Stenkullen 2019-04-02 Turny HD/Orbit, model Left/Right, 300, 395, 480 Jan M Jensen Managing Director... - Page 103 Accredited by SWEDAC as testing laboratory in accordance with ISO/IEC 17025:2005 Quality system certified in accordance with ISO 9001:2015 Illustrations, descriptions and specifications in the user manual are based on current product information. BraunAbility Europe AB reserves the right to make alterations without previous notice. © 2019 BraunAbility Europe AB...
- Page 104 BraunAbility Europe AB Åkerivägen 7 Phone: +46 302 254 00 443 61 Stenkullen E-mail: info@braunability.eu Sweden www.braunability.eu...
Need help?
Do you have a question about the Turny and is the answer not in the manual?
Questions and answers