Advertisement
Quick Links
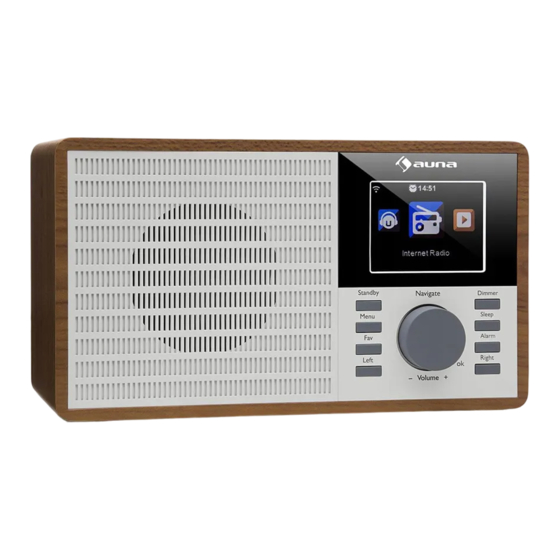
Product: INTERNET RADIO
Model: US-10031584
1.Features/Technical Specifications
Available for global stations by internet
Compatible with the audio of WMA/MP3/OGG
With 2.8" RGB TFT screen
With the adaptor of DC 5.9V/1.2A
Access to available Wi‐Fi Internet
2. Main Keys
1.
Speaker
2.
Menu‐‐‐Show Menu for the current mode
3.
Left‐‐‐Turn left
4.
Fav‐‐‐Quick access to favorite stations
5.
Standby‐‐‐ Press to switch between standby and on
User manual
1
Advertisement

Related Manuals for auna US-10031584


Summary of Contents for auna US-10031584
- Page 1 User manual Product: INTERNET RADIO Model: US-10031584 1.Features/Technical Specifications Available for global stations by internet Compatible with the audio of WMA/MP3/OGG With 2.8” RGB TFT screen With the adaptor of DC 5.9V/1.2A Access to available Wi‐Fi Internet 2. Main Keys Speaker Menu‐‐‐Show Menu for the current mode Left‐‐‐Turn left Fav‐‐‐Quick access to favorite stations Standby‐‐‐ Press to switch between standby and on ...
- Page 2 Volume/Navigator/OK‐‐‐Combine key Rotate rotary knob to adjust the volume when in working mode Rotate rotary knob to select when in menu mode Press rotary knob to confirm when in menu mode Switch program menu when in working mode Sleep‐‐‐ Press to set the sleep timer Right‐‐‐Turn right Alarm‐‐‐Alarm setting 10. Dimmer‐‐‐Adjust the brightness of screen to different level 11. TFT screen 12. Rating label recess 13. On/Off switch button 14. DC IN socket 15. Line out socket 16. Aux in socket 17. USB port‐play your USB sticks ...
- Page 3 3. Switch On or Off Plug the adaptor into the DC in socket (on the rear of the product) and switch the “ON/OFF” switch to “ON”, then “Welcome” will be shown on the screen. Meanwhile, the radio will scan the available access point automatically. You can use the button Volume/Navigator to choose the internet, and then press OK to confirm the Internet. ...
- Page 4 The steps are as below for first use: There will be prompt: Would you like to configure Network now? Press Navigator knob to Choose YES. Then the internet radio will scan available network. Choose the network you want to connect by switching the navigator knob and press it to confirm. It will remind you to enter password, by switching the navigator button to input the number, letter or character. After finishing input, presses navigator knob to confirm your input. Then your internet radio connected to your network. Tips: When you need input the internet password, please press Navigator button to choose the characters. In this condition, press Left button can turn left and delete the left characters at the same time: Note: Below characters are available for the radio: Numbers (from 0‐9) English letters ( from A to Z and from a to z) Other characters ( DEL ,@,Blank,!,”,#,$,%,&,*,’,+ and (,). 3. Basic Operation →Time Display →Analog ...
- Page 5 Enter → → Alarm →Alarm 1(Turn Off)→Turn On →Turn Off ...
- Page 6 → Resume When Power On →On →Off ...
- Page 7 radio→ Press OK button to enter the interface, then below choices will be shown on the screen: 1. My Favorite 2. Radio Station/Music 3. Local Radio 4. History 5. Service 3). Media Center 3.1 USB Functions : Play the audio medium by USB,which is compatible with the files of WMA/MP3/AAC/AAC+/FLAC/WAV. Steps : Press Menu→Rotate Navigate button to choose “Media Center” →Press OK to enter the interface. →Choose “USB” by rotate Navigate button→ Enter it by OK button. Compatible with USB3.0 and lower versions. For the setup of play, please refer to the Playback setup in Configuration. 3.2 UPNP FUNCTIONS: Play the media in computer. Steps: Press Menu→ Rotate Navigate button to choose“ Media Center” →press OK button to enter the interface →Choose“UPNP”by rotate Navigate button→Enter it by press OK Button. Note: You must install the software of“Windows Media Play 11”( or upgrade versions) or Twonky Media in Your computer, which is necessary for the UPNP operation. In“Windows Media Play”,you should get the media to share in your playlist. Your computer must be available to the internet. ...
- Page 8 3.3 My Playlist Steps: Press Menu→ Rotate Navigate button to choose“Media Center” →Press ok button to enter the interface→Choose“My playlist” by rotate Navigate Button→Enter it by OK button. Note: In the UPNP mode, when playing you can long press OK button to put the chosen file into your ”My playlist”. 3.4Clear My Playlist Press Menu→ Rotate Navigate button to choose“Media Center” →Press OK button to enter the interface→Choose“Clear My playlist” by rotate Navigate Button→Enter it by Enter button. Note: By cutting off the power, the files of your “My playlist” will be cleared automatically. 6. My media U Functions: Fastly play the program of internet radio per the personal playlist. Steps: Standby →My media U→Press OK to confirm ...
-
Page 9: Information Center
Note: For the first time,you need register in http://www.mediayou.net and set up related data before you use it,otherwise the display will show info to reminder you not to connect the internet. Note: This option default is disable.User need select Enable in Manage My Media U of Configu ration ,then can see My media U in Menu. 7. Information Center Functions:check the weather all over the world, Browse the stock status of main stock exchange globally,show the system info of the unit. Steps: Press Menu→Rotate Navigate button to choose “information center” →Press OK button to enter the interface→Choose the Item by rotate Navigate button→ Confirm it by OK button. 7.1 Weather Information Press OK button, it will enter the interface to choose location then choose the city by Navigate button, press OK button to enter. In the interface of city weather, you can check the weather in recent 5days by Left or right button. 7.2 Financial infomation Note: on the interface of “Financial information”,you can Aim at your interested items by cursor, then the related Information will be shown automatically. 7.3 System information Functions: To check the software version,the MAC,ID and IP of the wireless internet. 8. Configuration Functions: To set up Network,Alarm,Date& Time,Language,Weather,Dimmer and etc. Steps: Press Menu→Rotate Navigate button to choose“Configuration” → Press OK to ... - Page 10 enter the interface→ Choose the item by Left or Right→ Confirm it by OK button Note: Press Left button can return to the upper menu. There are 20 items can be setting as below: 8.1 Time Display Step: Press Menu→Configuration→Time Display There are 2 models: Analog and Digital If you select Analog mode, the time will show pointer clock in standby.If you select Digital,the time will show digital clock. 8.2 ...
- Page 11 Note: When choosing WPS PBC,It will show “Please press the WPS button on your router within 120 Secs”,you must press the WPS button of Router,then the network in both sides will be linked automatically. 8.3.3 Manual Configuration Steps: Press Menu→ Configuration→Network→Choose“Manual Configuration”by navigate knob→Enter>Wireless>Enter . Then three items in the list (DHCP,Enter SSID,Manage). Note: In the mode of ‘ON’( DHCP),the unit will check the IP address of wireless network and link the network automatically. In the mode of ‘OFF’(DHCP),the unit will check the IP address of wireless network and link the network automatically. 8.3.4 Check Network when Power On Functions: When“ Power On”,choose “Enable” to check the status of network link automatically; choose “Disable” not to check it. Note: If the network is not linked on the mode of “Enable”,it will automatically show the choices for you to set up the network. 8.4 Date and Time Steps: Press Menu→Configuration→Press OK to confirm→Press Rotate Navigate button to choose “Date & Time” →Press OK button to enter the interface 8.4.1 set Date and Time Manual Setup: You can manual set the date and time. Auto Detect(UTC+00:00) 00:00 means the time Difference between service and local time. 8.4.2 Set Time Format Tips: The format of 24 hour is acquiescent ...
- Page 12 DD/MM/YYYY MM/DD/YYYY 8.5 Alarm To set up three alarms(Alarm1,Alarm 2,NAP Alarm) and the Alarm Volume. Steps: Press Power→Configuration→Press OK to confirm→Press Rotate Navigate button to choose “Alarm” →Press OK button to enter the interface. 8.5.1 The time of NAP Alarm is from 5 minutes to 120 minutes.And after the setup of the NAP Alarm, it begins to count the time reversely until the time is over,then it will switch to the standby model automatically and rings. 8.5.2 When alarm rings, it will enter the display of “Standby” automatically. 8.5.3 You can set up the alarm volume by “Alarm Volume”.(Volume 7 is acquiescent) 8.5.4 If you press any button when alarm rings,the alarm will be closed and enter the model of standby with 5 minute SNOOZE. 8.5.5 To press Standby button, it will exit the mode of SNOOZE. 8.5.6 After the alarm setup, you should exit it, then the new setup can come into use. 8.5.7 Two alarms won’t ring at the same time.(Only after one alarm stop ringing,another alarm can be used). 8.5.8 Alarm 1 Turn On Turn Off Repeat: To set up the Alarm Date The choices are as below: Everyday,Once,Mon,Tue,Wed,Thu, Fri, Sat,Sun △ Time: To set up the Alarm time △ Sound :To set up the Alarm sound 1)Beep 2)Melody 3)Internet Radio 4)USB ...
- Page 13 ●Alarm sound Melody is acquiescent. 8.6 Timer Steps: Press Power→Configuration→Press OK to confirm→Press Rotate Navigate button to choose “Timer” →Press OK button to enter the interface. Press Left and Right to set the time and confirm by press the rotary knob. When in Count down, you can press OK button to stop. 8.7 Language Step: Press Menu→Configuration→Language→Press ok to enter. It can support 17 languages :English,Deutsch,Espanol,Francais(France),Portuges, Nederlands,Italiano,Pyccknn,Svenska,Norske,Dansk,magyar Cesky,slovensky,poski,Turkce,Suomi, 8.8 Dimmer Step: Press Menu→Configuration→Dimmer→Press OK to confirm→ Choose the Item by press Rotate Navigate button →Press OK button to confirm →press Navigate button or Left and Right button to adjust the brightness. Tips: There are two items for your choice (Power saving and Turn On). 8.9 Display There are 2 models you can select : Color and Monochrome 8.10 power management ...
- Page 14 Minutes Choose the power management timer(5/15/30 mins) to set the duration of the radio to switch standby mode automatically when you are not controlling it. Choose “Turn off” to ignore the power management function. 8.11 Sleep Timer To power off the unit automatically by setting up the sleep timer. Steps : Press Menu→Configuration→Sleep Timer → press OK to confirm. The time range is from Turn OFF ,15,30,60,90,120,150,180 minutes 8.12 Buffer Steps : Press Menu→Configuration→Buffer→select the buffer from 2 seconds to 8 seconds 8.13 Weather To show the current weather of selected city Step : Press Menu→Configuration→Weather→Select to choose the city and below Items are for your choice: 8.13.1 Set Location To set up global city weather showing Steps : Choose district →country→city→ ...
- Page 15 Manual Setup→Choose district and country to enter the interface →press OK (Save as local Radio”)will show on the display→ Press OK button to confirm . 8.14.2 Auto Detect Step : Press Standby→Configuration→Local Radio Setup→“Auto Detect ” to check the stations of Local Radio automatically. Tips: It will create the radio station of local internet automatically as per the local and national ID. 8.15. Playback Setup Press Standby→Configuration→Local Radio Setup→Press OK to choose the play status 8.15.1 OFF ‘OFF’means to just play the chosen item . 8.15.2 Repeat all , ‘ Repeat all’ means to play the Chosen item repeatedly. 8.15.3 Repeat one, means to play the chosen item once. ...
- Page 16 8.17 Equaliser Fuction : ‘Equalizer’ can strength the music impact On‐site Steps : Press Menu→Configuration→Equalizer→Press OK To choose different music impact(Normal→Flat→Jazz→Rock →Soundtracks→Classical→POP→News 8.18 . Resume When Power On Steps :Press Menu→Configuration→Resume When Power On→Press OK to choose On or Off ‘On’,means to continue the mode automatically when the power was off ‘Off’ ,means not to continue the mode and just show the main menu when the power was off 8.19. Software Update It’s just used for production and maintenance. Caution : Before starting a software upgrade, ensure That the unit is plugged into a stable mains power connection. Disconnecting power during a software may permanetly damage the unit. 8.20 Reset to Defaut Choose this item, it will show‘ Are you sure to reset to default setting’. ‘YES’, it will delete all your present setup and resume to the original mode ‘NO’ ,it will keep all your present setup and return to the upper menu. 5.. Line output You can switch the radio’s medium onto other Speakers by a 3.5mm audio line out Tips : By doing so, you can control the media volume only by other speakers. ...
- Page 17 FCC Statement Changes or modifications not expressly approved by the party responsible for compliance could void the user's authority to operate the equipment. This equipment has been tested and found to comply with the limits for a Class B digital device, pursuant to Part 15 of the FCC Rules. These limits are designed to provide reasonable protection against harmful interference in a residential installation. This equipment generates uses and can radiate radio frequency energy and, if not installed and used in accordance with the instructions, may cause harmful interference to radio communications. However, there is no guarantee that interference will not occur in a particular installation. If this equipment does cause harmful interference to radio or television reception, which can be determined by turning the equipment off and on, the user is encouraged to try to correct the interference by ...
Need help?
Do you have a question about the US-10031584 and is the answer not in the manual?
Questions and answers
Necesito el control, lo venden?