Advertisement
Advertisement

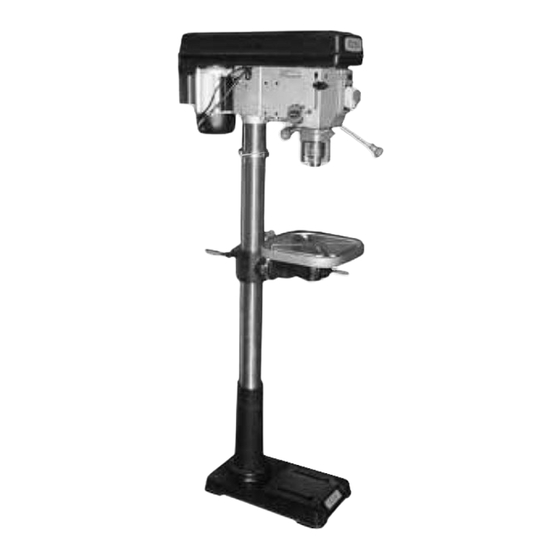
Related Manuals for SIP B13-5


Summary of Contents for SIP B13-5
- Page 1 Manual Drill Press Manual: 060120/00001...
- Page 2 Prefix ALWAYS READ INSTRUCTIONS BEFORE OPERATING THIS PRODUCT. The data and advise given in this document apply when the machine is sold and used for the stated application or applications. The machine is not sold as suitable for any other application. Use of the machine for applications other than stated in this document may give rise to risks not mentioned.
-
Page 3: Table Of Contents
Table of Contents PAGE TECHNICAL SPECIFICATION..............4 SAFETY ....................6 INSTALLATION AND ASSEMBLY ..............7 OPERATION ....................9 ADJUSTMENTS ..................10 MAINTENANCE ..................11 WIRING DIAGRAMS ................12 ENVIRONMENTAL POLICY................16... -
Page 4: Technical Specification
Technical Specifications... -
Page 5: 3 Spindle
Technical Specifications MODEL B13-5 B16-5 B16-16 F16-16 B16-16L F16-16L F25-16 F32-12 HEIGHT 1000 1640 1060 1630 1640 1710 (MM) MAX DIST. 1154 1136 1075 CHUCK TO BASE (MM) MAX DIST. CHUCK TO TABLE (MM) SPINDLE TRAVEL (MM) SPEED (RPM) (500-2500) (460-2480) (190-3000) (190-3000) (190-3000) (190-3000) (160-3000) (120-3480) -
Page 6: Safety
Safety Information BEFORE OPERATING THIS UNIT, YOU MUST PAY SPECIAL ATTENTION TO THE SAFETY NOTICES GIVEN BELOW. ELECTRICAL 1. Electrical repairs must only be carried out by a qualified or suitably trained person. 2. We strongly advise that access to the interior of the unit be restricted to trained personnel only and that operating the unit with the covers removed be avoided. - Page 7 Installation Your drilling machine is supplied as an easily assembled kit of major sub assemblies. Unpack the carton(s) carefully and check you have the following parts. Allowing for variations of models. Head assembly with motor (1) Table assembly (1) Column assembly with flange (1) Drill press foot casting (1) Feed handles and knobs (3+3) Column fixing Bolts (4)
- Page 8 Installation 1/2" (13mm) If the belt tension is not correct it is adjusted by loosening the belt tension locking screw and pushing the end of the slide bar until the tension is correct, then re-tighten the locking screw. MODELS WITHOUT RACK MODELS WITH RACK Table Support Screw Hex Hd M8X20...
-
Page 9: Operation
Operation OPERATION 1. Before changing the V belt position ensure that the machines ON/OFF switch is off by pushing the red button and switch off at the mains isolator or remove the plug from the mains socket. 2. Select speed required for drill bit size and material to be drilled by referring to the drill speed selection chart on the side of the drill head. -
Page 10: Adjustments
Adjustments Height Adjustment: To adjust up or down, loosen the clamp bolt then adjust the table to your desired position by turning the table bracket handle. Tilting Adjustment: (If applicable) Loosen the table bevel lock bolt with adjustable wrench. Tilt table to desired angle and retighten the bolt. Swing 360 degrees: Loosen clamp bolt then swing table to appropriate position and retighten clamp bolt. - Page 11 Adjustments Height Adjustment: To adjust up or down, loosen the clamp bolt then adjust the table to your desired position by turning the table bracket handle. Tilting Adjustment: (If applicable) Loosen the table bevel lock bolt with adjustable wrench. Tilt table to desired angle and retighten the bolt. Swing 360 degrees: Loosen clamp bolt then swing table to appropriate position and retighten clamp bolt.
-
Page 12: Maintenance
Maintenance Lubrication All of the BALL BEARINGS are packed with grease at the factory. They require no further lubrication. Periodically lubricate the table elevation mechanism, the SPLINES (grooves) in the spindle, and the RACK (teeth of the quill) Mantenance Frequently blow out any dust that may accumulate inside the motor. A coat of automotive type paste wax applied to the table and column will help to keep th surfaces clean. -
Page 13: Wiring Diagrams
Wiring Diagrams N.V.R SWITCH MOTOR LIGHT SWITCH WIRING DIAGRAM - MODELS WITH LIGHT MICRO SWITCH N.V.R SWITCH MOTOR WIRING DIAGRAM - MODELS WITHOUT LIGHT MICRO SWITCH... -
Page 14: 4 Collar
Parts List V-BELT Foam Washer Guard w/labels Motor Retaining Spring Motor Mount Ball Bearing x 2 Motor Support Pulley Insert Motor Adj. Knob Spindle Pulley Belt Tension Handle Spindle Pulley Nut Handle Knob Motor Pulley Handle Rod Screw Set Bolt Shaft Pinion Centre Pulley Ring Depth w scale... - Page 17 In the unlikely event that difficulties should be experienced with your new purchase, please refer to the enclosed instruction manual prior to contacting the SIP stockist from which the purchase was made. If the stockist is unable to rectify the problem encountered, they will contact us directly on your behalf.
Need help?
Do you have a question about the B13-5 and is the answer not in the manual?
Questions and answers