Table of Contents
Advertisement
Advertisement
Table of Contents

Related Manuals for Hertz HMR 10 D


Summary of Contents for Hertz HMR 10 D
- Page 1 HMR 10 D OWNER’S MANUAL Marine grade source units Rev. 0.1 hertzaudiovideo.com...
-
Page 2: Table Of Contents
INDEX 2. PRECAUTIONS ............................3 3. PACKAGING CONTENTS ........................4 4. DIMENSIONS ............................4 5. INSTALLATION ............................5 5.1 Installation Cautions .........................5 6. MOUNTING ............................6 7. CONNECTIONS ............................7 8. CONTROLS ............................8 8.1 Operational Panel ........................8 8.2 Name of Buttons and their Functions ..................8 9. OPERATIONS ............................9 9.1 Basic Operation .........................9 9.2 FM (RDS) Operation ........................10 9.3 DAB Operation .........................11... -
Page 3: Precautions
This unit uses precision parts and components for its operation. In the event of any operating issues, never open the case or disassemble the unit. Contact your Hertz dealer or service center. The Bluetooth word mark and logos are registered trademarks owned by the Bluetooth SIG, Inc. and any use of such marks by Elettromedia srl is under license. -
Page 4: Packaging Contents
PACKAGING CONTENTS HMR 10 D x2 Screws U-bracket x2 Nuts and washers USB extension cable 100 mm / 3,93 in. DIMENSIONS HMR 10 D USB RPT RDM LOUD EQ 106.50 89,5 24,5 mm HMR 10 D 4.45 3.52 2.83 0.96 in. -
Page 5: Installation
Owner’s Manual INSTALLATION Before Starting 1. This set is exclusively for use in vessels with a negative ground 12 V power supply. 2. Read these instructions carefully. 3. Make sure the battery “-” terminal is disconnected before starting. This is to prevent short circuits during installation. -
Page 6: Mounting
MOUNTING HMR 10 D... -
Page 7: Connections
Owner’s Manual CONNECTIONS HMR 10 D BLACK RADIO ANTENNA WHITE Aux In Rch Red Lch White BROWN Front Out Rch Red Lch White BLACK Rear Out Rch Red Lch White FUSE (10A) BLACK BLACK Wired Remote Control INPUT 12 PIN HARNESS... -
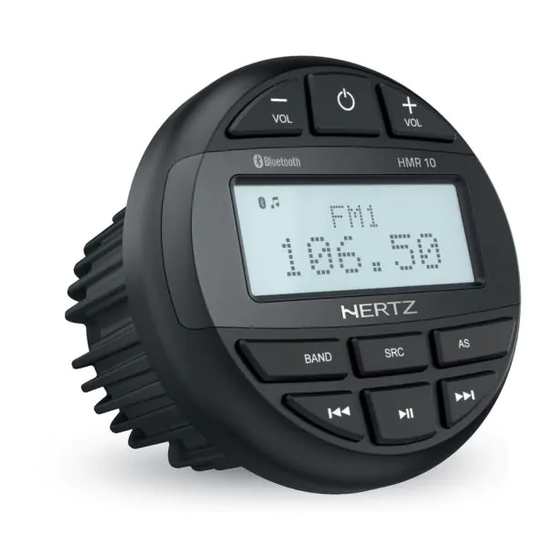
Page 8: Controls
CONTROLS Operational Panel USB RPT RDM LOUD EQ 106.50 Name of Buttons and their Functions Button - Mute ON / OFF (short press) - Power On (short press) - Power OFF (long press) VOL +/- Button - Adjust volume level Button - FM mode: entering manual tuning (short press) the display shows “MANUAL”. -
Page 9: Operations
Press VOL + or VOL - to select beep on/off. 6 EQ (Preset Equalizer Setting): Press VOL + or VOL - to change EQ: Hertz EQ -> Classic -> Pop. 7 LOUD: Press VOL + or VOL - to select ON/OFF. -
Page 10: Fm (Rds) Operation
FM (RDS) operation Select FM as Playing Source. Press SRC to select the FM mode. FM Settings menu - Long press ENT to enter the FM settings menu. - Short pressing the SEEK – or SEEK + you can select the desired function. - List of available functions: •... -
Page 11: Dab Operation
Owner’s Manual DAB operation Select DAB as Playing Source. Press SRC to select the DAB mode. DAB Settings menu - Long press ENT to enter the DAB settings menu. - Short pressing the SEEK – or SEEK + you can select the desired function. - List of available functions: •... -
Page 12: Usb Mode Operation
USB Mode Operation Connect 1. Insert a USB device into the USB pigtail. 2. To remove the USB device, you should select another source or turn off the power, in order to avoid damaging the USB device. Then take off the USB device. USB RPT RDM LOUD EQ 106.50 Select a Track... -
Page 13: Aux In Mode Operation
Pair the Bluetooth Device 1. From your Bluetooth enabled device, turn Bluetooth ON and search for Bluetooth device. 2. When a list of available Bluetooth devices appears on your Bluetooth device select HMR 10 D. 3. “CONN. OK” will appear on the display. -
Page 14: Troubleshooting
TROUBLESHOOTING 10.1 General Problem Cause Remedy Unit fuse blown. Replace with new fuse of correct value. Unit cannot power on. Vessel battery fuse blown. Replace with new fuse of correct value. Incorrect audio output connection. Check wiring and correct. Volume set too low. Increase volume level. -
Page 15: Technical Specifications
Owner’s Manual TECHNICAL SPECIFICATIONS FM TUNER Europe 87.5 - 108.0 MHz Frequency Range Asia 87.5 - 108.0 MHz Australia 87.5 - 108.0 MHz AUDIO Maximum Power Output 50 W x 4 (@ 4 Ohm) Max Output Level @ 0.1 % THD 4 x 4 V RMS (Front - Rear) 2.0 Full Speed USB Port... - Page 16 PART OF ELETTROMEDIA Strada Regina Km 3,500 - Marignano 62018 Potenza Picena (MC) Italy T +39 0733 870 870 - F +39 0733 870 880 www.elettromedia.it...
Need help?
Do you have a question about the HMR 10 D and is the answer not in the manual?
Questions and answers