Table of Contents
Advertisement
Advertisement
Table of Contents
Troubleshooting

Subscribe to Our Youtube Channel
Related Manuals for Hertz Marine PowerSports HMR-3


Summary of Contents for Hertz Marine PowerSports HMR-3
- Page 1 12.1V SOURCE HMR-3 R E A D Y OWNER’S MANUAL SiriusXM and all related marks and logos are trademarks of Sirius XM Marine Grade Audio Radio Inc. All rights reserved. Entertainment System Rev. 0.1 www.hertzaudiovideo.com marine_Owners manual HMR3.indd 1 04/04/18 15:55...
- Page 2 marine_Owners manual HMR3.indd 2 04/04/18 15:55...
-
Page 3: Table Of Contents
Owner’s Manual Index 1. Installation 1.1 Safety First ......................6 1.2 Mounting......................... 7 1.3 Wiring Diagram ...................... 8 2. General Operation 2.1 Key Functions .......................10 2.2 Main Menu ......................11 2.3 General Settings ....................11 2.3.1 Backlight ......................12 2.3.2 EQ .........................12 2.3.3 Beep ......................13 2.3.4 Led Color ......................13 2.3.5 Zone Level ....................13 2.3.6 Zone Audio ....................14... - Page 4 3.3.3 Radio Region ....................20 3.3.4 Localized Tuning..................20 3.3.5 FM Band .......................20 3.3.6 Auto Store ....................20 3.3.7 Stereo ......................21 4. Bluetooth Connectivity 4.1 Bluetooth mode Interface ...................22 4.2 Pairing your Device ....................23 4.3 Playback Control ....................23 5. iOS Device Playback via USB 5.1 iOS Device Interface .....................24 5.2 iOS Device Browser ....................25 6.
- Page 5 Owner’s Manual 9. General Operation Troubleshooting ................30 10. SiriusXM® Satellite Radio 10.1 SiriusXM Activation Process ................31 10.1.1 Activating Your SiriusXM Satellite Radio Subscription ....31 10.1.2 Identifying the SiriusXM Radio ID Number ........32 10.2 SiriusXM Satellite Radio Interface ..............32 10.2.1 SiriusXM Brands & Channel Numbeer ..........32 10.2.2 Channel Name ..................32 10.2.3 Channel Category .................32 10.2.4 Artist Name ..................32...
-
Page 6: Installation
INSTALLATION SAFETY FIRST Before beginning installation, follow these simple rules: 1. Be sure to carefully read and understand the instructions before starting installation of your HMR-3. 2. For best safety practices, disconnect the battery negative (-) terminal to prevent unintentional damage to your HMR-3, electrical fire, and/or possible injury. -
Page 7: Mounting
Owner’s Manual MOUNTING Find a flat 5”x5” square surface with a minimum of 6” unobstructed clearance behind it for the chassis and all it’s necessary wiring. 1. Once you have determined a mounting location, cut a 3” diameter hole (77mm). For best results, use a 3”... -
Page 8: Wiring Diagram
WIRING DIAGRAM FUSE No. Wire color Description Green LR Speaker(+) Green/Balck LR Speaker(-) ACC (12V) White LF Speaker(+) White/Black LF Speaker(-) Gray RF Speaker(+) Gray/Black RF Speaker(-) Power AMP Blue Remote Violet RR Speaker(+) Violet/Black RR Speaker(-) Black Ground marine_Owners manual HMR3.indd 8 04/04/18 15:55... - Page 9 Owner’s Manual BLACK RADIO ANTENNA GREEN Zone 1 Front RCA Out Rch Red Lch White GREEN Sub Green BLACK Aux IN RCA Rch Red Lch White BROWN Zone 2 RCA Out Rch Red Lch White GRAY Zone 3 RCA Out Rch Red Lch White BLACK...
-
Page 10: General Operation
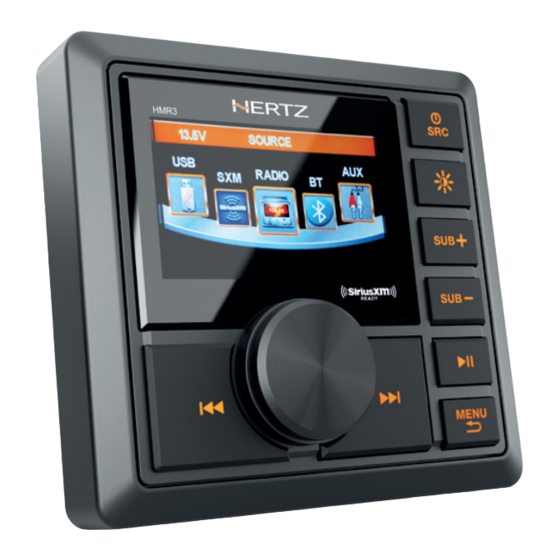
GENERAL OPERATION KEY FUNCTIONS Key functions will vary with each source/mode; see each source/mode sections below. However, to get started, here are the basics: - Press the SRC source key to return to the source menu. - Press & hold to turn on or off HMR-3. - Press the ILLUMINATION key to change the key color. -
Page 11: Main Menu
Owner’s Manual MAIN MENU Press the SRC key at any time to access the source main menu. 1. Turn the MFD clockwise or counterclockwise 12.1V SOURCE to alternate between the available sources; SXM, RADIO, BLUETOOTH, AUX, & USB. 2. When the desired source/mode is centered, press the MFD to activate. -
Page 12: Backlight
11.9V GENERAL SETTINGS BLACKLIGHT HIGHT 2.3.1 BACKLIGHT CUSTOM BEEP Select BACKLIGHT to adjust the LCD displays backlight brightness to HIGH or LOW. 1. Turn the MFD to highlight HIGH or LOW LED COLOR BLUE 2. Press the MFD to confirm & set the LCD backlight ZONE LEVEL >... -
Page 13: Beep
11.9V GENERAL SETTINGS 12.1V RADIO Owner’s Manual BLACKLIGHT HIGHT 87.50 CUSTOM BEEP 2.3.3 BEEP LED COLOR BLUE Select BEEP to turn off the audible haptic feedback tone. An audible tone will confirm any key ZONE LEVEL > press or MFD turn. 1. -
Page 14: Zone Audio
12.1V ZONE SELECT ZONE 1 ZONE 2 ZONE 3 2.3.6 ZONE AUDIO Select ZONE AUDIO to adjust the standard staging and equalizer settings for each zone. As a shortcut to access the ZONE AUDIO menu, press and hold the PLAY/PAUSE key on the front panel for 3 seconds. - Page 15 Owner’s Manual TREBLE - Select TREBLE to adjust the level of high octave frequencies for Zone 1. 1. Turn the MFD to increase/boost or decrease/cut the level of higher octave frequencies. The meter at right will change simultaneously with the MFD, giving a visual representation of the higher octave frequency levels.
- Page 16 SUBWOOFER LOW-PASS FILTER - Select SUBW LPF to change the subwoofer pre-amp output low-pass crossover frequency. 1. Turn the MFD to choose the frequency for the subwoofer low-pass crossover; 90Hz, 120Hz, 180Hz. 2. Press the MFD to confirm the subwoofer low-pass crossover setting and return to the list of EQ settings.
-
Page 17: Version
Owner’s Manual NOTE: When exiting a zone’s EQ setting by pressing the MENU/RETURN key, the volume control will remain with that zone. To avoid this confusion, select Zone1 prior to exiting the EQ menus. 2.3.7 VERSION Select VERSION by pressing the MFD to view software version information. 2.3.8 FACTORY RESET Select FACTORY RESET to reset all settings, presets, etc. -
Page 18: Radio Tuner
RADIO TUNER RADIO TUNER INTERFACE 1. FREQUENCY BAND & PRESET GROUP 12.1V RADIO 12.4V HMR-3’s digital radio tuner is capable of tuning local broadcast radio stations on 87.50 FM & AM bands, as well as the National 90.10 87.50 Oceanic and Atmospheric Administration’s 98.10 (NOAA) weather report bands. -
Page 19: Tuning A Preset Station
Owner’s Manual 3.2.2 TUNE A PRESET STATION 1. Press and hold the MFD until the top preset box is outlined in a white box 2. Turn the MFD to highlight the desired preset 3. Press the MFD to tune the preset For more information about saving &... -
Page 20: Radio Region
3.3.3 RADIO REGION Select RADIO REGION to change the frequency range & stepping values of the FM and AM frequency bands to your region. Default frequency range & stepping is for USA. 1. Turn the MFD to scroll the list of available region frequency stepping. 2. -
Page 21: Stereo
Owner’s Manual 3.3.7 STEREO Radio stations transmit their signal in stereo, (L&R). If a radio station reception is weak due to the distance from the stations transmitter, the radio tuner may receive only one channel of the original stereo signal, or a mixed mono signal. In mono mode, the tuner tunes only the stronger channel of the stereo signal. -
Page 22: Bluetooth Connectivity
GENERAL SETTINGS 12.1V RADIO 87.50 LIGHT HIGHT 90.10 87.50 CUSTOM 98.10 106.10 BLUETOOTH CONNECIVITY 107.90 BLUE 87.50 EVEL > Bluetooth connectivity allows wireless audio streaming and playback control of enabled mobile devices. Simply pair your mobile phone, tablet or other device for hands free operation. BLUETOOTH MODE INTERFACE 12.1V BLUETOOTH... -
Page 23: Pairing Your Device
1. While in the Bluetooth mode primary interface, enable Bluetooth pairing from your mobile device. 2. Momentarily, a Bluetooth device named “HERTZ” will appear as a pairable device 3. Select “HERTZ” to complete the pairing process. 4. Launch your favorite music player or streaming internet radio app and enjoy. -
Page 24: Ios Device Playback Via Usb
12.1V BLUETOOTH EQ SETTINGS Don’t hold T... CLASSIC > Justin Timbe... The 20/20 ... iOS DEVICE PLAYBACK via USB 03/12 The iOS device interface provides browsing, playback and track control of media stored on 00:03 select iOS devices. An intuitive browser makes searching for favorite songs easy. All audio 60 400 1k 2.5k 4k 10k 16k media is sorted &... -
Page 25: Ios Device Browser
12.1V Let The Gr... Justin Timb... The 20/20 ... Owner’s Manual 08/12 02:34 iOS DEVICE BROWSER To access the iOS device browser, press the MENU key to view the list of categories. 1. Turn the MFD, scrolling to highlight the USB SETTINGS desired category: PLAYLISTS;... -
Page 26: Usb Media Playback
12.1V BLUETOOTH EQ SETTINGS Don’t hold T... CLASSIC > Justin Timbe... The 20/20 ... USB MEDIA PLAYBACK 03/12 USB mode allows playback of multi-media files from a USB flash drive. USB mode offers a 00:03 media browser to scroll and select audio media files saved on your USB device. Compatible 60 400 1k 2.5k 4k 10k 16k playback files include .MP3 &... -
Page 27: Media Browser
Owner’s Manual MEDIA BROWSER To access the USB device browser, view, and select audio tracks for playback, press the MENU key to view USB SETTINGS. BROWSE 1. Turn the MFD to highlight BROWSER, then press the MFD to select. 001 D:/ 2. -
Page 28: Shuffle Tracks
SHUFFLE TRACKS Shuffle will playback tracks within the current tracks folder or root file list at random. To activate the SHUFFLE function, press the MENU key to view USB SETTINGS. 1. Turn the MFD to highlight SHUFFLE, then press the MFD to select 2. -
Page 29: Aux Audio Input
SiriusXM Hits 1 Another way to control the unit instead of using the front panel or remote control, you can use your phone. You will need to install the “HERTZ” app Kelly Clarkson onto your mobile device. The app will need to be downloaded from Google Love So Soft Play (Android phone) or App Store (iPhone). -
Page 30: General Operation Troubleshooting
GENERAL OPERATION TROUBLESHOOTING Before going through the checklist, check wiring connection. If any of the problems persist after checklist has been made, consult your nearest service dealer. Symptom Cause Solution If the power supply is connected to the The ignition switch is not on. accessory circuits, but the engine is not No power moving, switch the ignition key to “ACC”. -
Page 31: Siriusxm® Satellite Radio
Owner’s Manual SiriusXM® SATELLITE RADIO Only SiriusXM Satellite Radio brings you more of what you love to listen to, all in one place. ® Get over 140 channels, including commercial-free music plus the best sports, news, talk, comedy and entertainment. Welcome to the world of satellite radio. A SiriusXM Connect Tuner and Subscription are required. -
Page 32: Identifying The Siriusxm Radio Id Number
12.1V RADIO 12.4V 87.50 90.10 87.50 98.10 106.10 107.90 10.1.2 IDENTIFYING THE SIRIUSXM RADIO ID NUMBER 87.50 The SiriusXM Radio ID is required for activation and can be found by tuning to Channel 0 as well as by looking on the label found on the SiriusXM Connect Vehicle Tuner and its packaging. Note: The Radio ID does not include the letters I, O, S or F. -
Page 33: Siriusxm Key Function
Owner’s Manual 10.3 SIRIUSXM KEY FUNCTION ® - Press the SRC source key to return to the source menu. - Press & hold to turn on or off HMR-3. - Press the ILLUMINATION key to change the key color. - Press & hold to change the LCD brightness. - Press SUB+ or - to increase or decrease the sub volume. -
Page 34: Direct Tuning
10.3.1 DIRECT TUNING Selecting a channel using the Direct Tuning feature 1. From the primary SXM Interface, press and hold the MFD. 2. Enter the 3-digit Channel Number in the pop-up window by turning the MFD to scroll to the first digit 3. -
Page 35: Selecting Preset
Owner’s Manual 10.4.2 SELECTING PRESETS To select a preset on the active SXM band, 1. Press the MENU key to access SXM Settings. 2. Turn the MFD scrolling to & highlighting PRESETS 3. Press the MFD to access the preset list 4. -
Page 36: Manage Lock Code
How to Lock (restrict) or Unlock (unrestricted) the Parental Control Mature Channels. The default Lock Code is 5220. 1. Enter the 4-digit default Lock Code in the pop-up window by turning the MFD to scroll to the first digit 2. Press the MFD to confirm the first digit, and proceed to the second digit 3. -
Page 37: Sxm Factory Default
Owner’s Manual 10.4.6 SXM FACTORY DEFAULT Select SXM FACTORY DEFAULT to reset all SiriusXM Satellite Radio setting to default. Defaulted settings include Presets, Parental Lockout Code, Locked Channels, etc. 1. Press the MENU key to access SXM SETTINGS 2. Turn the MFD, scrolling to and highlight SXM FACTORY DEFAULT 3. -
Page 38: Siriusxm® Satellite Radio Troubleshooting
10.5 SIRIUSXM SATELLITE RADIO TROUBLESHOOTING ® Symptom Cause Solution Verify the antenna cable is connected to the SiriusXM Connect Vehicle Tuner. The radio has detected a fault SiriusXM advisory Inspect the antenna cable for damage with the SiriusXM antenna. The message: and kinks. - Page 39 Owner’s Manual Symptom Cause Solution The channel that you have requested is not a valid SiriusXM In the U.S.A., visit www.siriusxm.com or channel or the channel that you SiriusXM advisory call 1-866-635-2349 If you have were listening to is no longer message: questions about your subscription.
-
Page 40: Specifications
SPECIFICATIONS GENERAL Power Supply Requirements 10.5-16V DC, Negative Ground Chassis Dimensions 123 (W) x 134 (D) x 116 (H) Maximum Output Power 4 x 40 W @ 4 Ohms (Z1 only) Fuse Rating 15 A Audio Preamp Output Stereo Pair RCA each zone Subwoofer Preamp Output Stereo Pair RCA Preamp Output Voltage...
Need help?
Do you have a question about the Marine PowerSports HMR-3 and is the answer not in the manual?
Questions and answers
Barletta tritoon front speakers and subwoofer work but rear speakers do not work radio is set to center and all wires are in correct spots but still no sound to rear speakers
The issue with the rear speakers not working could be due to one or more of the following reasons:
1. Wiring not properly connected – Check the connections for the rear right speaker (Violet and Violet/Black wires) and rear left speaker (Green and Green/Black wires) to ensure they are secure and correctly connected.
2. Balance/Fader settings – Adjust the FADER setting to ensure audio is balanced between front and rear channels. If the fader is set fully to the front, the rear speakers will not output sound.
3. Blown fuse – A blown fuse could affect the audio output. Inspect and replace the fuse if necessary.
4. Volume set to minimum – Ensure the volume level is adequate and not set too low for the rear channels.
5. Damaged speakers or wiring – Inspect the rear speakers and their wiring for any physical damage or loose connections.
Check these areas systematically to identify and resolve the issue.
This answer is automatically generated