
Related Manuals for Eclipse PRA6 Series


Summary of Contents for Eclipse PRA6 Series
- Page 1 Instruction Manual 904 7/24/06 Eclipse Programmable Rotary Actuator Series PRA6 Version 1...
- Page 2 Eclipse will not be liable for any other injury, loss, damage or expenses, whether direct or consequential, including but not limited to loss...
-
Page 3: About This Manual
Eclipse, Inc. • If you do not understand any part of the infor- mation in this manual, do not continue. Con- tact your Eclipse sales office or Eclipse, Inc. Eclipse Rotary Actuator Instruction Manual 904- 7/24/06... -
Page 4: Document Conventions
Caution: Indicates hazards or unsafe practices which could result in damage to the machine or minor per- sonal injury. Act carefully. Note: Indicates an important part of the text. Read the text thoroughly. Eclipse Rotary Actuator Instruction Manual 904-7/24/06... -
Page 5: Table Of Contents
Actuator Mounting ..........Mount Actuator to Butterfly Valve ....Actuator Wiring ........... Power supply ............. Auxiliary contacts ..........Low fire wiring ..........High fire wiring ..........Control signal wiring ........Disable settings wiring ........Eclipse Rotary Actuator Instruction Manual 904- 7/24/06... - Page 6 Keypad orientations ..........Maintenance & Troubleshooting 33 Introduction ............Maintenance ............Monthly Checklist ..........Yearly Checklist ..........Troubleshooting ............ Appendix ............Table 1: Actuator Parameter Record ..... Table 2: Model Number Configuration ..Eclipse Rotary Actuator Instruction Manual 904- 7/24/06...
-
Page 7: Introduction
Introduction The Eclipse Programmable Rotary Actuator is a roDuCt keypad-programmable, direct-coupled modulating DesCription motor for use in burner and valve control systems. It is typically used with an electronic control to regu- late a process temperature. The drive shaft of the... -
Page 8: Installation
2. After you have made sure that everything is present and in good condition, keep the actua- tor in the original package as long as possible. 3. Store the actuator in a cool, clean, dry room. Eclipse Rotary Actuator Instruction Manual 904- 7/24/06... -
Page 9: Approval Of Components
Check the following items: • voltage, frequency and stability of the electrical power • humidity, altitude and temperature of air • presence of damaging corrosive gases in the air. Eclipse Rotary Actuator Instruction Manual 904- 7/24/06... -
Page 10: A Note On Safety
PRA6 Controlling Flame Safeguard Air Butterfly Valve Blower Caution: Use of this product in the European community shall only be deployed in a manner that meets the applicable EC directives and laws. Eclipse Rotary Actuator Instruction Manual 904- 7/24/06... -
Page 11: Actuator Mounting
Figure 1. The holes are threaded and use M6 metric screws. • Mounting this actuator depends on the applica- tion; See Data 904 and contact Eclipse, Inc. for available mounting kits. • When mounting the actuator, be certain that the actuator’s drive shaft is properly aligned with the... -
Page 12: Mount Actuator To Butterfly Valve
90 degrees or 75 degrees (see Table 2 of the Appendix). These settings can be changed through the keypad. Compare the BV requirements to the PRA. Eclipse Rotary Actuator Instruction Manual 904-7/24/06... - Page 13 When the shaft is rotated Shaft Slot is in to align the slot to the pipe direction, the valve is line with at maximum flow. Eclipse BVs with the beveled the shutter Bolt is shutter option have a 75-degree stroke. The perpendicular...
- Page 14 4. Loosely attach the mounting bracket to the BV. The Eclipse mounting kits include M8 bolts, flat washers, and lock washers for this purpose. Do not tighten at this time to allow alignment in the next steps.
-
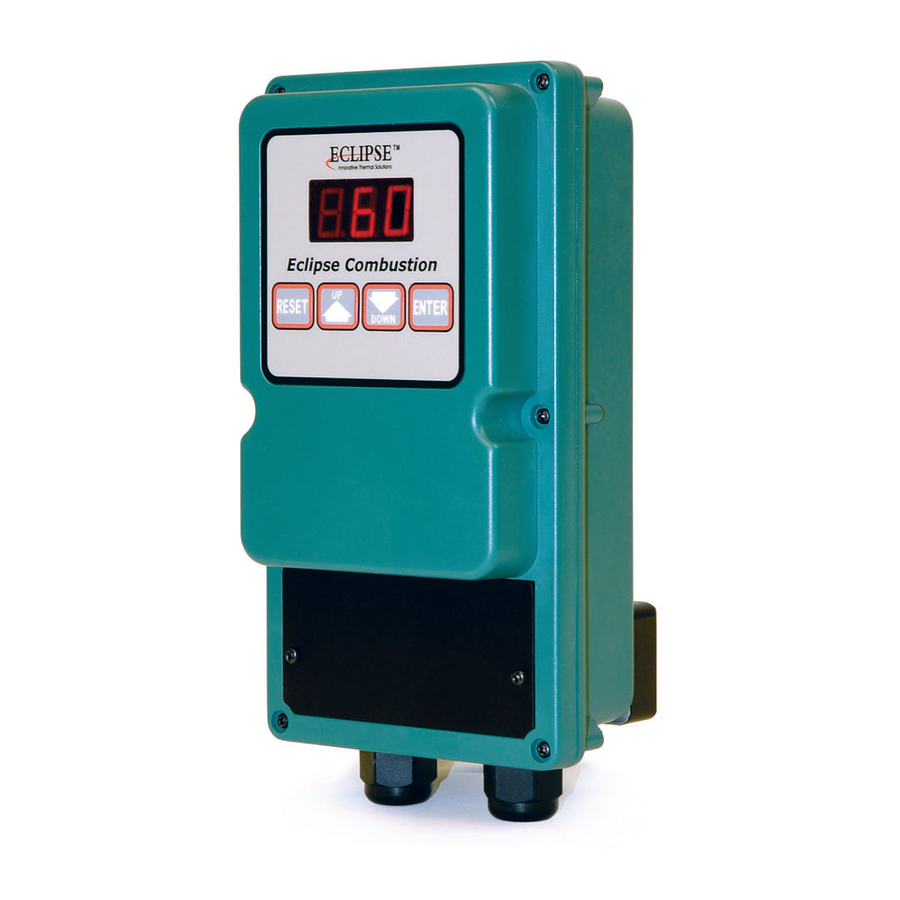
Page 15: Actuator Wiring
Remove the front coverplate to access the terminal strips, as shown in Figure 2. Warning: Risk of electric shock. Removal of the cover plate allows access to conductors carrying hazardous voltages. Eclipse Rotary Actuator Instruction Manual 904- 7/24/06... -
Page 16: Power Supply
P2-4. Low Fire Wiring A switch or voltage-free contact can be wired between P1-5 (Low Fire) and P1-1 (COM) to move the actuator to the low fire position. Eclipse Rotary Actuator Instruction Manual 904- 7/24/06... -
Page 17: High Fire Wiring
Disable Settings Section 3, connect P1-6 (LC) to P1-1 (COM) to Wiring prevent inadvertent parameter changes through the keypad. With this jumper installed, pressing the ENTER key will display "LC" and not allow parameter changes. Eclipse Rotary Actuator Instruction Manual 904-7/24/06... - Page 18 22 to 16 AWG (.5 to 1.5mm ), and c) be in accordance with all applicable codes. 3. Insert only one wire per terminal. 4. Provide power supply circuit protection. 5. P2-G and P1-G are internally connected Eclipse Rotary Actuator Instruction Manual 904- 7/24/06...
- Page 19 P2-G P2-1 P2-2 P2-3 shaft at high position P2-4 Coil P2-5 shaft at low position P2-6 Coil These components relate to burner sequence (not shown); See “Control Signal Loss (LO)” on page 22. Eclipse Rotary Actuator Instruction Manual 904- 7/24/06...
- Page 20 Refer to Section 3, “Parameter Selections,” for any adjustments. 4. Record the parameter settings for future reference in Table 1, Actuator Parameter Con- figuration Record, on page 35. Eclipse Rotary Actuator Instruction Manual 904- 7/24/06...
-
Page 21: Parameter Selection
5. Press either the UP or DOWN key until your desired number (the desired degree of shaft rota- tion) appears on the display. 6. Press the RESET key to complete the sequence. Eclipse Rotary Actuator Instruction Manual 904- 7/24/06... -
Page 22: High Fire Stop (Hf)
5. Press either the UP or DOWN key until your desired number (the desired degree of shaft rota- tion) appears on the display. 6. Press the RESET key to complete the sequence. Eclipse Rotary Actuator Instruction Manual 904-7/24/06... -
Page 23: Low Fire Contact Release (Ll)
2. Press either the UP or DOWN key until the number “16” appears on the display. 3. Press the RESET key; the message “PG” will ap- pear on the display. (Continued on page 25) Eclipse Rotary Actuator Instruction Manual 904- 7/24/06... - Page 24 For the settings of note 2, the high contact is closed when the shaft is between 75 and 85 degrees. HS=75 HH=85 Contact Closed Contact Open Linear Diagram Actuator Shaft’s Degree of Rotation CLOSED OPEN Eclipse Rotary Actuator Instruction Manual 904-7/24/06...
-
Page 25: High Fire Contact Sense (Hs)
(the desired degree of shaft rotation) appears on the display; this number must be of lesser value than the desired high fire contact release (HH) number. 6. Press the RESET key to complete the sequence. Eclipse Rotary Actuator Instruction Manual 904- 7/24/06... -
Page 26: High Fire Contact Release (Hh)
1. Press the ENTER key; the message “SC” will appear on the display. 2. Press either the UP or DOWN key until the num- ber “05” appears on the display. 3. Press the RESET key to complete the sequence. Eclipse Rotary Actuator Instruction Manual 904- 7/24/06... -
Page 27: Signal Input Select
3. Press the RESET key to complete the sequence. Note: The next two parameters describe shaft rotation when facing the keypad. Warning: Disconnect shaft coupling before changing. The shaft will reposition as such that 0 becomes 90 degrees. Eclipse Rotary Actuator Instruction Manual 904-7/24/06... -
Page 28: Clockwise Rotation Select
(C5) or automatic (C6): j. aux. contact mode N.O. (C8) or N.C. (C7); k. rotation CW (CO) or CCW (C1) The display will show each function's setpoint for two seconds before scrolling to the next one. Eclipse Rotary Actuator Instruction Manual 904- 7/24/06... -
Page 29: Default Setpoints
In some cases it may be necessary to dis- connect the mechanical coupling to the valve. Eclipse Rotary Actuator Instruction Manual 904- 7/24/06... -
Page 30: Specifications
Flexible cord connector: 5.8 to 10 mm ( 0.231to 0.394 in.) OD cable 3/8 in. liquid tight conduit 1/2 in. Female NPT adapter Terminal Connections 0.5 - 1.5 mm (22 - 16 AWG) 1.1 kg (2.5 lb.) Shipping Weight Eclipse Rotary Actuator Instruction Manual 904- 7/24/06... -
Page 31: Dimensions
112mm (4.41") (2.91) 206mm 164mm (8.11") (6.46”) Front View Side View 19mm 17.47mm (0.75") (0.69”) 56mm (2.20”) 6.35mm 35mm (0.25”) (1.38”) Diameter Shaft 146mm (5.75”) Threaded Mounting Hole 12mm Deep 25mm (0.98”) Back View Eclipse Rotary Actuator Instruction Manual 904-7/24/06... -
Page 32: Keypad Orientations
Holes (2) 36.53mm 19mm (0.75") each (1.44”) 27mm 6.35mm (1.06") (0.25”) 10mm (0.39”) 11mm (0.43") 26.5mm (1.045”) (0.12”) Dia. Bottom End View Keypad Orientation Upright (Standard) Inverted RH- 90 degrees LH- 270 degrees Eclipse Rotary Actuator Instruction Manual 904- 7/24/06... -
Page 33: Maintenance & Troubleshooting
2. Inspect the coupling for loose connections. 3. Confirm the parameters settings are identical to those originally selected. 4. Drive the actuator to its full clockwise and counterclockwise positions and observe the shaft while moving for smooth operation. Eclipse Rotary Actuator Instruction Manual 904- 7/24/06... -
Page 34: Troubleshooting
(P1-4 to P1-1). • Stalled motor; “ o o” message Correct the mechanical on display. problem; see “Stalled Motor” on page 29. Displays "LC" • Setting mode disabled. See "Disable Settings Wiring" on page 17. Eclipse Rotary Actuator Instruction Manual 904- 7/24/06... -
Page 35: Appendix
D - 75 stroke 1- Standard ..A- PG11 liquidtite flexible cord connector 2- Inverted ..180 B- 3/8" straight liquidtite conduit connecto r 3- RH ....C- 1/2" Female NPT adapter 4- LH ....Eclipse Rotary Actuator Instruction Manual 904- 7/24/06... - Page 36 Litho in U.S.A. 904 Instruction Manual 7/24/06...
Need help?
Do you have a question about the PRA6 Series and is the answer not in the manual?
Questions and answers