
Summary of Contents for Rad Power Bikes Front Rack
- Page 1 FRONT RACK OWNER’S MANUAL 2018 WWW.RADPOWERBIKES.COM We are here to help! Please contact us at INFO@RADPOWERBIKES.COM or 1-800-939-0310 if you have questions. REV030818...
-
Page 2: Welcome
This manual contains details of the product, its equipment, and information on its operation and maintenance. Read it carefully and familiarize yourself with the Front Rack before using it in order to ensure a safe use and prevent tragic accidents. Be sure to retain this manual as your convenient Front Rack information source. -
Page 3: Table Of Contents
Table of Contents Welcome ......................................2 Using This Manual ..................................... 2 Assembly Instructions for The RadRover ............................4 Assembly Instructions for The RadCity ............................11 Assembly Instructions for The RadMini ............................18 Assembly Instructions for The RadWagon ............................25 Carrying Loads ....................................31 Link to Assembly Video and Online Resources .......................... -
Page 4: Assembly Instructions For The Radrover
NOTICE: The following assembly steps are only a general guide to assist in the assembly of your Front Rack and is not a complete or comprehensive manual of all aspects of assembly, maintenance and repair. We recommend you consult a bicycle repair specialist to assist in the assembly, repair and maintenance of your bicycle and all accessories. - Page 5 Step 2: If your brake cable is routed in front of the fork brace then it will need to be moved to the back of the fork. Remove the clip holding the brake cable to the front of the fork and remove the caliper from the fork. Pass the caliper around the fork lowers and remount the caliper loosely so it has some play.
- Page 6 Squeeze the brake lever to center the caliper, while holding the brake lever down, evenly tighten each mounting bolt a ¼ of a turn at a time. Torque these bolts to 10Nm Mount the brake housing to the rear of the fork. W W W .
- Page 7 It is critical that the cables do not rub or interfere with the front wheel or the safe turning of your Rad Power Bikes. Make sure that it is not possible for the cables to be snagged on any part of the bike while turning.
- Page 8 Plug in the headlight to the included headlight extension cable and zip tie the headlight extension cable on the right side of the front rack when the rack is upside down as shown. Cut the ends of the zip ties off.
- Page 9 Remove all four (4) screws from the head tube as shown. Apply lubricant to threads of screws as needed if it is difficult to remove the screws. The screws have Loctite on the threads and locking washers to ensure the front rack is secure when installed, so be careful to remove the screws slowly and carefully to avoid stripping the heads of the screws.
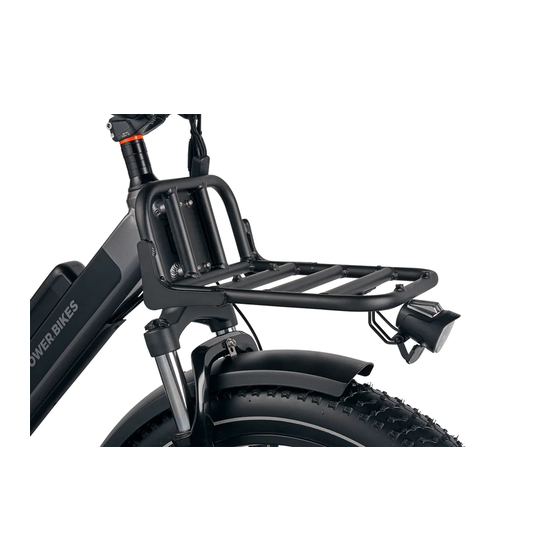
- Page 10 Place the front rack onto the mounts on the head tube. Ensure none of the wires get pinched. Tighten these screws to 5-8Nm and plug in the headlight extension cable to the main wiring harness. Ensure the front wheel has a free range of motion when turning left and right.
-
Page 11: Assembly Instructions For The Radcity
NOTICE: The following assembly steps are only a general guide to assist in the assembly of your Front Rack and is not a complete or comprehensive manual of all aspects of assembly, maintenance and repair. We recommend you consult a bicycle repair specialist to assist in the assembly, repair and maintenance of your bicycle and all accessories. - Page 12 Using the bracket included with the front rack, mount the headlight to the front rack as shown. W W W . R A D P O W E R B I K E S . C O M...
- Page 13 Plug in the headlight to the included headlight extension cable and zip tie the headlight extension cable on the right side of the front rack when the rack is upside down as shown. Cut the ends of the zip ties off.
- Page 14 Remove all four (4) screws from the head tube as shown. Apply lubricant to threads of screws as needed if it is difficult to remove the screws. The screws have Loctite on the threads and locking washers to ensure the front rack is secure when installed, so be careful to remove the screws slowly and carefully to avoid stripping the heads of the screws.
- Page 15 Split the wires and cables as shown to make room for installing the front rack. The only wires on the brake side (left side) of the bike should be the front and rear brake cables. It may be necessary to cut one of the zip ties holding the wire and cable together to allow for adequate slack for installing the front rack.
- Page 16 Place the front rack onto the mounts on the head tube. Ensure none of the wires get pinched. Tighten these screws to 5-8Nm and plug in the headlight extension cable to the main wiring harness. W W W . R A D P O W E R B I K E S . C O M...
- Page 17 Ensure the front wheel has a free range of motion when turning left and right. It is critical that the cables do not rub or interfere with the front rack. Make sure that it is not possible for the cables to be snagged on any part of the bike while turning.
-
Page 18: Assembly Instructions For The Radmini
NOTICE: The following assembly steps are only a general guide to assist in the assembly of your Front Rack and is not a complete or comprehensive manual of all aspects of assembly, maintenance and repair. We recommend you consult a bicycle repair specialist to assist in the assembly, repair and maintenance of your bicycle and all accessories. - Page 19 Plug in the headlight to the included headlight extension cable and zip tie the headlight extension cable on the right side of the front rack when the rack is upside down as shown. Cut the ends of the zip ties off.
- Page 20 Remove all four (4) screws from the head tube as shown. Apply lubricant to threads of screws as needed if it is difficult to remove the screws. The screws have Loctite on the threads and locking washers to ensure the front rack is secure when installed, so be careful to remove the screws slowly and carefully to avoid stripping the heads of the screws.
- Page 21 It is very important to split the wires as shown below. The only wires on the brake side (left side) of the bike should be the front and rear brake cables. W W W . R A D P O W E R B I K E S . C O M...
- Page 22 Place the front rack onto the mounts on the head tube. Ensure none of the wires get pinched. Tighten these screws to 5-8Nm and plug in the headlight extension cable to the main wiring harness W W W . R A D P O W E R B I K E S . C O M...
- Page 23 If the cable comes unattached to the fork crown as shown in the photo above, the front cable may catch of snag on the front rack, causing damage to your Rad Power Bike and serious injury.
- Page 24 Ensure the front wheel has a free range of motion when turning left and right. It is critical that the cables do not rub or interfere with the front rack. Make sure that it is not possible for the cables to be snagged on any part of the bike while turning.
-
Page 25: Assembly Instructions For The Radwagon
NOTICE: The following assembly steps are only a general guide to assist in the assembly of your Front Rack and is not a complete or comprehensive manual of all aspects of assembly, maintenance and repair. We recommend you consult a bicycle repair specialist to assist in the assembly, repair and maintenance of your bicycle and all accessories. - Page 26 Plug in the headlight to the included headlight extension cable and zip tie the headlight extension cable on the right side of the front rack when the rack is upside down as shown. Cut the ends of the zip ties off.
- Page 27 Remove all four (4) screws from the head tube as shown. Apply lubricant to threads of screws as needed if it is difficult to remove the screws. The screws have Loctite on the threads and locking washers to ensure the front rack is secure when installed, so be careful to remove the screws slowly and carefully to avoid stripping the heads of the screws.
- Page 28 It is very important to split the wires as shown below. The only wires on the brake side (left side) of the bike should be the front and rear brake cables. W W W . R A D P O W E R B I K E S . C O M...
- Page 29 Place the front rack onto the mounts on the head tube. Ensure none of the wires get pinched. Tighten these screws to 5-8Nm and plug in the headlight extension cable to the main wiring harness. W W W . R A D P O W E R B I K E S . C O M...
- Page 30 Do not load more than 10 kg on the front rack and ensure load is spread out otherwise damage can occur. It is critical that the cables do not rub or interfere with the front wheel or the safe turning of your Rad Power Bikes handlebars.
-
Page 31: Carrying Loads
MAXIMUM PAYLOAD FOR THE FRONT RACK The total maximum weight limit of the Front Rack is (10kg). The kickstand is not designed to be used for loading cargo. You MUST hold onto the bike whenever loading cargo on the front rack. Do not assume the bike is stable and balanced when using the kickstand, always hold onto the bike when cargo is being loaded or in place. -
Page 32: Link To Assembly Video And Online Resources
Limited Warranty WARRANTY INFO Every Front Rack is covered under our manufacturer's one year all-inclusive warranty for the original owner against all manufacturing defects. Rad Power Bikes warrants this product, including all individual components against defects in material or workmanship as follows: RAD POWER BIKES LIMITED 1 YEAR WARRANTY Rad Power Bikes’... - Page 33 (tires, tubes, brake pads, cables and housing, grips). Rad Power Bikes will not be liable and/or responsible for any damage, failure or loss caused by any unauthorized service or use of unauthorized parts. In no event shall Rad Power Bikes be...
Need help?
Do you have a question about the Front Rack and is the answer not in the manual?
Questions and answers