Table of Contents
Advertisement
D10D
Model No.
INTRODUCTION TO FISHTRAX™ INTELLIGENT SONAR
FishTrax™ Intelligent Sonar uses SONAR sound waves to detect
depth, locate fish, and define bottom contour, composition and
structure. Using specialized microprocessors, these sound waves
are generated by the FishTrax™ display and sent to the
FishTrax™ Sonar Sensor (Transducer). The sonar sensor, acting
first as a "speaker", emits these sound waves as a series of
pulses.
Then, microseconds later, the sonar sensor switches to
a "microphone" and listens for the return of the pulses as they
bounce off of objects in the water column (referred to as
"echoes"). The "echoes" are sent back to the display where,
using proprietary algorithms in the FishTrax™ software, they are
analyzed for location, size, and composition. These signal are
then arranged by FishTrax's™ Human Interface Software and
displayed in an easy to understand manner on the VirtuView™
Dot Matrix Display.
OPERATION MANUAL
FishTrax™ 1X Fish Finder (FT1PX)
To ensure safety and many years of trouble-free
operation of your product, please read this
manual carefully before using this product.
- 1 -
Advertisement
Table of Contents

Related Manuals for Hawkeye Mfg FishTrax 1X


Summary of Contents for Hawkeye Mfg FishTrax 1X
- Page 1 D10D Model No. OPERATION MANUAL FishTrax™ 1X Fish Finder (FT1PX) To ensure safety and many years of trouble-free operation of your product, please read this manual carefully before using this product. INTRODUCTION TO FISHTRAX™ INTELLIGENT SONAR FishTrax™ Intelligent Sonar uses SONAR sound waves to detect depth, locate fish, and define bottom contour, composition and structure.
- Page 2 SAFETY INFORM ATION • Periodically wipe the face with a dry cloth. Do not use abrasives or solvents on this device. • Only qualified personnel should perform repairs or servicing not covered in this manual. • The LCD used in the product is made of glass. Therefore, it can break when the product is dropped or impacted.
- Page 3 NFORMATION If you have questions about this device please visit our Customer Service Center on our website at support.norcrossmarine.com. Warranty Details • Warranty Registration Troubleshooting • Product Knowledgebase Product Specifications • Parts & Accessories www.hawkeyeelectronics.com PARTS SUPPLIED IN PACKAGING The following parts should be included with the display: •...
- Page 4 INITIAL SETUP MPORTANT If you are going to be using the Fish Finder in Temperatures Below 20º F (-7 ºC) you must use Lithium ‘AAA’ Batteries. Cold temperatures significantly reduce the power output of Alkaline batteries, which will inhibit the performance of the Fish Finder. MPORTANT To ensure your FISHTRAX™...
-
Page 5: Adjusting The Sonar Sensor Float
ADJUSTING THE SONAR SENSOR FLOAT The Sonar Sensor float must be adjusted so that it is a minimum of 6 inches away from the sensor (it can be further depending upon water conditions, see Note below). 1. Pull out the rubber stopper. 2. -
Page 6: Removing The Sonar Sensor Float
REMOVING THE SONAR SENSOR FLOAT If you find that you do not have a need for the sonar sensor float, it can be removed as follows: 1. Remove the rubber stopper from the cable by sliding the safety strap toward the plug and gently working it over plug. -
Page 7: Using The Fish Finder Through A Boat Hull
USING THE FISH FINDER THROUGH A BOAT HULL The FishTrax™ 1X’s advanced sonar capabilities allow it to “Shoot-Thru” the bottom of a boat, kayak or canoe. The hull must be made out of solid fiberglass, or a maximum of 1/8” aluminum, and be in direct contact with the water, with no air pockets. -
Page 8: Using The Variablezone™ Water Temperature Sensor
1. Clear away snow to expose the ice surface. 2. Place a small amount of liquid water on the ice and set the sonar sensor on the water allowing the Sonar Sensor to freeze to the ice. SOLID ICE 3. If there are any air pockets between the sonar sensor and ice, or the water below the ice, the fish finder will not work properly and will require you to try another spot, or cut a hole in the ice to use. -
Page 9: Understanding The Virtuview™ Liquid Crystal Display
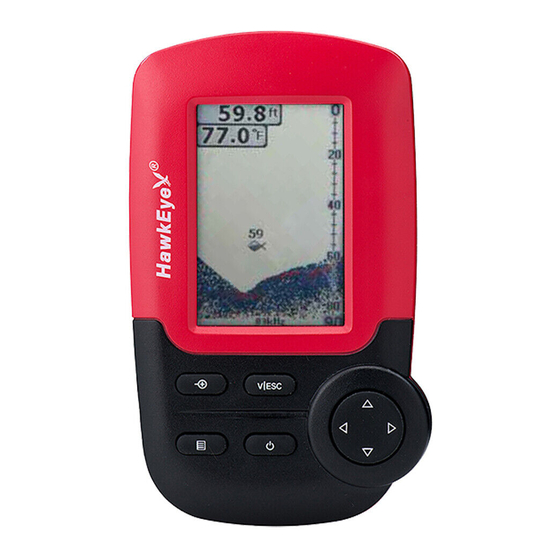
GETTING TO KNOW THE FISHTRAX™ 1X UNDERSTANDING THE VIRTUVIEW™ LIQUID CRYSTAL DISPLAY 1. Water Depth 2. Water Temperature 3. Battery Strength Indicator 4. Simulator Indicator 5. Bottom Contour/Composition 6. Upper Limit 7. Surface Clutter 8. FishTarget™ 9. Depth Scale 10. Lower Limit UNDERSTANDING THE BUTTONS Zoom / Enter V | ESC... -
Page 10: Turning The Fish Finder On/Off
TURNING THE FISH FINDER ON/OFF 1. To turn the fish finder ON, press and release the button. 2. To turn the fish finder OFF, Press and Hold the button for 3 seconds. OTICE The fish finder has an automatic “power-off” feature to prevent battery drain if you accidentally leave the Fish Finder on. - Page 11 Bottom Zoom (Bottom Lock) Fish Alarm Depth Alarm Contrast Scroll Speed (Chart Speed) FishTarget™ (Fish Symbols Depth) Units of Measure ADJUSTING THE DETAIL DISPLAYED ON THE SCREEN Adjusting the amount of detail the shown on the VirtuView™ display is as simple as adjusting the fish finder’s sensitivity.
-
Page 12: Adjusting The Display Backlight
3. Press the to expand the Sensitivity Menu. 4. Press and release the button to increase the sensitivty, to decrease the sensitivity. • Press the to save the adjustment and exit the Sensitivity Setup. • Press V | ESC to cancel the adjustment and exit the Sensitivity Setup. - Page 13 • Press V | ESC to cancel the adjustment and exit the Backlight Setup. 5. Press and release the V | ESC button 2 times to exit the menu and return to the fish finder mode. OTICE Quick-Access to this feature is available by pressing the V | ESC button during normal fish finder operation.
- Page 14 • Press the to save the adjustment and exit the Depth Range Setup. • Press V | ESC to cancel the adjustment and exit the Depth Range Setup. 6. Press and release the V | ESC button 3 times to exit the menu and return to the fish finder mode.
- Page 15 OTICE Quick-Access to this feature is available by pressing the button during normal fish finder operation. Pressing the or the buttons while in Zoom mode will manually adjust the Upper and Lower Limits. Press the button again to turn the Zoom OFF. The Upper Limit will be displayed as “000”...
- Page 16 AUDIBLE NOTIFICATION OF THE PRESENCE OF FISH You can set the FishTrax™ 1X to sound an audible alarm when fish are detected. To Turn the Fish Alarm ON or OFF: 1. Press and release the button 1 time (MENU I will appear at the top of the screen) ...
-
Page 17: Display Contrast
3. Press the to expand the Alarms Menu. 4. Press and release the button until “Depth Alarm” is highlighted. 5. Press the button to increase the depth of Shallow Water Alarm, press to decrease the depth of the Shallow Water Alarm. -
Page 18: Display Scroll Speed
NFORMATION When the scroll speed is set to high, the FishTrax™ sonar will deliver quicker, less detailed data to the VirtuView™ display. A lower scroll rate setting will allow the FishTrax™ sonar to deliver more detailed returns to the VirtuView™ display. (CHART SPEED) DISPLAY SCROLL SPEED The data on the FishTrax™... - Page 19 OTICE Pressing the button during normal fish finder operation will freeze the screen allowing you more time to decipher the data. Pressing again will renable the scrolling. FISHTARGET™ SYMBOLS AND DEPTH The FishTrax™ 1X FishTarget™ feature displays fish icons and a numeric fish depth reading instead of fish arches to help identify fish.
-
Page 20: Units Of Measure
7. Press and release the V | ESC button 3 times to exit the menu and return to the fish finder mode. OTICE Pressing the button during normal fish finder operation will freeze the screen making it easier to read the Fish Depth numbers. Pressing the again will renable the scrolling. - Page 21 3. Store the fish finder in the storage bag in a cool, dry place. Never leave it in temperatures over 120° F (49° C) as the extreme temperatures can damage the electronic components. MPORTANT Cold weather is extremely hard on the electrical components within the display housing.
- Page 22 Nothing Happens When I Turn the Power On Make sure that you have installed a good set of batteries and aligned them as per the diagram within the battery compartment. You may also need to test the batteries in another device to ensure they are charged. If in doubt, replace the batteries with a set from a newly opened package.
- Page 23 REPLACEMENT PARTS Please check our website for replacement parts and accessories. If you need replacement parts that are not listed, please email our Customer Service Department at customerservice@norcrossmarine.com. WARRANTY This device is covered by a 2 Year Limited Warranty. To be eligible for warranty coverage, you must register your product within 15 days of purchase.
- Page 24 ARNING © 2018 NorCross Marine Products Inc., All Rights Reserved. ALL unauthorized copying of the content of this document without the expressed written consent of NorCross Marine Products, Inc is strictly forbidden. NOTES - 24 -...
Need help?
Do you have a question about the FishTrax 1X and is the answer not in the manual?
Questions and answers