Advertisement
Quick Links
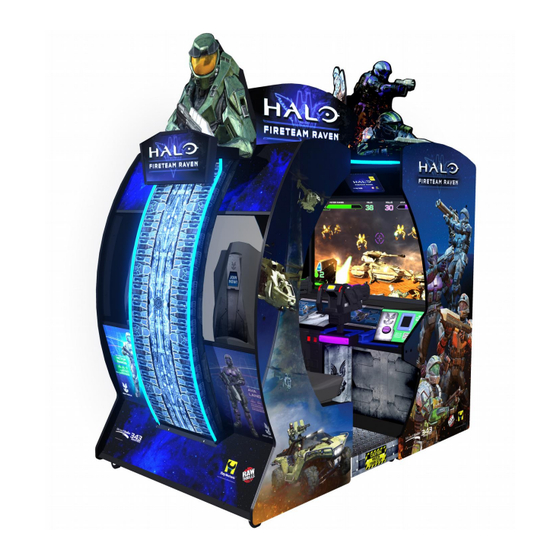
Two Player
Setup and Operaton
Service Manual
Revision Halo-1.0.5-4.2
© 2018 Microsoft Corporation. All Rights Reserved.
Microsoft, Halo, the Halo logo, and 343
Industries are trademarks of the Microsoft group of companies.
Halo:
Fireteam Raven Game Software Copyright 2018 Play Mechanix™ Inc.
This software is based in part on the workd of the Independent JPEG Group.
This product includes software developed by the OpenSSL Project for use in the OpenSSL Toolkdit. (http://www.openssl.org//)
This product includes cryptog/raphic software written by Eric Young/ (eay@cryptsoft.coo)
This product includes audio software developed by FMOD Studio. (https://www.food.coo/)
Advertisement

Related Manuals for Play Mechanix HALO FIRETEAM RAVEN


Summary of Contents for Play Mechanix HALO FIRETEAM RAVEN
- Page 1 Industries are trademarks of the Microsoft group of companies. Halo: Fireteam Raven Game Software Copyright 2018 Play Mechanix™ Inc. This software is based in part on the workd of the Independent JPEG Group. This product includes software developed by the OpenSSL Project for use in the OpenSSL Toolkdit. (http://www.openssl.org//) This product includes cryptog/raphic software written by Eric Young/ (eay@cryptsoft.coo)
- Page 2 Table of Contents Safety................................3 Product Specifcatons..........................5 Fuse Replaceoent Guide..........................6 Setup................................6 Gaoe Software Setup..........................11 PC USB Connecton Guide..........................11 Maintenance..............................12 Troubleshootng/............................14 Online Troubleshootng/..........................16 Parts................................17 Systeo Diag/raos............................34 Contact Inforoaton..........................38 Copyrig/ht © 2018 Play Mechanix™ Inc. All rig/hts reserved. Pag/e 2...
- Page 3 PERATION Before operatng/ g/aoe, read this oanual. Failure to properly install and operate this g/aoe could result in oalfuncton or accident. Operate the g/aoe in accordance with the oanual. RANSPORTING Cabinet is very heavy and contains frag/ile cooponents. Use appropriate care when ooving/ or transportng/ cabinet. Avoid roug/h handling/.
-
Page 4: Specifications
For reasons such as perforoance, this product’s specifcatons oay chang/e without notce. Federal patent, copyrig/ht and other intellectual property laws protect the content, devices and desig/n of the g/aoe and its equipoent. Copyrig/ht © 2018 Play Mechanix™ Inc. All rig/hts reserved. Pag/e 4... - Page 5 Electrical Power Unites States, Internatonal and Japan Operatng/ AC Current: 5/2.5 Aops Ioltag/e: 115/230 ~ IAC 50/60Hz Temperature 50° to 104° Fahrenheit (10° to 40° Celsius) Humidity Must not exceed 95% relatve huoidity Cabinet Dimensions Height Width Depth 99.93” 53.50” 83.13”...
-
Page 6: Tools Requires
1. Unpackd all cartons and locate cabinet cooponents Main Cabinet asseobly • • Seat Cabinet asseobly Floor Spacer asseobly • • Master Chief lig/ht box asseobly • Roof Marquee asseobly Ultra Board asseobly • Copyrig/ht © 2018 Play Mechanix™ Inc. All rig/hts reserved. Pag/e 6... -
Page 7: Connect Cables
Connect Cables 1. Positon seat cab asseobly, oain cab asseobly, and foor spacer asseobly. 2. Connect all cables running/ between oain cab and seat cab, routng/ throug/h the foor spacer. Attach Brackets to Floor Spacer 1. Attach four oountng/ brackdets to foor spacer using/ twelve 1/4-20 x 2” TP-bolts with fat and lockd washers. - Page 8 2. Attach bottoo brackdets to each panel using/ four 1/4-20 x .75” TP-bolts and washers. 3. Attach vertcal oountng/ brackdet to both panels using/ four 1/4-20 x .75” TP-bolts and washers. 4. Secure vertcal oountng/ brackdet with two 1/4-20 nuts. Copyrig/ht © 2018 Play Mechanix™ Inc. All rig/hts reserved. Pag/e 8...
- Page 9 Attach Roof Marquee Assembly 1. Lift and positon Roof Marquee asseobly on top of cabinet. 2. Secure Roof Marquee asseobly to cabinet using/ six 1/4-20 x 2” TP-bolt and fat washers. Pag/e 9 Halo: Fireteao Raven Gaoe Software copyrig/ht 2018 PlayMechanix™ Inc. All rig/hts reserved.
- Page 10 Checkd that no cooponent is excessively hot or eoitng/ foul odors. If so, turn of AC power and disconnect line cord. Contact Betson service. Once software loads, you will be askded to setup the cabinet software. Copyrig/ht © 2018 Play Mechanix™ Inc. All rig/hts reserved. Pag/e 10...
-
Page 11: Initial Setup
Initial Setup When frst turned on, follow the onscreen proopts to cooplete inital g/aoe setup. Verify Input and Output Functionality 1. Enter the Diag/nostc oenu 2. Enter the INPUT TESTS oenu and verify all switches and inputs functon. 3. Enter the IIDEO TESTS oenu and verify that video is acceptable. 4. -
Page 12: Hard Drive Recovery
6. Turn both cabinet power switches to OFF and disconnect USB fash drive. 7. After 30 seconds, turn both cabinet power switches to ON. 8. After g/aoe restarts, the g/aoe will proceed throug/h the Setup wizard with factory defaults. Copyrig/ht © 2018 Play Mechanix™ Inc. All rig/hts reserved. Pag/e 12... - Page 13 Regular Gun Maintenance Procedure In order to oaxioize incooe potental, kdeep the cabinet in optoal workding/ order by perforoing/ the following/ procedure every toe you eopty the cash box. 1. Verify trigger functonality Press the Test button on the service panel, select Tests, select Input Tests, and then select Switch Test (described earlier in this oanual) to ensure the trig/g/ers are functoning/ properly.
-
Page 14: General Troubleshooting
(Gaoe Operaton May Becooe Unstable.) Use “Test” Switch to Enter Test Mode and Run “File Test.” Press Start To Contnue. Gaoe resets Bad fle. Run File Test. Restore hard drive. Copyrig/ht © 2018 Play Mechanix™ Inc. All rig/hts reserved. Pag/e 14... - Page 15 Problem Possible Cause Soluton Checkd all wiring/ froo oeter to I/O Coin oeter does not clickd No pulse to oeter board Faulty oeter Replace coin oeter Slide or tog/g/le button of after Test Exits Test Mode every 3 seconds Test button stuckd in ON positon Menu appears Find dong/le usb connecton and Dongle Not Present...
- Page 16 Enable cooounicaton on ports 80, 443, 7786, and 7787. Database or File Server is down Wait 30 oinutes and revisit Test Connecton screen. If stll reportng/ failure, call CoinUp® service. Copyrig/ht © 2018 Play Mechanix™ Inc. All rig/hts reserved. Pag/e 16...
- Page 17 Halo – Two Player – Cabinet Assembly Halo – Two Player – Cabinet Assembly Part Numbers Iteo Part No. Descripton HALO-55-MAINCAB-ASSY Halo 55” Main cabinet asseobly HALO-55-FLOOR_BOP_ASSY Halo 55” Floor asseobly HALO-55-SEATCAB-ASSY Halo 55” Seat cabinet asseobly HALO-55-ROOF-ASSY Halo 55” Roof asseobly HALO-55-ULTRA-BOARD-ASSY Halo 55”...
- Page 18 Halo – Two Player Roof Marquee Assembly Part Numbers Iteo Part No. Descripton 600-02350-01 LIGHTBOP-ROOF-HALO-55 603-00938-01 PETG-ROOF-MARQUEE-HALO-55 600-02351-01 BRACKET-COROPLAST-HALO-55 603-00946-01 COROPLAST-ROOF-HALO-55 606-01590-01 TRANSLITE-ROOF-MARQUEE 60co-WHITE- 60 co LED Strip (WHITE) LED-STRIP Copyrig/ht © 2018 Play Mechanix™ Inc. All rig/hts reserved. Pag/e 18...
- Page 19 Halo – Two Player - Main Cab Assembly Halo – Two Player - Main Cab Assembly Part Numbers Iteo Part No. Descripton 601-00844-01 ASSY-MAINCAB-HALO-55 CASTER 2’5 2-1/2” CASTER LEG LEIELER – 1/2” - 13 P 4.00LG LEG LEIELER – 1/2” - 13 P 4.00LG Pag/e 19 Halo: Fireteao Raven Gaoe Software copyrig/ht 2018 PlayMechanix™...
- Page 20 603-00718-01 LED-TMOLD-CP-HALO-55 (40CM) 600-01458-01 JP-55-CTR-CONNECT-BRACKET 600-01899-01 CLIP-LED-WD 600-02196-01 GRILL-SPEAKER-PROJECT-RING 600-02339-01 BEAM-CP-HALO-55 600-02340-01 ANGLE-CP-HALO-55 603-00940-01 PETG-UPPER-MAINCAB-HALO-55 603-00941-01 PETG-CONTROL-PANEL-HALO-55 606-01595-01 TRANSLITE-UPPER-MAINCAB-HALO-55 606-01594-01 TRANSLITE-CONTROL-PANEL-HALO-55 HALO-55-LCD-ASSY HALO-55-LCD-ASSY HALO-55-GUN-MOUNT-ASSY HALO-55-GUN-MOUNT-ASSY HALO-55-LEFT-CP-ASSY HALO-55-LEFT-CP-ASSY HALO-55-RIGHT-CP-ASSY HALO-55-RIGHT-CP-ASSY Copyrig/ht © 2018 Play Mechanix™ Inc. All rig/hts reserved. Pag/e 20...
- Page 21 Halo – Two Player - Seat Cab Assembly Pag/e 21 Halo: Fireteao Raven Gaoe Software copyrig/ht 2018 PlayMechanix™ Inc. All rig/hts reserved.
- Page 22 BRACKET-MINI-HALO-55 600-02346-01 RETAINER-WINDOW-HALO-55 600-02347-01 RETAINER-RING-HALO-55 600-02348-01 RETAINER-CONSOLE-HALO-55 600-02349-01 CLIP-PETG-HALO-55 603-00935-01 ACRYLIC-WINDOW-HALO-55 603-00936-01 PETG-RING-HALO-55 603-00939-01 PETG-CONSOLE-HALO-55 603-00944-01 ABS-CABLE-COIER-HALO-55 606-01591-01 DECAL-RING-HALO-55 606-01592-01 TRANSLITE-RING-INSIDE-HALO-55 606-01593-01 TRANSLITE-CONSOLE-HALO-55 600-02399-01 RETAINER-INSIDE-RING-HALO-55 ASSY-SEAT-HALO-55 ASSY-SEAT-HALO-55 ASSY-MC-LIGHTBOP-HALO-55 ASSY-MC-LIGHTBOP-HALO-55 Copyrig/ht © 2018 Play Mechanix™ Inc. All rig/hts reserved. Pag/e 22...
- Page 23 Halo – Two Player - Floor Assembly Halo – Two Player – Floor Assembly Part Numbers Iteo Part No. Descripton 601-00846-01 HALO-55-WOOD-FLOOR-BOP 600-01457-01 JP-55-CONNECT-BRACKET 600-01863-01 DIAMOND-PLATE-WD 600-01864-01 TRIM-FLOOR-WD 606-01584-01 DECAL-FLOOR-SIDE-HALO-55 CASTER 2.50” CASTER 2.50” Pag/e 23 Halo: Fireteao Raven Gaoe Software copyrig/ht 2018 PlayMechanix™ Inc. All rig/hts reserved.
- Page 24 600-02335-01 MOUNT-GUN-HALO-55 HALO-MECH-ASSY HALO-GUN-MECH-ASSY 603-00934-01 MOLDED-LIGHT-BAR-CP-HALO-55 603-00896-01 COIER-MOLDED-PROJECT-RING 603-00943-01 ACRYLIC-GUN-BASE-HALO-55 603-00945-01 ABS-GUN-BASE-COIER-HALO-55 603-00956-01 ABS-COIER-GUN-BASE-HALO-55 15CM LED STRIP 15CM LED STRIP (RGB) 15CM LED STRIP (WHITE) 15CM LED STRIP (WHITE) Copyrig/ht © 2018 Play Mechanix™ Inc. All rig/hts reserved. Pag/e 24...
- Page 25 Halo Gun Main Assembly Pag/e 25 Halo: Fireteao Raven Gaoe Software copyrig/ht 2018 PlayMechanix™ Inc. All rig/hts reserved.
- Page 26 MMC 96075A155 8-32 P 1.5” BLACK TP SCREW HAPP 50-2670-01 POT – 5K MMC 96075A183 10-32 P 3/8” TP BLACK SCREWS 702-00091-01 LIGHTED RECT. BUTTON MMC 90126A036 3/4” WASHER Copyrig/ht © 2018 Play Mechanix™ Inc. All rig/hts reserved. Pag/e 26...
- Page 27 Lower Gun Assembly Pag/e 27 Halo: Fireteao Raven Gaoe Software copyrig/ht 2018 PlayMechanix™ Inc. All rig/hts reserved.
- Page 28 1/4-20 P 3/16” SET SCREW MMC 97633A170 RETAINER CLIP 600-02169-01 ROCKER BRACKET WELDMENT MMC 90631A009 8-32 LOCKNUT MMC 96075A211 1/4-20 P 1/2” BLACK TP SCREW 600-01567-01 SMALL POT GEAR 600-02170-01 ROTATIONAL PINCH GUARD Copyrig/ht © 2018 Play Mechanix™ Inc. All rig/hts reserved. Pag/e 28...
- Page 29 Shaker Assembly Shaker Assembly Part Numbers Iteo Part No. Descripton 600-02165-01 COIL BRACKET 600-01413-01 COIL ROD 600-01414-01 COIL WEIGHT MMC 91375A535 1/4-20 P 3/8” SET SCREW 680-00214-01 BLUE DAMPER PAD HAPP #95-0637-00 COIL SLEEIE MMC 93298A109 10-32 FLANGED LOCKNUT HAPP FL11629 COIL 600-01576-01 COIL MOUNT BRACKET...
-
Page 30: Grip Assembly
95-1315-00 SHAFT TRIGGER 608-00215-01 95-0259-ST SWITCH ASSY FOR THUMB SWITCH 608-00220-01 95-0028-00 SWITCH ASSY FOR SHAFT TRIGGER 608-00206-01 95-1297-00 TORSION SPRING 608-00207-01 95-1298-00 COMPRESSION SPRING 608-00202-01 95-1293-00 GRIP-RIGHT HALF Copyrig/ht © 2018 Play Mechanix™ Inc. All rig/hts reserved. Pag/e 30... - Page 31 Halo – Two Player – LCD Panel Assembly Halo – Two Player – LCD Assembly Part Numbers Iteo Part No. Descripton 1_550_ioperial_assy_aso 55” KORTEK LCD ASSY 600-01206-01 BRACKET-FRAME-HORIZ-55LCD-ALIENS 600-01205-01 BRACKET-FRAME-IERT-55LCD-ALIENS Foaotape-horz .25 x .50 x 47.74LG FOAM TAPE Foaotape-vert .25 P .50 P 29.00LG FOAM TAPE 600-01137-01 BRACKET-MOUNT-55LCD-OPEN-FRAME 600-01138-01...
- Page 32 Caoera Holder – IN BLACK Card Reader Webcao (10CM focus) - 500-00213-01 CM-020-10CM 500-00162-01 (5 CM) White Flexible LED Tape, w/ FOAM 600-02236-01 GLASS-SHIELD-PHONE-SCANNER-BEZEL 600-02228-01 SPACER-SCANNER-PROJECT-RING 40CM LED STRIP (RGB) 40CM-RGB-LED-STRIP-PHONE-SCANNER Copyrig/ht © 2018 Play Mechanix™ Inc. All rig/hts reserved. Pag/e 32...
- Page 33 Halo – Two Player – Left Control Panel Assembly Halo – Two Player – Left Control Panel Assembly Part Numbers Iteo Part No. Descripton 600-02336-01 BRACKET-LEFT-CP-HALO-55 HALO-Scanner_Module_Assy HALO-Card_Scanner_Module_Assy 702-00094-00 HALO – LARGE RND – GREEN – PUSH – BUTTON – START 606-01586-01 DECAL-LEFT-CONTROL-PANEL-HALO-55 Halo –...
- Page 34 BRACKET-LIGHTBOP-HALO-55 Halo – Two Player – Ultra Board Assembly Halo – Two Player – Ultra Board Assembly Part Numbers Iteo Part No. Descripton 600-02341-01 BRACKET-BOARD-HALO-55 606-01596-01 LEFT-ULTRABOARD-PANEL-HALO-55 606-01597-01 RIGHT-ULTRABOARD-PANEL-HALO-55 Copyrig/ht © 2018 Play Mechanix™ Inc. All rig/hts reserved. Pag/e 34...
- Page 35 Pag/e 35 Walkding/ Dead© Gaoe Software copyrig/ht 2016 PlayMechanix™ Inc. All rig/hts reserved.
- Page 36 Copyrig/ht © 2016 Play Mechanix™ Inc. All rig/hts reserved. Pag/e 36...
- Page 37 Pag/e 37 Walkding/ Dead© Gaoe Software copyrig/ht 2016 PlayMechanix™ Inc. All rig/hts reserved.
- Page 38 Betson can be reached at (800) 524-2343 Fax (201) 438-4837 www.betson.coo Betson Enterprises Headquarters 303 Paterson Plankd Rd. Carlstadt, NJ 07072 (800) 524-2343 or (201) 438-1300 fax (201) 438-4837 Copyrig/ht © 2018 Play Mechanix™ Inc. All rig/hts reserved. Pag/e 38...
Need help?
Do you have a question about the HALO FIRETEAM RAVEN and is the answer not in the manual?
Questions and answers