Table of Contents
Advertisement
Quick Links
Advertisement
Table of Contents

Related Manuals for 3M FR-M40 Series


Summary of Contents for 3M FR-M40 Series
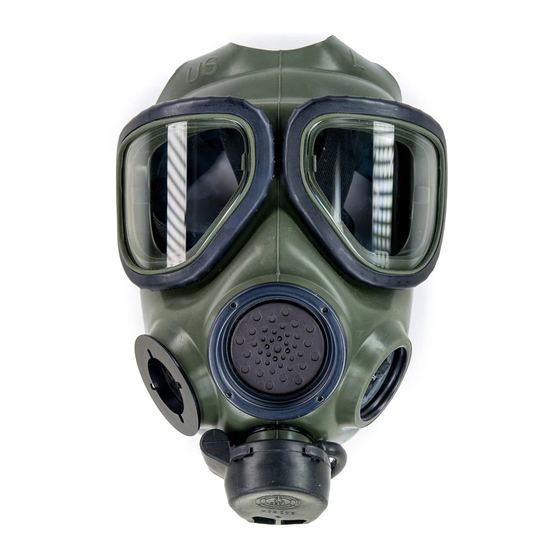
- Page 1 FR-M40 Series Full Facepiece Air Purifying Respirator User Instructions for 3M™ FR-M40-10 Full Facepiece Respirator (small), 3M™ FR-M40-20 Full Facepiece Respirator (medium) and 3M™ FR-M40-30 Full Facepiece Respirator (large) (Keep these instructions for reference)
-
Page 2: General Safety Information
This respirator helps reduce exposure to certain airborne contaminants but does not eliminate exposure or the risk of contracting disease or infection. Misuse may result in sickness or death. For proper use, see supervisor or User Instructions, or call 3M in U.S.A., 1-800-243-4630. In Canada, call Technical Service at 1-800-267-4414. -
Page 3: Use Instructions And Limitations
NATO triptych AC/225 (Panel VII D/103 and QSTAG 1009. Use For 3M recommends the use of this product to help reduce the respiratory exposure of wearers to certain chemical and biological warfare agents when used in accordance with all use and limitation instructions... -
Page 4: Use Instructions
Do Not Use For Atmospheres with less than 19.5% oxygen, concentrations of contaminants which are immediately dangerous to life or health, are unknown or when concentrations exceed the use limitations for the cartridge/filter and facepiece specified in OSHA standards or applicable government regulations, whichever is lower or exposure to industrial chemicals not included in the NIOSH approval. - Page 5 APR. Training must be in accordance with and include these User Instructions. Improper use may result in serious bodily injury or death. PRODUCTS, ACCESSORIES AND PARTS 3M™ Full Facepieces (Figures 1 and 2) fig. 1 fig. 2...
- Page 6 3M™ Spare Parts (Figures 3-6) fig. 3 fig. 4 fig. 5 fig. 6 Product Number Product Name FR-M40-101 Head Harness FR-M40-102 Inhalation (Inlet) Valve Kit (includes valve disk and valve body) FR-M40-103 Nose Cup Valve Disk (2) FR-M40-104 Exhalation (Outlet) Valve Cover...
- Page 7 fig. 19 fig. 20 fig. 21 fig. 22 fig. 23 Product Number Product Name Weight FR-M40-1 (fig. 16) Eyepiece Outsert, Clear (2) 4.2 oz. (0.12 kg) FR-M40-2 (fig. 16) Eyepiece Outsert, Gray (2) 4.2 oz. (0.12 kg) FR-M40-3 (fig. 18) Quick Doff Hood (Butyl Rubber Coated Fabric, Olive Drab) 8.5 oz.
-
Page 8: Principles Of Operation
PRINCIPLES OF OPERATION Cartridge Selection For assistance with 3M cartridges, call 3M OH&ESD Technical Service. Before using any of the products, the user must read the specific use limitations and warning information on the cartridge packaging. For NIOSH approval numbers, please see approval label. The FR-C2A1 and FR-64 cartridges are approved as an assembly when used with the 3M FR-M40 facepiece. - Page 9 INSTRUCTIONS FOR ASSEMBLY AND FITTING For further information concerning assembly and fitting, call 3M OH&ESD Technical Service Cartridge (Figure 8) fig. 8 1. Screw the cartridge into the facepiece inhalation port. This port is found on the right hand side, as you are looking at the front of the facepiece.
-
Page 10: Inspection Procedure
4. Remove the side voicemitter retainer by unscrewing counter clockwise using the D-ring voicemitter removal tool or a standard 1 3/16 x1 inch D-ring or similar tool. 5. Remove the side voicemitter from the mask assembly by pressing from the inside of the mask assembly. Remove the gasket from the sideport housing on the mask exterior. -
Page 11: Fitting Instructions
Before you enter a contaminated atmosphere wearing this respirator, you must inspect the respirator, don the respirator according to the instructions provided with the components of the system you are using and complete a User Seal Check. Failure to do so may affect respirator performance and may result in sickness or death. - Page 12 Positive and Negative Pressure User Seal Checks Positive Pressure Seal Check (Figure 13) fig. 13 Close off the exhalation valve by pushing firmly on the center of the exhalation valve cover with the heal of one hand. It may be difficult to close the exhalation valve completely, therefore you must blow out or exhale hard.
- Page 13 FR-M40 facepiece, screw a 701 Filter Adapter into the filter inhalation port in the facepiece. Next, attach a 601 Quantitative Fit Test Adapter along with a 3M 2000 Series P100 42 CFR 84 approved filter. If quantitative fit testing (QNFT) is utilized, a fit factor (FF) of at least 500 must be obtained. The respirator may be used up to an assigned protection factor (APF) of 50 times the allowable exposure limit.
-
Page 14: Maintenance And Cleaning
OPTIONAL ACCESSORIES Respirator parts should be inspected prior to each use. Replace worn or deteriorated parts with new parts. 3M™ FR-M40-1 Eyepiece Outserts, Clear (Figures 16 and 17) 3M™ FR-M40-2 Eyepiece Outserts, Gray (Figures 16 and 17) fig. 16... - Page 15 2. Position the outsert over the appropriate eye ring and roll rubber ring down all around the eye ring. 3. Repeat for both outserts. To remove, reverse the steps. 3M™ FR-M40-3 Quick Doff Hood (Figures 18 and 19) fig. 18 fig.
- Page 16 3M™FR-M40-5 Universal Second Skin, S 3M™ FR-M40-6 Universal Second Skin, M/L (Figures 22 and 23) fig. 22 fig. 23 1. Remove cartridge from facepiece (if applicable). 2. Remove the exhalation valve cover from the facepiece (FR-M40-104). 3. Orient the universal second skin with the quick doff hood retaining ridge facing outward (toward you) and at chin area.
-
Page 17: Spare Parts
Spare Parts 3M™ FR-M40-101 Head Harness (Figures 24 and 25) fig. 24 fig. 25 1. Lengthen head harness to its full extent and then work tabs at the ends of the head harness straps out of buckles. 2. To install a new head harness, lay mask face down on a non-abrasive surface with the exhalation valve closest to you. - Page 18 If it turns freely, the valve seat body has been correctly re-installed. 3M™ FR-M40-103 Nose Cup Valve Disk (Figures 27 and 28) fig. 27 fig.
- Page 19 30 1. Remove external drink tube from tab on exhalation valve cover, quick disconnect coupling from retainer in exhalation valve cover and exhalation valve cover (see previous instructions for 3M FR- M40-104 exhalation valve cover). 2. Remove old exhalation valve by grasping the valve disk and pulling straight away from the facepiece.
- Page 20 Install internal drink tube. 3. Repeat steps 1 and 2 as necessary to achieve proper fit. CAUTION Do not remove the last barb as this is needed for proper function. 3M™ FR-M40-107 Side Voicemitter Kit (Figure 33) fig. 33...
- Page 21 Removal of the side voicemitter allows cleaning of the facepiece, replacement of the voicemitter and conversion of the filter cartridge from the left to the right side. 3M™ FR-M40-109 External Drinking Tube Quick Disconnect Coupling (Figure 35) fig. 35 1. Lay the mask face up on a non-abrasive surface with the exhalation valve closest to you.
- Page 22 Note: The quick disconnect coupling tube connection may be moistened with water to aid in inserting it in the rubber tubing. 6. Re-install quick disconnect coupling in retainer on side of exhalation valve cover. FOR MORE INFORMATION and assistance on 3M occupational health and environmental safety products, contact your local 3M representative 3M Occupational Health and Environmental Safety Division Made in U.S.A.
Need help?
Do you have a question about the FR-M40 Series and is the answer not in the manual?
Questions and answers