Table of Contents
Advertisement
Quick Links
Advertisement
Table of Contents

Related Manuals for Abocom WR5502


Summary of Contents for Abocom WR5502
- Page 1 802.11b/g/n Wireless Broadband Router User’s Manual...
-
Page 3: Table Of Contents
Table of Contents CHAPTER 1: INTRODUCTION .................... 3 ..........................3 EATURES ....................... 3 ACKAGE ONTENTS ........................4 HYSICAL ETAILS ....................6 BOUT THE PERATION ODES CHAPTER 2: INSTALLATION ..................... 8 ........................8 EQUIREMENTS ..........................8 ROCEDURE CHAPTER 3: CONFIGURATION VIA WEB..............10 .......................... - Page 4 Federal Communication Commission Interference Statement This equipment has been tested and found to comply with the limits for a Class B digital device, pursuant to Part 15 of the FCC Rules. These limits are designed to provide reasonable protection against harmful interference in a residential installation. This equipment generates uses and can radiate radio frequency energy and, if not installed and used in accordance with the instructions, may cause harmful interfer- ence to radio communications.
-
Page 5: Chapter 1: Introduction
Chapter 1: Introduction The 802.11b/g/n Wireless Broadband Router is a draft 802.11n/b/g compliant Wireless Broadband Router with 4-port Fast Ethernet Switch. With the advanced MIMO technology, it can support the data transmission rate 6 times more (up to 300Mbps) and the coverage 3 times more than IEEE 802.11b/g devices. -
Page 6: Physical Details
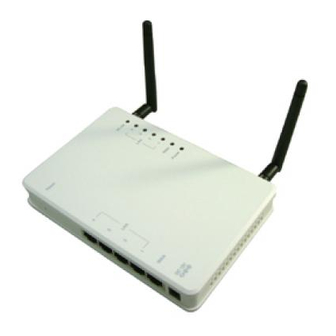
Physical Details Front-mounted LEDs Figure 1: Front Panel Printed Color Behavior Indication No power Power Green System powered on Power/ WPS Orange Blinking Booting Green Blinking WPS link (Duration 2 min) WLAN Disabled Wireless LAN WLAN Green Blinking WLAN Enabled Link failed, or not linked 10/100 WAN Internet... - Page 7 Rear Panel Figure 2: Rear Panel Power port Connect the supplied power adapter here. LAN 1~4 ports Use standard LAN cables (RJ45 connectors) to connect your PCs to these ports. If required, any port can be connected to another hub. Any LAN port will automatically function as an "Uplink"...
-
Page 8: About The Operation Modes
About the Operation Modes Gateway Mode In this mode, the device is supposed to connect to internet via ADSL/Cable Modem. The NAT is enabled and PCs in LAN ports share the same IP to ISP through WAN port. The connection type can be setup in WAN page by using PPPOE, DHCP client, PPTP client or static IP. - Page 9 Wireless ISP Mode In this mode, all Ethernet ports are bridged together and the wireless client will connect to ISP access point. The NAT is enabled and PCs in Ethernet ports share the same IP to ISP through wireless LAN. You must set the wireless to client mode first and connect to the ISP AP in Site- Survey page.
-
Page 10: Chapter 2: Installation
Chapter 2: Installation Requirements • Network cables. Use standard 10/100BaseT network (UTP) cables with RJ45 connectors. • TCP/IP protocol must be installed on all PCs. • For Internet Access, an Internet Access account with an ISP, and either of a DSL or Cable modem (for WAN port usage.) •... - Page 11 3. Connect WAN Cable Connect the DSL or Cable modem to the WAN port on the Wireless Router. Use the cable supplied with your DSL/Cable modem. If no cable was supplied, use a standard cable. 4. Power Up • Power on the Cable or DSL modem. •...
-
Page 12: Chapter 3: Configuration Via Web
Chapter 3: Configuration via Web Overview This chapter describes the setup procedure for: • Internet Access • LAN configuration • Wireless setup • Assigning a password to protect the configuration data PCs on your local LAN may also require configuration. For details, see Chapter 4 - PC Con- figuration. - Page 13 Using your Web Browser To establish a connection from your PC to the Wireless Router: 1. After installing the Wireless Router in your LAN, start your PC. If your PC is already running, please restart it. 2. Start your Web Browser. 3.
-
Page 14: Setup Wizard
Setup Wizard The Setup Wizard provides brief and basic configuration of this device, you may enter each screen to change the default settings. For more detailed settings, you may refer to the “Configuration via Web” section. 1. View the listed configuration items and click Next to continue. 2. - Page 15 3. You can maintain the system time by synchronizing with a public time server over the Internet. Then click Next to continue. 4. Configure the parameters for local area network (If you want to change the default parame- ters) by entering New IP Address and Subnet Mask. Then click Next to continue. 5.
- Page 16 6. This page is used to configure the parameters for wireless LAN clients which may connect to your Access Point. 7. To manage your wireless network security by selecting the encryption type (None, WEP, WPA, WPA2 (AES) and WPA2 Mixed) from the pull-down menu. Click Finished to exit Setup Wizard screen.
- Page 17 Common Connection Types Cable Modems Type Details ISP Data required Dynamic Your IP Address is allocated Usually, none. IP Address automatically, when you con- However, some ISP's may require you nect to you ISP. to use a particular Hostname, Domain name, or MAC (physical) address.
-
Page 19: Operation Mode
Operation Mode You can setup different modes to LAN and WLAN interface for NAT and bridging function. -
Page 20: Wireless
Wireless Basic Settings This page is used to configure the parameters for wireless LAN clients which may connect to your Access Point. Here you may change wireless encryption settings as well as wireless network parameters. Check to disable the Access Point function. Disable Wireless LAN Interface The wireless (WLAN) LED on front panel will remain OFF if the... - Page 21 Mode You can select AP, Client, WDS or AP+WDS mode as you need. Under the AP mode, you can click the Multiple AP button to display the Multiple APs list. Default Multiple AP settings are enabled. Network Type Under Client mode this function will be enabled, there is Infra- structure or Ad hoc type can be selected form the pull-down menu.
- Page 22 (Acting as AP and enable to this function. client simultane- ously) SSID of Extended When the Enable Universal Repeater Mode (Acting as AP and Interface client simultaneously) function is enabled, the SSID of Extended Interface can be entered. Apply changes After completing the settings on this page, click Apply changes button to save the settings.
- Page 23 performance instead of providing a remedy. This value should remain at its default setting of 2347. Should you encoun- ter inconsistent data flow, only minor modifications of this value are recommended. Beacon Interval is the amount of time between beacon transmis- Beacon Interval sions.
- Page 24 button to save the settings. Reset Click Reset to restore to default values. Encryption Disable: (Encryption is set to Disable by default). If Use 802.1x Authentication is selected, the RADIUS Server will proceed to check the 802.1x Authentication. RADIUS Server IP Address: Please enter the RADIUS Server IP Address in the field.
- Page 25 phrase in Encryption Key field. Note: You must use the same Key and Encryption settings for the both sides of the wireless network connection. WPA (TKIP/AES): If WPA is selected, users will have to select the WPA Authentication Modes between Enterprise (RADIUS) and Personal (Pre-shared Key), and select WPA Cipher Suite for TKIP or AES.
- Page 26 RADIUS Server ISP. The default is 1812. IP Address: Enter the RADIUS Server’s IP Address provided by your ISP. Password: Enter the password that the AP shares with the RADIUS Server. Apply changes After completing the settings on this page, click Apply changes button to save the settings.
- Page 27 Delete All Click Delete All to delete all the items. Reset Click Reset to rest. Settings Wireless Distribution System uses wireless media to communicate with other APs, like the Ethernet does. To do this, you must set these APs in the same channel and set MAC address of other APs which you want to communicate with in the table and then enable the WDS.
- Page 28 WDS Security Setup Encryption: Select the encryption type None, WEP 64 bits, WEP 128 bits, WPA (TKIP) and WPA2 (AES) from the pull-down menu. WEP Key Format: For WEP 64 bits and WEP 128 bits encryption type, the selection of WEP Key Format are Hex and ASCII. WEP Key: If select Hex if you are using hexadecimal numbers (0-9, or A-F).
- Page 29 Refresh: Click to renew the counters information. Close: Click to leave the screen. Current WDS Here shows the current WDS AP information. AP List Delete Selected Click Delete Selected to delete the selected AP information. Delete All Click Delete All to delete all the items. Reset Click Reset to restore the settings.
- Page 30 This page allows you to change the setting for WPS (Wi-Fi Protected Setup). Using this feature could let your wireless client atomically synchronizes its setting and connect to the Access Point in a minute without any hassle. Disable WPS Check the box to Disable the WPS function, default setting is En- abled.
-
Page 31: Tcp/Ip Settings
TCP/IP Settings LAN Interface This page is used to configure the parameters for local area network which connects to the LAN port of your Access Point. Here you may change the setting for IP addresss, subnet mask, DHCP, etc. IP Address Shows the IP address of the router. - Page 32 Refresh: Click this button to refresh the table. Close: Click this button to close the window. Static DHCP Select enabled or disabled form pull-down menu, default setting is disabled. When set to enabled, user can click Static DHCP button to set the Static DHCP function.
- Page 33 Clone MAC This table displays you the station MAC information. Address Apply Changes After completing the settings on this page, click Apply changes button to save the settings. Reset Click Reset to restore to default values. WAN Interface This page is used to configure the parameters for Internet network which connects to the WAN port of your Access Point.
- Page 34 tion. Reducing the packet size can help connecting to certain web sites or speeding up packet transfer rate. If the incorrect packet size is entered, you may not be able to open certain web sites. Attain DNS Auto- Select to Attain DNS Automatically or select Set DNS Manually to matically set the DNS server IP address at the following DNS 1~3 columns.
-
Page 35: Firewall
Firewall Port Filtering Entries in this table are used to restrict certain types of data packets from your local network to Internet through the Gateway. Use of such filters can be helpful in securing or restricting your local network. Enable Port Filter- Check to enable this port filtering function. - Page 36 IP Filtering Entries in this table are used to restrict certain types of data packets from your local network to Internet through the Gateway. Use of such filters can be helpful in securing or restricting your local network. Enable IP Filtering Check to enable IP filtering function.
- Page 37 MAC Filtering Entries in this table are used to restrict certain types of data packets from your local network to Internet through the Gateway. Use of such filters can be helpful in securing or restricting your local network. Enable MAC Filter- Check to enable MAC filtering function.
- Page 38 Port Forwarding Entries in this table allow you to automatically redirect common network services to a specific machine behind the NAT firewall. These settings are only necessary if you wish to host some sort of server like a web server or mail server on the private local network behind your Gate- way's NAT firewall.
- Page 39 URL Filtering URL filter is used to deny LAN users from accessing the internet. Block those URLs which contain keywords listed below. Enable URL Filter- Check to enable URL filtering function. URL Address Enter the URL address in the field. Apply Changes After completing the settings on this page, click Apply Changes button to save the settings.
- Page 40 A Demilitarized Zone is used to provide Internet services without sacrificing unauthorized access to its local private network. Typically, the DMZ host contains devices accessible to Internet traffic, such as Web (HTTP) servers, FTP servers, SMTP (e-mail) servers and DNS servers.
-
Page 41: Qos
Use this section to configure QoS. The QoS settings improve your online gaming experience by ensuring that your game traffic is prioritized over other network traffic, such as FTP or Web. Enable QoS Check the box to enable QoS function. If the DMZ Host Func- tion is enabled, it means that you set up DMZ host at a particular computer to be exposed to the Internet so that some applica- tions/software, especially Internet / online game can have two-... -
Page 42: Management
Management Status This page shows the current status and some basic settings of the device. Statistics This page shows the packet counters for transmission and reception regarding to wireless and Ethernet networks. - Page 43 DDNS Dynamic DNS is a service that provides you with a valid, unchanging, internet domain name (an URL) to go with that (possibly ever changing) IP-address. Enable DDNS Check to enable the DDNS function. Select the desired DDNS Service Provider DynDNS or TZO Service Provider from the pull-down list.
- Page 44 Time Zone Setting You can maintain the system time by synchronizing with a public time server over the Internet. Current Time Enter the current time of this wireless router. Time Zone Select Select the local time zone from the pull-down menu. Enable NTP client Check to enable NTP (Network Time Protocol Server) client update...
- Page 45 Denial of Service A "denial-of-service" (DoS) attack is characterized by an explicit attempt by hackers to prevent legitimate users of a service from using that service. Enable DoS DoS (Denial of Service) attacks can flood your Internet connection Prevention with invalid packets and connection requests, using so much band- width and so many resources that Internet access becomes unavailable.
- Page 46 This page can be used to set remote log server and show the system log. Check to enable logging function. Enable Log System all Activates all logging functions. Only logs related to the wireless LAN will be recorded. Wireless Only logs related to the DoS protection will be recorded. Enable Remote Log Only logs related to the Remote will be recorded.
- Page 47 Upgrade Firmware This page allows you upgrade the Access Point firmware to new version. Please note, do not power off the device during the upload because it may crash the system. Select File Click the Browse button to find and open the firmware file (the browser will display to correct file path.) Upload Click the Upload button to perform.
-
Page 48: Logout
Password Setup This page is used to set the account to access the web server of Access Point. Empty user name and password will disable the protection. User Name Key in a new login user name in the blank field. New Password Maximum input is 36 alphanumeric characters (case sensitive.) Confirmed Password... -
Page 49: Chapter 4: Pc Configuration
Chapter 4: PC Configuration Overview For each PC, the following may need to be configured: • TCP/IP network settings • Internet Access configuration • Wireless configuration Windows Clients This section describes how to configure Windows clients for Internet access via the Wireless Router. - Page 50 Checking TCP/IP Settings - Windows 2000: 1. Select Control Panel - Network and Dial-up Connection. 2. Right - click the Local Area Connection icon and select Properties. You should see a screen like the following: 3. Select the TCP/IP protocol for your network card. 4.
- Page 51 Using DHCP To use DHCP, select Obtain an IP Address automatically. This is Windows default setting. Using this setting is recommended. By default, the Wireless Router will act as a DHCP Server. Restart your PC to ensure it obtains an IP Address from the Wireless Router. Using a fixed IP Address ("Use the following IP Address") If your PC is already configured, check with your network administrator before making the following changes.
- Page 52 5. Ensure your TCP/IP settings are correct. Using DHCP To use DHCP, select the radio button Obtain an IP Address automatically. This is the default Windows setting. Using this setting is recommended. By default, the Wireless Router will act as a DHCP Server. Restart your PC to ensure it obtains an IP Address from the Wireless Router.
- Page 53 Internet Access To configure your PCs to use the Wireless Router for Internet access: • Ensure that the DSL modem, Cable modem, or other permanent connection is functional. • Use the following procedure to configure your Browser to access the Internet via the LAN, rather than by a Dial-up connection.
-
Page 54: Macintosh Clients
Macintosh Clients From your Macintosh, you can access the Internet via the Wireless Router. The procedure is as follows. 1. Open the TCP/IP Control Panel. 2. Select Ethernet from the Connect via pop-up menu. 3. Select Using DHCP Server from the Configure pop-up menu. The DHCP Client ID field can be left blank. -
Page 55: Wireless Station Configuration
Wireless Station Configuration This section applies to all Wireless stations wishing to use the Wireless Router's Access Point, regardless of the operating system which is used on the client. To use the Wireless Access Point in the Wireless Router, each Wireless Station must have compatible settings, as follows: Mode The mode must be set to Infrastructure. -
Page 56: Appendix A: Troubleshooting
Appendix A: Troubleshooting Overview This chapter covers some common problems that may be encountered while using the Wireless Router and some possible solutions to them. If you follow the suggested steps and the Wireless Router still does not function properly, contact your dealer for further advice. General Problems Problem 1: Can't connect to the Wireless Router to configure it. -
Page 57: Internet Access
Internet Access Problem 1: When I enter a URL or IP address I get a time out error. A number of things could be causing this. Try the following troubleshooting Solution 1: steps. • Check if other PCs work. If they do, ensure that your PCs IP settings are correct. -
Page 58: Wireless Access
Wireless Access Problem 1: My PC can't locate the Wireless Access Point. Check the following. Solution 1: • Your PC is set to Infrastructure Mode. (Access Points are always in Infrastructure Mode) • The SSID on your PC and the Wireless Access Point are the same. Remember that the SSID is case-sensitive. -
Page 59: Appendix B: About Wireless Lans
Appendix B: About Wireless LANs Modes Wireless LANs can work in either of two (2) modes: • Ad-hoc • Infrastructure Ad-hoc Mode Ad-hoc mode does not require an Access Point or a wired (Ethernet) LAN. Wireless Sta- tions (e.g. notebook PCs with wireless cards) communicate directly with each other. Infrastructure Mode In Infrastructure Mode, one or more Access Points are used to connect Wireless Stations (e.g. -
Page 60: Security
Security WEP (Wired Equivalent Privacy) is a standard for encrypting data before it is transmitted. This is desirable because it is impossible to prevent snoopers from receiving any data which is transmitted by your Wireless Stations. But if the data is encrypted, then it is meaningless unless the receiver can decrypt it. -
Page 61: Wireless Lan Configuration
Wireless LAN Configuration To allow Wireless Stations to use the Access Point, the Wireless Stations and the Access Point must use the same settings, as follows: Mode On client Wireless Stations, the mode must be set to "Infrastructure". (The Access Point is always in "Infrastructure" mode.) SSID (ESSID) Wireless Stations should use the same SSID (ESSID) as the Access Point they wish to connect to, but the SSID can not set to be null (blank). -
Page 62: Appendix C: Specifications
Appendix C: Specifications 802.11n/b/g Wireless Broadband Router Standards IEEE 802.11 n/b/g standards compliant Antenna 2 Dipole antennas( 2dBi) Security WEP 64, 128 WPA, WPA2 Frequency Range 2.400 ~ 2.4835GHz ( subject to local regulations) Number of Selectable USA and Canada – 11 Channels Most European countries –... - Page 63 Appendix B - Specifications...
Need help?
Do you have a question about the WR5502 and is the answer not in the manual?
Questions and answers