
Related Manuals for iM3 VET-TOME V2000


Summary of Contents for iM3 VET-TOME V2000
- Page 1 Vet-Tome INSTRUCTIONS FOR USE AND TECHNICAL MANUAL VET-TOME V2000 FOR VETERINARY USE ONLY...
-
Page 2: Introduction
Skilled application of accessories and spare parts which are not released The Vet-Tome is an automated periotome intended by iM3 invalidates all claims under warranty and any for use as a tool for tooth extraction in animals by other claims. -
Page 3: Table Of Contents
TABLE OF CONTENTS Introduction Changing Intensity (power) Parts & Features How to Use Safety Technique Use: Handpiece Tip Function Handpiece Assembly Troubleshooting 14-15 Handpiece Disassembly Cleaning & Handling 16-17 Handpiece Operation Handpiece & Tips Tip Installation Sterilization Tip Operation Disposal of Unusable Parts Use: Starting Product Specifications Use: Front Panel... -
Page 4: Parts & Features
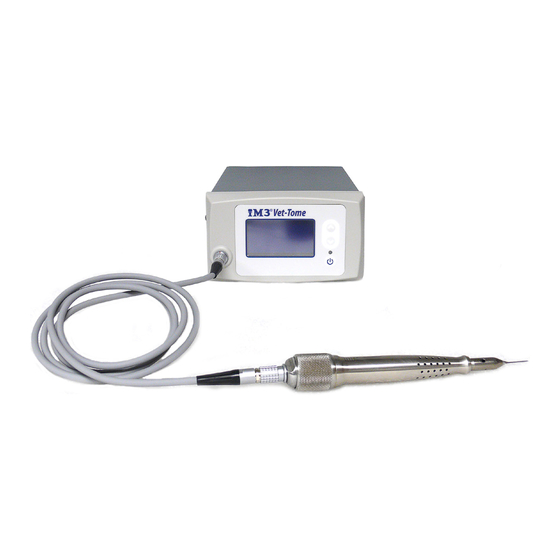
Inspect components and packaging for damage. If any components have visible defects, including dents or scratches that have penetrated the labels or coating, discoloration or moisture damage do not use the Vet-Tome. Contact iM3 or your local distributor Release Tool Power Foot immediately. - Page 5 PARTS & FEATURES Intensity Value & Intensity Icon Increasing Intensity Switch (1-10) Display Window Decreasing Intensity Switch (1-10) Indicator Light Hand Piece Connector *indicated by grey ring Hand Piece Standby Switch Mains Switch FUSE Holder Foot Switch Connector 2 x T2A/250V Replace only with same type and rating fuse...
-
Page 6: Safety
To avoid overheating the handpiece, adhere to duty cycle stated in this manual. • Do not use any accessories or replacement parts not supplied by iM3. • If at any point the handpiece is dropped inspect it for damage immediately. If the appearance or function has changed, do not use and return to iM3 for service. -
Page 7: Handpiece Disassembly
The handpiece and tips are not sterile upon delivery. The handpiece and tips must be sterilized according to manufacturer’s instructions before use and between patients. • With the handpiece in one hand, insert the solenoid assembly with handpiece cable attached into the handpiece. -
Page 8: Tip Installation
TIP OPERATION Inspect Tip for damage. If damage is found, do not use and replace tip. Tips and release tool are not shipped sterile and must be sterilized according to manufacturer’s instructions before use and Chuck between patients. See sterilization instructions. •... -
Page 9: Use: Starting
USE - STARTING Make sure the mains switch on the back of the controller is in the off position. • Connect the power cord to the rear of the controller. • Connect the footswitch connector to the rear of the controller. •... -
Page 10: Use: Front Panel
USE - FRONT PANEL Controller Display Intensity Value & Intensity Icon Display Window Increasing Intensity Switch (1-10) Decreasing Intensity Switch (1-10) Intensity Value & Intensity Icon Indicator Light Hand Piece Standby Switch Hand Piece Connector *indicated by grey ring... -
Page 11: Front Panel Operation
FRONT PANEL OPERATION Mains Switch: On/Off. Increasing Intensity Switch. Located on the back of the unit. Increases intensity of the tapping action. Hand Piece Standby Switch. Decreasing Intensity Switch. Decreases intensity of the tapping action. Indicator Light: Green Solid. The following icons may appear in the Display Panel. “Ready For Action”... -
Page 12: Turning On
TURNING ON Turning the Vet-Tome on. • Turn main power switch on located at the back of the unit. • Press and release handpiece standby switch once on the front of the unit. • Wait until self-test completes and indicator light is ready for action (solid green). •... -
Page 13: How To Use
HOW TO USE The handpiece and tips must be sterilized before use and between patients. Technique Approach the tooth at a 45° angle allowing the tip to enter the alveolus (tooth socket) and then follow parallel to the root (within the ligament space). The larger (wider and thicker) tip (V2) can be used first to create a gap, and then insert the thinner tip/blade (V1) to progress deeper. -
Page 14: Tip Function
• Turn standby switch off. cause them to break and thus require replacement. • Remove and re-attach the handpiece cable iM3 recommends tips should be replaced after connector to the controller. 10 uses/extractions. • Turn standby switch on. There is an obvious noise change when inserting the Damage to handpiece or solenoid assembly. - Page 15 Turn mains switch on, if this fails to clear the • Remove and re-attach the foot switch cable error, contact iM3 to order a replacement connector to the controller. controller. • Turn standby switch on. If the foot switch is damaged contact iM3 for fault diagnosis and replacement parts.
-
Page 16: Cleaning & Handling
CLEANING & HANDLING Follow your country-specific directives, standards and guidelines for cleaning, disinfection and sterilization. Always use sterile handling techniques when working with sterile components. Controller & Foot switch The controller and foot switch should not come in contact with the patient. Only apply external spray or wipe with microbiologically tested surface disinfectants or alcohol as required. -
Page 17: Handpiece & Tips
134 °C (273.2 °F) If the handpiece or tips show signs of physical degradation or deformity, including colour change, do not reuse. iM3 recommends replacing hand pieces and tips if this occurs. • Allow the handpiece and tips to cool at room temperature before use. -
Page 18: Product Specifications
PRODUCT SPECIFICATIONS Technical Description Model: Vet-Tome (product code V2000) Manufacturer: iM3 Inc. 12414 NE 95th St, Vancouver, WA 98682 USA Supply Voltage & Current: 100 to 240 Volts AC, 500 mA max Supply frequency: 50/60 Hz Mode of Operation: Intermittent with max. 15 seconds of continuous operation... -
Page 19: Warranty
Claims under warranty – accompanied by proof of purchase – must be sent to the vendor or to an authorized iM3 service organization. The provision of service under warranty extends neither the warranty period nor any other... -
Page 20: Service
Manufactured for and serviced by: The Vet-Tome contains no internal user serviceable parts. Refer all service or repairs to qualified service personnel at iM3 or accredited iM3 Authorised Service Partners. www.im3vet.com iM3 Inc 12414 NE 95th St,Vancouver, WA 98682 USA Ph: +1 800 664 6348 Fax: +1 360 254 2940 Email: info@im3usa.com...
Need help?
Do you have a question about the VET-TOME V2000 and is the answer not in the manual?
Questions and answers