Table of Contents

Subscribe to Our Youtube Channel
Related Manuals for Rane Black&Blue


Summary of Contents for Rane Black&Blue
-
Page 1: User Guide
User Guide English (3–11) Guía del usuario Español (12–20) Guide d’utilisation Français (21–29) Guida per l’uso Italiano (30–38) Benutzerhandbuch Deutsch (39–47) Appendix English (48–49) - Page 3 User Guide (English) Introduction Thank you for purchasing the Black & Blue. At Rane, performance and reliability mean as much to us as they do to you. That’s why we design our equipment with only one thing in mind—to make your performance the best it can be.
-
Page 4: Setup Diagram
Setup Diagram Items not listed under Introduction > Box Contents are sold separately. Bluetooth Sources Computer Bluetooth Antennas Tablet Power Amplifier Loudspeaker 4 - 8 Ω Loudspeakers 70 V 100 V... -
Page 5: Application Examples
Application Examples Meeting Room This example shows: - a head-worn Bluetooth microphone paired to Bluetooth input A - the Amplifier output connected to full-range speakers - the Mix button is depressed to monitor a mix of the Bluetooth A and Computer sources Tablet Bluetooth microphone... - Page 6 Coffee Bar This example shows: - a head-worn Bluetooth microphone paired to Bluetooth input A - a smartphone paired to Bluetooth input B - a TV with a Bluetooth transmitter paired to Bluetooth input C - the Amplifier output connected to full-range speakers Bluetooth microphone TV with Bluetooth...
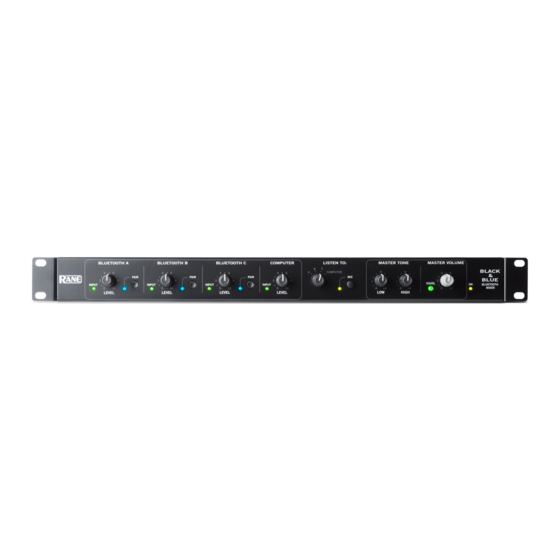
- Page 7 Features Front Panel 11 12 Bluetooth Signal LED: This LED will illuminate green when the Bluetooth signal exceeds -40 dBFS. Input Level Knob: Turn this knob to adjust the input signal level for the individual Bluetooth channels. Pairing LED: This LED flashes when the Pair button is pressed and held for 3 seconds and is lit solid when paired to a Bluetooth source.
- Page 8 Rear Panel Power Input: Connect the included power cable here. Power Amplifier Output: This sends the master signal to your loudspeaker. 4 – 32 ohms, 70 V, and 100 V connections are provided. Connect this to your loudspeaker using a properly terminated 4-pin Euroblock connector and appropriately sized wire.
-
Page 9: Operation
Operation Pairing Bluetooth Sources 1. Connect the 3 included Bluetooth antennas to the connectors on Black & Blue’s rear panel. 2. Power on Black & Blue. The power LED will illuminate solid. 3. Press and hold the Pair button for 3 seconds for the particular Bluetooth input you desire to connect to for your Bluetooth source. - Page 10 Recording 1. Connect a USB cable from Black & Blue's USB port to an available USB port on your computer. 2. See the section Computer Setup > Setting Black & Blue as the Default Recording Device to set Black & Blue as the default recording device. 3.
- Page 11 Computer Setup Setting Black & Blue as the Default Recording Device Windows XP: Click Start Menu Control Panel (or Settings Control Panel in Classic View) • Sound and Audio Devices. Click the Audio tab and under Sound recording, select USB Audio Codec as the default device.
- Page 12 Guía del usuario (Español) Introducción Gracias por comprar el Black & Blue. En Rane, el rendimiento y la confiabilidad significan tanto para nosotros como para usted. Por eso es que diseñamos nuestros equipos con una sola cosa en mente—hacer que pueda tocar su mejor interpretación.
-
Page 13: Diagrama De Instalación
Diagrama de instalación Los elementos que no se enumeran en Introducción > Contenido de la caja se venden por separado. Fuentes Bluetooth Ordenador Bluetooth Antenas Tableta Suministro eléctrico Amplificador Black Series 4 - 8 Ω Altavoces 70 V 100 V... -
Page 14: Ejemplos De Aplicación
Ejemplos de aplicación Salas de reunión Este ejemplo muestra: - Un micrófono Bluetooth de diadema apareado a la entrada Bluetooth A - La salida Amplifier conectada a los altavoces de rango completo - El botón Mix se pulsa para monitorizar una mezcla de las fuentes de Bluetooth A y Computer Tableta Micrófono... - Page 15 Cafetería Este ejemplo muestra: - Un micrófono Bluetooth de diadema apareado a la entrada Bluetooth A - Un teléfono inteligente (smartphone) apareado con la entrada Bluetooth B - Una TV con un transmisor Bluetooth apareado a la entrada Bluetooth C - La salida Amplifier conectada a los altavoces de rango completo Una TV con un transmisor Bluetooth...
- Page 16 Características Panel frontal 11 12 LED de señal Bluetooth: Este LED se iluminará de color verde cuando la señal Bluetooth supere los -40 dBFS. Perilla de nivel de entrada: Gire esta perilla para ajustar el nivel de la señal de entrada de los canales Bluetooth individuales.
- Page 17 3 1 3 5 11 12 14 Panel trasero Entrada de corriente: Conecte aquí el cable de alimentación incluido. Salida del amplificador de potencia: Esta salida envía la señal maestra a su altavoz. Se proveen conexiones de 4 – 32 ohmios, y 70 y 100 V. Conecte esta salida su altavoz utilizando un conector Euroblock de 4 patillas correctamente terminado y un cable del tamaño apropiado.
- Page 18 Funcionamiento Apareamiento de fuentes Bluetooth 1. Conecte las 3 antenas Bluetooth incluidas en los conectores del panel trasero del Black & Blue. 2. Encienda el Black & Blue. El LED de encendido se enciende de forma permanente. 3. Mantenga pulsado durante 3 segundos el botón Pair de la entrada Bluetooth en particular a la cual desea conectarse para utilizar como fuente Bluetooth.
- Page 19 Grabación 1. Conecte un cable USB desde el puerto USB del Black & Blue a un puerto USB disponible en el ordenador. 2. Consulte la sección Configuración del ordenador > Configuración del Black & Blue como dispositivo de grabación predeterminado para configurar al Black &...
-
Page 20: Configuración Del Ordenador
Configuración del ordenador Cómo ajustar el Black & Blue como dispositivo de grabación predeterminado • Windows XP: Haga clic en el menú Start (Inicio) Control Panel (Panel de control) (o Settings [Ajustes] Control Panel [Panel de control] en la vista clásica) Sound and Audio Devices (Dispositivos de sonido y audio). Haga clic en la pestaña Audio y bajo Sound recording (Grabación de sonido), seleccione USB Audio Codec como dispositivo predeterminado. - Page 21 Guide d’utilisation (Français) Présentation Merci d’avoir fait l’acquisition du Black & Blue. Chez Rane, la performance et la fiabilité sont aussi importantes pour nous qu’ils le sont pour vous. C’est pourquoi nous concevons nos produits avec une seule chose en tête — faire de votre performance la meilleure qui soit.
-
Page 22: Schéma D'installation
Schéma d'installation Les articles qui ne figurent pas dans la section Présentation > Contenu de la boîte sont vendus séparément. Sources Bluetooth Ordinateur Antennes Bluetooth Tablette Alimentation Amplificateur Enceinte 4 - 8 Ω Enceintes 70 V 100 V... -
Page 23: Exemples D'applications
Exemples d’applications Salle de réunion Cet exemple montre : - un casque d’écoute Bluetooth avec microphone est jumelé à l’entrée Bluetooth A - la sortie Amplifier est reliée à des enceintes à gamme étendue - la touche Mix est enfoncée afin de contrôler le mix des sources Bluetooth A et Computer Tablette Microphone Bluetooth... - Page 24 Bar à café Cet exemple montre : - un casque d’écoute Bluetooth avec microphone est jumelé à l’entrée Bluetooth A - un smartphone est jumelé à l’entrée Bluetooth B - un téléviseur avec émetteur Bluetooth est jumelé à l’entrée Bluetooth C - la sortie Amplifier est reliée à...
-
Page 25: Caractéristiques
Caractéristiques Panneau avant 11 12 DEL du signal Bluetooth : Cette DEL devient verte lorsque le signal Bluetooth dépasse -40 dBfs. Bouton du niveau d’entrée Bluetooth : Ce bouton permet d'ajuster le niveau du signal d’entrée pour chaque canal Bluetooth. DEL de jumelage : Cette DEL clignote lorsque la touche Pair est maintenue enfoncée pendant 3 secondes et demeure allumée lorsque l'appareil est connecté... - Page 26 3 1 3 5 11 12 14 Panneau arrière Entrée d'alimentation : Cette entrée permet de brancher câble d’alimentation fourni. Sortie d'amplificateur : Cette sortie transmet le signal principal à une enceinte. Les options de connexions sont 4 – 32 ohms, 70 V et 100 V. Utilisez un connecteur Euroblock à...
- Page 27 Fonctionnement Jumelage des sources Bluetooth 1. Branchez les trois antennes Bluetooth fournies aux connecteurs arrière du Black & Blue. 2. Mettez le Black & Blue sous tension. La DEL d’alimentation devrait s’allumer. 3. Maintenez la touche Pair de l’entrée Bluetooth à laquelle vous souhaitez connecter votre appareil Bluetooth enfoncée pendant 3 secondes.
- Page 28 Enregistrement 1. Branchez un câble USB du port USB du Black & Blue à un port USB sur votre ordinateur. 2. Veuillez consulter la section Configuration de l’ordinateur > Configuration du Black & Blue comme périphérique d’enregistrement par défaut avant de commencer à...
- Page 29 Configuration de l’ordinateur Configuration du Black & Blue comme appareil d’enregistrement par défaut Windows XP : Cliquez sur Démarrer Panneau de configuration (ou Paramètres Panneau de • configuration en Affichage classique) Sons et périphériques audio. Cliquez sur l’onglet Audio sous Enregistrement audio et sélectionnez «...
-
Page 30: Guida Per L'uso (Italiano)
Guida per l'uso (Italiano) Introduzione Grazie per aver acquistato il Black & Blue. Per noi di Rane, prestazioni e affidabilità contano moltissimo, proprio come per te. Ecco perché progettiamo i nostri dispositivi con un unico obiettivo in mente: rendere le tue prestazioni le migliori possibili. -
Page 31: Schema Di Configurazione
Schema di configurazione Elementi non elencati sotto Introduzione > Contenuti della confezione sono venduti separatamente. Fonti Bluetooth Computer Antenne Bluetooth Tablet Alimentazione Amplificatore Altoparlante 4 - 8 Ω oppure Altoparlanti 70 V oppure 100 V... -
Page 32: Esempi Di Applicazione
Esempi di applicazione Sala conferenze Questo esempio mostra: - un microfono Bluetooth con archetto collegato all’ingresso A Bluetooth - l’uscita Amplifier collegata ad altoparlanti a gamma completa - il tasto Mix è premuto per monitorare un mix delle fonti Bluetooth A e Computer Tablet Microfono Bluetooth... - Page 33 Questo esempio mostra: - un microfono Bluetooth con archetto collegato all’ingresso A Bluetooth - uno smartphone collegato all’ingresso B Bluetooth - una TV con un trasmettitore Bluetooth collegato all’ingresso C Bluetooth - l’uscita Amplifier collegata ad altoparlanti a gamma completa Microfono Bluetooth TV con trasmettitore Bluetooth...
- Page 34 Caratteristiche Pannello anteriore 11 12 LED segnale Bluetooth: questo LED si illumina di verde quando il segnale Bluetooth supera -40 dBFS. Manopola Input Level: girare questa manopola per regolare il livello del segnale di ingresso per i singoli canali Bluetooth. LED di collegamento: questo LED lampeggia quando il tasto Pair viene mantenuto premuto per 3 secondi ed è...
- Page 35 11 12 14 Pannello posteriore Ingresso di alimentazione: collegare a questo livello il cavo di alimentazione in dotazione. Uscita amplificatore: invia il segnale master all’altoparlante. Sono presenti collegamenti a 4 – 32 ohm, 70 V, e 100 V. Collegarla all’altoparlante servendosi di un connettore Euroblock a 4 perni adeguato e un cavo delle dimensioni adeguate.
- Page 36 Collegamento di fonti Bluetooth 1. Collegare le 3 antenne Bluetooth in dotazione ai connettori presenti sul pannello posteriore del Black & Blue. 2. Accendere il Black & Blue. Il LED di alimentazione si illumina in maniera fissa. 3. Tenere premuto il tasto Pair per 3 secondi per l’ingresso Bluetooth specifico cui si desidera collegare la fonte Bluetooth.
- Page 37 Registrazione Collegare un cavo USB dalla porta USB del Black & Blue a una porta USB disponibile del computer. Si veda la sezione Setup computer > Configurazione del Black & Blue come dispositivo di registrazione predefinito per impostare il Black & Blue come dispositivo di registrazione predefinito.
- Page 38 Configurazione del computer Configurare il Black & Blue come dispositivo di registrazione predefinito Windows XP: cliccare sul Menu Start Pannello di controllo (o Impostazioni Pannello di controllo • nella vista Classica) Suoni e periferiche audio. Cliccare sulla scheda Audio e selezionare USB Audio Codec come periferica predefinita sotto Registrazione suoni.
- Page 39 Benutzerhandbuch (Deutsch) Einführung Vielen Dank für den Kauf des Black & Blue. Bei Rane schätzen wir Leistung und Zuverlässigkeit - genau wie Sie. Darum entwerfen wir unsere Geräte stets nur mit einem einzigen Ziel vor Augen: Ihre Anwendung so gut wie möglich zu unterstützen.
- Page 40 Aufbaudiagramm Teile, die nicht unter Einführung > Lieferumfang angegeben sind, sind separat erhältlich. Bluetooth- Quellen Computer Bluetooth Antennen Tablet Stromversorgung Verstärker Lautsprecher 4 - 8 Ω oder Lautsprecher 70 V oder 100 V...
- Page 41 Anwendungsbeispiele Konferenzraum Dieses Beispiel zeigt: - ein am Kopf getragenes Bluetooth-Mikrofon, das mit dem Bluetooth-Eingang A verbunden ist - den Amplifier-Ausgang, der mit Full-Range-Lautsprechern verbunden ist - die Mix-Taste ist heruntergedrückt, um das Monitoring der Bluetooth A und Computer- Quellen zu ermöglichen Tablet Bluetooth- Mikrofon...
- Page 42 Kaffeebar Dieses Beispiel zeigt: - ein am Kopf getragenes Bluetooth-Mikrofon, das mit dem Bluetooth-Eingang A verbunden ist - ein Smartphone, das mit dem Bluetooth-Eingang B verbunden ist - ein TV-Gerät mit einem Bluetooth-Sender, das mit dem Bluetooth-Eingang C verbunden - den Amplifier-Ausgang, der mit Full-Range-Lautsprechern verbunden ist ein TV-Gerät mit Bluetooth-Mikrofon einem Bluetooth-...
- Page 43 Funktionen Vorderseite 11 12 Bluetooth-Signal-LED: Diese LED leuchtet grün, wenn das Bluetooth-Signal - 40 dBFS überschreitet. Eingangspegelregler: Drehen Sie diesen Regler, um den Eingangssignalpegel für die einzelnen Bluetooth-Kanäle einzustellen. Koppel-LED: Diese LED blinkt, wenn die Pair-Taste gedrückt und 3 Sekunden lang gedrückt gehalten wird und leuchtet konstant, wenn sie mit einer Bluetooth-Quelle gekoppelt ist.
- Page 44 11 12 14 Rückseite Netzeingang: Schließen Sie das mitgelieferte Netzkabel hier an. Endstufenausgang: Sendet das Master-Signal an Ihren Lautsprecher. Es stehen 4 - 32 Ohm, 70 V und 100 V Anschlüsse zur Verfügung. Schließen Sie dies an Ihren Lautsprecher an, indem Sie einen 4-poligen Euroblock-Stecker einen entsprechend dimensionierten...
-
Page 45: Betrieb
Betrieb Koppeln von Bluetooth-Quellen 1. Schließen Sie die 3 mitgelieferten Bluetooth-Antennen an die Anschlüsse an der Rückseite von Black & Blue an. 2. Schalten Sie Black & Blue ein. Die Betriebsanzeige leuchtet dauerhaft. 3. Halten Sie die Pair-Taste 3 Sekunden lang gedrückt, um den Bluetooth-Eingang auszuwählen, den Sie für Ihre Bluetooth-Quelle verwenden möchten. - Page 46 Aufnahme Verbinden Sie den USB-Anschluss des Black & Blue mit einem freien USB- Anschluss Ihres Computers mit einem USB-Kabel. Lesen Sie den Abschnitt Computer-Setup > Einstellungen, um Black & Blue als Standard-Aufnahmegerät festzulegen. Öffnen Sie auf Ihrem Computer Ihre bevorzugte Aufnahmesoftware. Hinweis: Um die Musik während der Wiedergabe zu hören oder um Aufnahmeinhalte zu überwachen, verwenden Sie die Lautsprecher Ihres Computers oder verbinden den Master-Ausgang des Black &...
- Page 47 Computer-Setup Einstellen von Black & Blue als Standardaufnahmegerät Windows XP: Klicken Sie auf Startmenü Systemsteuerung (oder Einstellungen Systemsteuerung • in der klassischen Ansicht) Sound und Audiogeräte. Klicken Sie auf die Registerkarte Audio unter Aufnahme und wählen USB Audio Codec als Standard-Gerät aus. Wählen Sie Eigenschaften aus und klicken Sie auf die Registerkarte Erweitert, um das Standardformat 44100 Hz oder 48000 Hz auszuwählen.
-
Page 48: Block Diagram
Appendix (English) Block Diagram UNIVERSAL AC MAINS POWER SUPPLY & POINT OF LOAD REGULATORS PAIR INPUT BUFFER BLUETOOTH 4.0 LEVEL CONTROL PAIR INPUT BUFFER BLUETOOTH 4.0 LEVEL CONTROL PAIR INPUT BUFFER BLUETOOTH 4.0 LEVEL CONTROL INPUT BUFFER INPUT LEVEL CONTROL MINI TRS BUFFER (sum T/R) -
Page 49: Technical Specifications
Specifications are subject to change without notice. Trademarks & Licenses Rane is a trademark of inMusic Brands, Inc., registered in the U.S. and other countries. The Bluetooth word mark and logos are registered trademarks owned by Bluetooth SIG, Inc. and any use of such marks by Rane is under license. - Page 52 Manual Version 1.4...
Need help?
Do you have a question about the Black&Blue and is the answer not in the manual?
Questions and answers