Table of Contents
Advertisement
Quick Links
Advertisement
Table of Contents

Subscribe to Our Youtube Channel
Related Manuals for Asus Tucana


Summary of Contents for Asus Tucana
- Page 1 Asus Mobile Tucana Cell Phone User Guide...
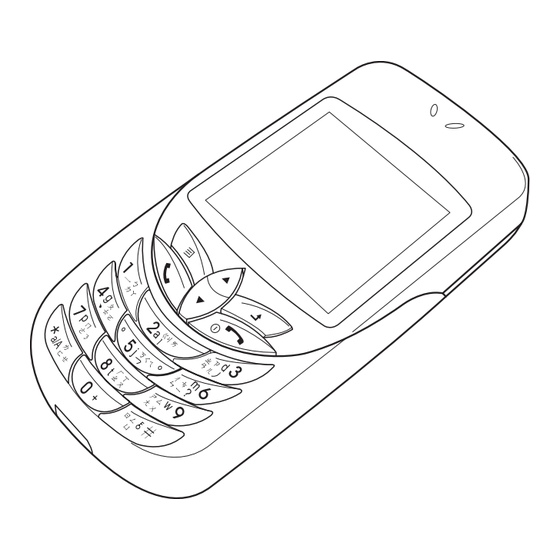
- Page 3 Welcome Congratulations on your purchase of an Asus Mobile Tucana Cell Phone. The following illustration displays the features found on the front of your phone. Strap Eyelet Attach phone Speaker strap to carry easily. Screen Up/Down Navigation Key Scroll through Left/Menu menu items.
-
Page 4: Overview
Stay in touch with wireless networking The Tucana is a phone for people who want to stay in touch with the world. In addition to all the basic calling and messaging functions you would expect with a cell phone, it supports multimedia messaging, allowing you to send and receive pictures. -
Page 5: Unpacking List
Unpacking list The following items come included in the box with your phone. Battery charger Cell phone User manual Note: Please save the original box and packing materials in case you need to repack any items or send them for servicing. -
Page 7: Table Of Contents
Contents Overview....... 4 Unpacking list ......5 Getting Started . - Page 8 Redialing a number..... . 17 Caller ID ......17 Showing or hiding personal information .
- Page 9 Viewing the status of the phone ... 23 Messages......24 Sending messages .
- Page 10 Entering your name and phone number ..46 Time and date......46 Ring style .
- Page 11 Viewing and Editing Notes ....55 Deleting Notes ......56 Sending Notes .
-
Page 12: Getting Started
Getting Started Inserting the SIM card and battery When you register with a service provider, you receive a SIM card (Subscriber Identity Module card). Your phone must have a SIM card in order to make calls. The SIM card is a computer chip that contains your phone number, phone book information, and service provider information. - Page 13 Place the new SIM card in the lower right corner. The gold plate on the SIM card should face down. Slide the SIM card into position, secured under the metal clips. Metal Clips Replace the battery cover. Place the back cover against the phone case, then slide it upwards to lock into...
-
Page 14: Turning The Phone On
Turning the phone on 1. Hold down the Power/end key until the screen lights If needed, enter your SIM card PIN code and press OK. Turning the phone off Press the Power/end key and hold until the phone shuts down. -
Page 15: Charging The Battery
Charging the battery 1. Connect the charger plug to an outlet. Connect the charger to the socket at the bottom of the phone. The connector can only be inserted one way. Note: For best battery performance, allow the battery to charge and discharge completely the first few times you use it. -
Page 16: Making A Call
Making a call 1. Enter the number you wish to dial. If you make a mistake, select Clear to delete. (The right soft key is just under the word Clear on the lower right screen, so select this key to clear a number.) To delete an entire number, press and hold the key. -
Page 17: Using Your Phone
Using Your Phone Standby mode When your phone is on, but not in use, it is in standby mode. During standby mode, the upper part of the display screen shows various icons. 11/11/2005 14:35 Menu Camera The date and time is displayed at the bottom of the screen. Beneath the date and time are Menu in the left corner and Camera in the right corner. - Page 18 The Standby screen icons are as follows: Bars indicate the strength of the GMS network signal. Five bars means your current position has the best recep- tion. Alarm is set. A text message has been received. A multimedia message has been received.
-
Page 19: Menu
Menu To view the menu, select the left soft key from the main display. Select Exit After the menu appears, scroll through menu items with the up and down navigation keys. Beneath the main menu are Select, to the left, and Exit, to the right. - Page 20 For example, to view missed calls, use the navigation key to scroll to Call Logs. Press the right navigation key to select. In the submenu, scroll down to Missed Calls, the second item, then press the right navigation key to select Tip: Hitting the Power/End key is an alternative way to exit any menu.
- Page 21 Personal Information Manager (PIM) contains a simple calculator and a calendar for scheduling appointments. You can also enter notes or record memos. Camera enables you to take pictures with your phone. Pictures are also stored here. Fun and Games has a number of games as well as tools to manipulate audio and pictures.
-
Page 22: Function Keys
Function keys The following table lists the phone’s keys and their functions. Power/end key • Hold to turn the phone on or off. • Press to stop an incoming call or cancel a call you are dialing. • Press to exit any menu view. Send/answer key •... -
Page 23: Text Entry
Up and down navigation key • Press to scroll through menu items. • Press the up arrow to view the main menu. • Press to move up and down when playing games. Text entry When you add names to your address book, send a text message, or use your WAP browser, you need to enter text. -
Page 24: Multitap Text Entry
Multitap text entry Multitap text entry enables you to enter individual letters. This is ideal for adding a phone book entry or entering a WAP address. Press a key repeatedly to scroll through the assigned characters. When you find the desired character, enter it by typing the next letter on another key. - Page 25 Assigned Characters M N O Ñ Ö Ø ò 6 P Q R S ß 7 Y U V Ü ü 8 W X Y Z 9 For practice, try entering text into a text message (SMS). > From the menu, go to Messages New SMS.
-
Page 26: T9™ Text Entry
Press to enter p, then press two times to enter h. Continue until the word “phone” is entered. T9™ text entry T9™ text entry is a predictive text entry method. It uses a built-in dictionary to predict the word you are typing. You can choose the correct word from the suggestions on the bottom of the screen. - Page 27 Press the key once again for the third letter b. cab is the first character combination, and it appears on the screen, Scroll to bab, select, and bab appears on the screen. Press the key. The T9™ system predicts that baby is the probably the only word in English beginning with bab, and this word only appears on the screen.
-
Page 28: Calling Features
Calling Features Redialing a number Press the send/answer key. A list of numbers dialed appears, with the last number dialed at the end of the list. Select the number you wish to dial, and press the send/answer key. Dialed numbers can also be accessed from call logs>dialed. Caller ID If you have entered a contact’s name and phone number into the phone book, then when the contact calls you, the name... -
Page 29: Canceling An Incoming Call
Canceling an incoming call If you would like to cancel an incoming call, press the power/end key. Depending on your service provider, the caller may be transferred to your voice mail, or may hear a busy signal. Call logs To view missed calls, as well as logs of dialed calls and received calls, select call logs from the main menu. -
Page 30: Answer Mode
Answer mode The default setting for the phone is to answer when you press the send/answer key. However, you may also set the phone to pick up with any key, or to answer automatically.Select any of these options at settings<call settings<answer mode. Call waiting If your service provider offers call waiting, you first need to enable the call waiting option by selecting activate at... -
Page 31: Timing Calls
Timing Calls Depending on the type of service package you have, you may pay according to the length of your calls. Some users like to monitor the length of their calls. Your phone offers a convenient and accurate way to keep track of length and costs of calls at Call logs>Call Info>Call Costs and Call Timers. -
Page 32: Phone Book
Phone Book The phone book enables you to store information for your contacts, including phone numbers, fax numbers, addresses, and email address. You can also set up special information for contacts, such as ringtone, picture, group, company, and URL. You can access the phone book from either Main Menu>Phonebook or by pressing the Down navigation key. -
Page 33: Copying Contact Information To Sim Card
groups, fixed dialing lists and speed dialing, and view your own number and memory status. Copying contact information to SIM card Copying contact information to the SIM card means the information can be read using other handsets by exchanging the SIM card. -
Page 34: Using A Fixed Dialing List
Using a fixed dialing list Fixed Dialing Lists restrict the calls that can be made with the SIM card to those specified in the list. To specify a number in the Fixed Dialing List, select Fixed Dial List and then select an entry to view, edit, or delete. -
Page 35: Messages
Messages From the Messages section of the menu, you can send and receive text messages (SMS) or multimedia messages containing a combination of audio, pictures, or text (MMS). If you have received a new text message or voice message, the envelope icon in the standby screen will flash on and off. - Page 36 The phone supports two types of text entry, Multitap, and T9™ predictive text input. For more information, see Text entry: The basics on page 12. 1. Enter the text of your message. To send the message, select Options>Send. Selecting Options from the text entry box also enables you to select the following options: Send Prompts you to enter a phone number and...
- Page 37 Input method Switch between Multitap and T9™ predictive text input. Setting need more info Capacity need more info Shortcut keys key switches between different case entry methods. The text entry icon at the top of the screen shows text entry modes.
-
Page 38: Multimedia Messages (Mms)
Multimedia Messages (MMS) Composing a new multimedia message To compose a multimedia message, select Messages>New MMS. Three options appear: Text Image Audio Add text 1. Scroll to Text and select to enter text. The text entry box is the same as the text entry box for a text-only message.Enter text. - Page 39 Add images 1. Select Image to add a picture or photograph to the message. A list of images appears in the phones My Pictures folder. Select the photo you wish to add and select OK. The photo is automatically added to the MMS. In the main MMS screen, you see the text and images of your message combined together.
- Page 40 Sending the MMS 1. From the main MMS screen, press the send/answer key. Select Send. When you press the send/answer key from the main MMS screen, the following options also appear: Insert new Inserts a new page into the message. page Send Sends the message.
-
Page 41: Information Services
Additional options for composing multimedia messages When you select Messages<MMS, in addition to composing a new message, the following MMS options also appear on the screen: Inbox Received messages are stored here. Drafts You may select a previous draft to work with or delete drafts. -
Page 42: Voicemail
The phone comes with an information message box already set up. However, you need to enable various settings for it to work: Reception Enable on. Auto Display Enable on or off according to your preference Set Info. Choose among services offered by your provider. -
Page 43: Using The Camera And Managing Photos
Using the Camera and Managing Photos Your phone has an easy-to-use, built-in digital camera. After you take photos with it, you can send them to friends and family, set them as wallpaper, or even add a photo to your phone book, so that the picture appears when a someone calls you. -
Page 44: Self-Portrait
Self-portrait You can take a self-portrait by using the small mirror on the back of your phone. Hold the camera with one hand and use another to press Capture. Look at your reflection in the mirror to position the camera. Settings There are two ways to adjust settings. - Page 45 Image Resolution. Select high, medium, or low resolution. “Resolution” refers to image quality and clarity. Tip: High resolution requires the most memory. To save memory space, select middle or low resolution. While in picture-taking mode (Camera>Activate), select Options to view camera settings icons and adjust camera settings.
-
Page 46: Managing Your Photos
Icon here Color effects. Scroll through several color effects. Color filters add a certain color to the entire shot. For example, with a blue filter, all objects in the picture are taken with a blue shade or overtone. There is also a photo negative effect and a color inversion effect, which replaces original colors with other colors. -
Page 47: Adding Effects To Your Photos
on Center views. For more information on wallpaper, see Display on page 47 Set to Caller ID. Associate a photo with a contact in your phonebook. When the contact calls you, the photo displays. 1. Select Options>Caller ID. A list of contacts in your phonebook appears. Select the de- sired contact. - Page 48 decorative frames and animations or change the look of a photo through artistic filters. Animation The Animated Frame option adds a decorative animated picture frame. Animated Morph will animate a portion of the photo. Use the scroll bar keys to select different portions of the photo to animate.
- Page 49 Face Off contains the types of effects you would expect to find at a carnival. Morph twists the shape of a face or other selection something like the twisted reflections in a funhouse mirror. You may reapply this function several times to create even weirder effects.
- Page 50 Filter applies a variety of artistic effects to your photos. Blur decreases definition and contrast of objects. A radius bar appears. Increase or decrease the amount of blur by setting levels on the bar, using the up/down navigation keys. Sharpen increases definition and contrast of objects. Fill Flash distributes light evenly over both the subject and the background.
- Page 51 Adjustment enables you to adjust some of the basic visual components of a photo. After viewing an adjustment, press select to either undo or save the changes. Hue/Saturation refer to the purity of a color, without dilution by black or white. Increasing hue/saturation makes the colors look deeper and more intense.
-
Page 52: Fun And Games
Fun and Games The Fun and Games section of the menu contains games, as well as creative sound and image tools. Album Selecting Album opens the photo album, along with the same functions found in Camera>View Pictures. For more information on managing and editing photos, see Managing your photos on page 35. - Page 53 stores up to five tunes. The factory default setting for these phones is empty, so you can create completely new melodies. Here is how to create a melody in Composer: Select a melody, then select Edit. Choose one channel, from channels 1-4. A keyboard and blank music score appear on the screen.
- Page 54 notes on a seven-note scale from do/C Keys to si/B. through Adds a dot to a note. (Lengthens duration.) Select notes using the up/down navigation key. Press to change the value of notes, among Change the values of rests, among Adds a rest.
-
Page 55: Games
Games Your phone contains two games, RallyProContest, and Xfinity. To navigate through games: , Use the keys to move right and left. Move up and down up and down navigation key Move right and left. keys If you receive a phone call or message or an alarm sounds while you are playing a game, the game pauses. -
Page 57: Settings In Your Phone
Settings in Your Phone In the settings section of the menu, you can select settings for personal preferences, such as display or ring style. You can also set useful features such as time and date or security features. This section of the manual introduces the most commonly used features. -
Page 58: Ring Volume
You may also compose your own ring tone. For more information, see Composer on page 41 Ring volume To adjust ring volume, go to Settings>Sound and Alert>Ring Volume. Earpiece and ring volume, ring style, and answering settings can also be set together in Settings>Profile. In profile, you select the type of environment you are in, and earpiece and ring volume adjust accordingly. -
Page 59: Start-Up Animation
There are two display options: Fit to Screen, and Put on Center. Choosing Fit to Screen means the picture fills the entire screen. Choosing Fit to Screen places the picture over the entire screen. Put on Center centers an image which is smaller than the size of the screen. -
Page 60: Language
Language Set the language for displays and menus, as well as for language input. Go to Settings>Handset>Language. The automatic setting automatically sets the phone to the main language of the regional service provider. Security SIM card lock To protect your phone from unauthorized use, you can enable PIN (Personal Identification Number) protection. -
Page 61: Network Information
You may also set the phone to automatically lock the keypad when the phone is unused for a certain period of time, by going to Settings>Handset>Auto Keylock. The auto keylock can be set to on or off. Network information View information about the type of network your phone is operating on at Settings>Handset>PLMN. -
Page 63: Personal Information Manager (Pim)
Personal Information Manager (PIM) Your phone has a Personal Information Manager which includes a calendar, notebook, alarm clock and calculator. Select PIM on the main menu to access the Personal Information Manager. Calendar Your phone has a calendar which you can use to keep track of your appointments. -
Page 64: Viewing And Editing Appointments
If the Date field is not correct, change it by pressing Select, choosing a day from the calendar then pressing Select again. Use the number keys to change the Start Time, End Time, Subject and Note fields. To change the other fields, press Select, select the new set- ting and press Select again. -
Page 65: Deleting Appointments
1. Follow the previous steps for viewing an appointment but instead of pressing View to view an appointment’s details, press Options. Select the Edit option and press Select. Edit the details as described in “Adding Appointments” on page 52 and press Save. -
Page 66: Notes
Notes You can use the phone to record important information such as names of people or places or as a reminder to do an important task. Select Notes from the PIM sub-menu and press the Left arrow key to access notes. Adding Notes To add a note: 1. -
Page 67: Deleting Notes
Deleting Notes To delete a Note: 1. Select the note you want to delete and press Options. Select Delete to delete the selected note or Delete All to de- lete all notes. Press Select then press Yes to delete the note or notes. Sending Notes You can send notes to someone else. -
Page 68: Calculator
Select Repeat Daily and press Select to turn it on or off. By turning this on, the alarm will activate at the same time each day. Select Alarm Status and press Select to turn the alarm on or off. Calculator The calculator provides basic calculation functions such as addition and subtraction. -
Page 69: Voice Memo
Calculator Phone Key Function Clear/ Press the right key located just under the delete symbol on the calculator to clear the last number entered. This is also used to calculator window after the value has been calculated. Press the menu key, located just under the calculator’s symbol to perform the calculation. -
Page 70: Listening To Voice Memos
Press record to begin recording a memo. Press the stop key to stop recording. Press the play key to listen to the recording. Press the floppy disk, enter a name for the recorded memo and press Options. Select Save and press Select to save the recorded memo. NOTE: If you save a voice memo with the same name as an existing one, the new voice memo will record over the old one. -
Page 71: Renaming Voice Memos
Renaming Voice Memos To rename a voice memo. 1. Select the voice memo you want to rename from the list and press Options. Select Rename from the list and press Select. Type in a new name and press Options. Select Save and press Select to rename the voice memo. Setting Voice Memos to a Ringtone The phone enables you to set a voice memo to a ringtone. -
Page 72: Wap
Wireless Application Protocol (WAP), allows you to browse the web, much like you would on a regular computer. Unlike regular websites, though, sites designed for WAP include only key content, and generally do not include graphics. WAP access is provided through your service provider. Check with your service provider to see if your service package includes WAP access. -
Page 73: Homepage
Homepage The Homepage is where you can browse the internet. You can browse by manually entering URLs or by accessing stored bookmarks. To stop browsing, press . When browsing, you can: • Add the current address to your bookmarks • Save a picture from the site •... -
Page 74: Wap Push
To add a new provider: 1. Press Select Add. Using the Up and Down navigation keys and the number keys to enter the Profile name, and settings according to those supplied by the provider Select Save to save the settings. WAP Push WAP Push is a service which provides a WAP-accessible URL embedded in an SMS. -
Page 75: Additional Information
Additional Information FCC Regulation: This model phone complies with part 15 of the FCC Rules. Operation is subject to the condition that this device does not cause harmful interference. This device complies with Part 15 of the FCC Rules. Operation is subject to the following two conditions:(1) this device may not cause harmful interference, and (2) this device must accept any interference received, including interference that may cause... -
Page 76: Rf Exposure Information (Sar)
• Reorient or relocate the receiving antenna. • Increase the separation between the equipment and receiver. • Connect the equipment into an outlet on a circuit different from that to which the receiver is connected. • Consult the dealer or an experienced radio/TV technician for help. - Page 77 The exposure standard for wireless mobile phones employs a unit of measurement known as the Specific Absorption Rate, or SAR. The SAR limit set by the FCC is 1.6W/kg. Tests for SAR are conducted using standard operating positions accepted by the FCC with the phone transmitting at its highest certified power level in all tested frequency bands.
- Page 78 For body worn operation, this phone has been tested and meets the FCC RF exposure guidelines for use with an accessory that contains no metal and the positions the handset a minimum of 1.5 cm from the body. Use of other enhancements may not ensure compliance with FCC RF exposure guidelines.
- Page 79 Battery, charging 4 Battery, Inserting 1 Call 18 Call barring 19 Call logs 18 Call waiting 19 Call, answering 5 Call, making 5 Caller ID 17 Calling, answer mode 19 Calling, call barring 19 Calling, call waiting 19 Calling, caller ID 17 Calling, canceling incoming call 18 Calling, emergency numbers 20 Calling, features 17...
- Page 80 Calls, timing 20 Camera 32 Date 46 Display 47 Emergency numbers 20 Info. messages 30 Info. services 30 International calls 20 Keypad lock 49 Keys, assigned characters 13 Keys, function keys 8 Keys, left/menu soft 11 Keys, power/end 11 Keys, right soft 11 Keys, send/answer 11 Keys, up and down navigation 12 Language 49...
- Page 81 Menu 12 Messages 24 Messages, info. messages 30 Messages, MMS 27 Messages, multimedia message 27 Messages, sending 24 Messages, SMS 24 Missed call 18 MMS 27 Multimedia message 27 Network information 50 Phone 21 Photos 32 Photos, taking 32 PIN, change 49 Reset settings 50 Ring, ring style 46 Ring, volume 47...
- Page 82 Security, change PIN 49 Security, keypad lock 49 Security, SIM card lock 49 Settings 46 Settings, display 47 Settings, Language 49 Settings, reset 50 Settings, ring style 46 Settings, security 49 Settings, time and date 46 Settings, volume 47 SIM Card, Inserting 1 SIM card, lock 49 SMS 24 Standy mode 6...
- Page 83 Volume, adjusting 5 Volume, Adjusting speaker volume 5 Volume, ring 47...
Need help?
Do you have a question about the Tucana and is the answer not in the manual?
Questions and answers