Table of Contents
Advertisement
Quick Links
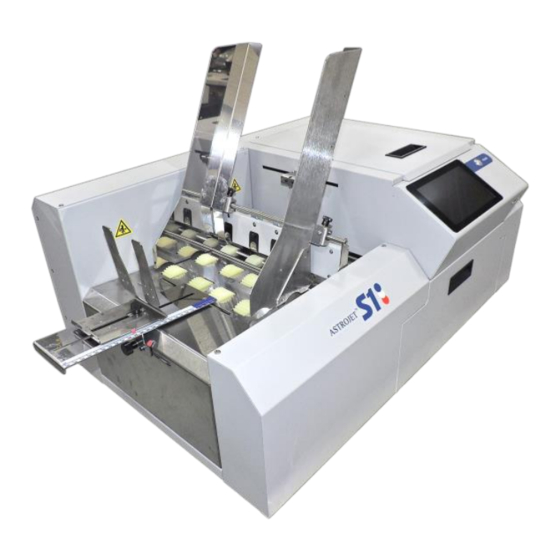
AstroJet S1
Quick Start Guide
Step 1
Remove Printer and Accessories
from packaging
Place Printer on a level, stable surface. Make
sure Printer is level.
Step 2
Assemble Ink Drip Tray Assembly
1. Select the High or Low Grate and install it
on the Ink Tray as shown [A].
High Grate [1] is for thinner media
(paper or envelopes).
Low Grate [2] is for thicker card stock
and cardboard.
Step 3
Install Ink Drip Tray Assembly
1. Open Ink Tank Door [A].
2. Release Latch [B] to raise Top Assembly.
3. Insert tabs on Ink Drip Tray into frame slots
[C] as shown.
4. Close Top Assembly.
Page 1
Advertisement
Table of Contents

Subscribe to Our Youtube Channel
Related Manuals for Astro Machine AstroJet S1


Summary of Contents for Astro Machine AstroJet S1
-
Page 1: Quick Start Guide
AstroJet S1 Quick Start Guide Step 1 Remove Printer and Accessories from packaging Place Printer on a level, stable surface. Make sure Printer is level. Step 2 Step 3 Assemble Ink Drip Tray Assembly Install Ink Drip Tray Assembly 1. Select the High or Low Grate and install it on the Ink Tray as shown [A]. -
Page 2: Print Driver Installation
Connect Power to Printer Step 4 1. Main Power Switch [1] is OFF. 2. Plug power cord into receptacle Assembly [1] located below the Main Power Assemble Adjustable Side Guide [1], Switch. Internal power supply in Envelope/Media Side Guide [2], Printer is rated 100 to 240VAC, 50/60 Hz. - Page 3 1. Check that Printer is 6. Would You Like to Install This Device Software? Click “Install”. plugged in and turned OFF. Disconnect USB connection if already plugged in. Install disk supplied with Printer in your CD drive. When AutoPlay Window opens, click “Run Setup.exe”...
- Page 4 Step 7 Step 6 Install Printhead Cartridge Install Ink Tanks Handle Printhead Cartridge with extreme care to Printer uses (1) Printhead Cartridge and (5) Ink Tanks avoid damage. (two Black, one Cyan, one Magenta, and one Yellow). 1. Look at the Control Panel CAUTION Touchscreen.
- Page 5 DO NOT FORCE Cartridge into position. normal. Step 8 For instructions on installing Accessories and Printer set- up or operation, please refer to “AstroJet S1 Color Printer Operator Manual” in Print Driver CD supplied with Printer. 630 Lively Blvd. Elk Grove Village, IL 60007...
Need help?
Do you have a question about the AstroJet S1 and is the answer not in the manual?
Questions and answers