Table of Contents
Advertisement
Advertisement
Table of Contents

Subscribe to Our Youtube Channel
Related Manuals for Besantek BST-DL10

Summary of Contents for Besantek BST-DL10
- Page 1 BESANTEK USB Data Logger Instructional Manual (BST-DL10, BST-DL13, BST-DL14)
-
Page 2: Table Of Contents
1.2 Features..........................1 1.3 Application..........................1 1.4 BESANTEK USB Data Logger Model..................1 1.5 BESANTEK USB Temperature Data Logger Appearance ............2 1.6 BESANTEK USB Temperature Data Logger Screen ...............2 1.7 BESANTEK USB Temperature & Humidity Data Logger Appearance........3 1.8 BESANTEK USB Temperature &... -
Page 3: Chapter 1. Usb Data Logger Hardware
Chapter 1. USB Data Logger Hardware 1.1 Introduction BESANTEK USB Data logger has USB interface, enjoying elegant appearance and compact construction, specially designed for refrigerator and cold-chain transportation as well as container transport applications. BESANTEK USB Data logger adopts friendly USB interface, friendly mounting bracket and the screws. -
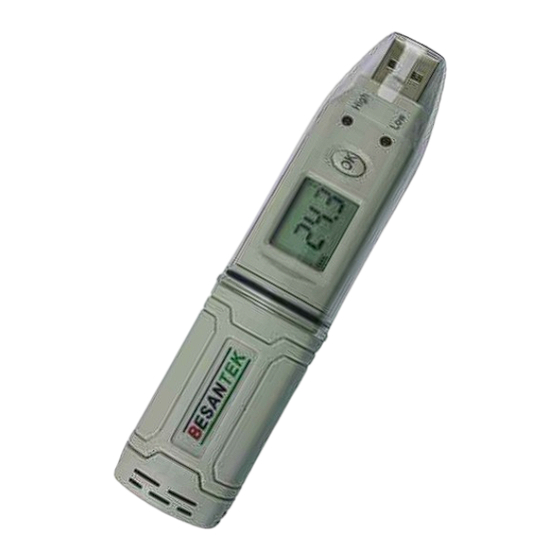
Page 4: Besantek Usb Temperature Data Logger Appearance
1.5 BESANTEK USB Temperature Data Logger Appearance LCD Screen Battery Replacement Position. ① ⑥ Button Waterproof Transparent Cover ② ⑦ Warming Light When Fixed Bracket ③ ⑧ Temperature Value Exceeds Setting Limits. USB Connection Port Label ④ ⑨ Waterproof Ring ⑤... -
Page 5: Besantek Usb Temperature & Humidity Data Logger Appearance
Value Exceeds the Setting Limits. USB Connection Port Label ④ ⑨ Waterproof Ring ⑤ 1.8 BESANTEK USB Temperature & Humidity Data Logger Screen Display the High Limit Battery power indication. ① ⑤ Display the Low Limit Units symbol display ②... -
Page 6: Button
Check the MAX; MIN; High & Low values as well as the current value in the working status. 1.10 Install Battery Open the Battery Cover Install Battery 1.11 Fix BESANTEK USB Data Logger Use Screw to Fix the Bracket onto the Wall. Install the Data Logger. -
Page 7: Chapter 2. Bstsoftware
Chapter 2. BSTSoftware 2.1 The Requirement of the Computer Hardware OS: Windows XP/Vista/7/8 (32/64bit) CPU: 1.6GHz Physical Memory: 512MB Hard-drive Space: 4 GB USB Port: 1 2.2 Install Driver & Software Install Driver Notice: Windows 64bit please install 64bit-driver. Install BSTSoftware Notice: Please Install BSTSoftware in D:\... -
Page 8: Setting The Logger's Properties To Start A New Measurement
2.3 Setting the logger’s properties to start a new measurement. 1. Connect the data logger to the computer. 2. Running BSTSoftware on the PC. 3. From the toolbar select Connect. 4. Read the logger’s properties. 5. Set the properties. 6. Sync the properties & time. (The PC time will be synchronized to the logger as well.) 7. -
Page 9: Properties Description
2.4 Properties Description Property Text Description Name English letters or Name of the logger Numbers 10 Characters Must be the same as the one in the label of logger. Sampling Interval (s) Number from 1 to 240 Sampling frequency in LCD screen Logging Interval (s) Number from 2 to 86400 Logging frequency. -
Page 10: Download The Records After A Measurement
2.5 Download the Records after a Measurement. 10. Connect the data logger to a free USB port on the computer. 11. Running BSTSoftware on the PC. 12. From the toolbar select Connect. 13. From the toolbar select Download Once the data is transferred from the logger to the PC, the data graph will be displayed. The graph display will be blank if there are not any logs. -
Page 11: Data Listing Window
2.6 Data Listing Window Click "Data List" button on the toolbar, and then the data listing window is shown below. Channel 3 unit is Dew Point. The Value is calculated from temperature & humidity. The data pane lists the data samples collected by the logging device. The column width of each column is adjustable by using the left mouse button and dragging the column the desired width. -
Page 12: Delete Records In The Logger
2.8 Delete Records in the Logger 14. From the toolbar select Delete 2.9 Check the Save File in File List 15. From the toolbar select Filelist. 16. Click to open the file. Double click left mouse button, then the selected file is opened. Click right mouse button, a popup menu is shown as below, you can rename or delete or log file. -
Page 13: Chapter 3. Attention
Chapter 3. Attention BESANTEK USB Data logger water proof level is IP67. Do not put it into the water. BESANTEK USB Data logger plastic shell is ABS, flame retardant, not resistant to acid and alkali. If repair is needed, only authorized technician could do the repair.
Need help?
Do you have a question about the BST-DL10 and is the answer not in the manual?
Questions and answers