
Related Manuals for Uniden R3


Summary of Contents for Uniden R3
- Page 1 LONG RANGE Radar/Laser Detector User’s Manual © 2019 Uniden America Corporation Issue 5, January 2019 Irving, Texas Printed in Korea...
-
Page 2: Customer Care
Do not change settings of the product while driving. Uniden expects consumer’s use of these products to be in compliance with all local, state, and federal law. Uniden expressly disclaims any liability arising out of or related to your use of this product. -
Page 3: Table Of Contents
MENU SYSTEM ..................12 BASIC OPERATIONS ................19 FEATURE DETAILS ................... 20 AUTO DIM ........................20 Set DIM to Auto from the R3/Power Cord ..........20 Configure Auto from MENU ................21 USER MARKS (LASER AND RADAR SITES) ............22 RED LIGHT CAMERA POINT DELETE ..............22 HIGHWAY VS CITY MODE ..................22... - Page 4 RED LIGHT CAMERA QUIET RIDE .................26 MAINTENANCE ..................27 MAINTAINING THE EQUIPMENT ................27 UPDATING THE FIRMWARE/DATABASE .............27 TROUBLESHOOTING ................27 SPECIFICATIONS ..................28 FCC/IC COMPLIANCE ................28 FCC COMPLIANCE ......................28 IC COMPLIANCE ......................29 ONE-YEAR LIMITED WARRANTY ............29...
-
Page 5: R3 Overview
USER’S MANUAL R3 OVERVIEW Uniden’s R3 is a top of the line Radar Detector with a built-in GPS feature. With the R3, you can mark geographical points where you commonly encounter radar transmissions. These can be school zones, red-light cameras, and places where police frequently monitor traffic. -
Page 6: What's In The Box
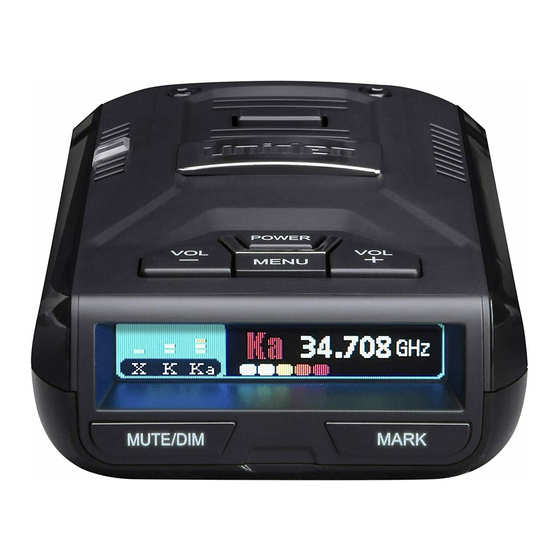
Jack Jack PRESS TO... PRESS AND HOLD TO ... POWER Turn R3 on and off. VOL + Turn volume up (7 levels: 0 - 6; Default = 4). Quickly turn volume up or down. In Menus, go to next item. - Page 7 Mute Memory whether or not there is displays on the screen. an alert.) R3 stores up to 500 Mute Memory points. DURING RED LIGHT Delete Mute Memory - Press MUTE/ CAMERA ALERT DIM while Mute Memory displays; the R3 Press and hold MUTE/ displays a delete confirmation message.
-
Page 8: Non-Key Elements
NON-KEY ELEMENTS ELEMENT WHAT IS DOES Eagle Eye Provides a 360° monitoring radius. Latch Slot Insert the bracket latch into this slot. Mini USB Provides PC connection for data updates. Audio Jack Plug in headset. Eject Press to release the bracket latch. Power Jack Plug the 12V Power Cord here. - Page 9 • Press the MUTE button to mute an alarm. Returns to normal button operation 10 seconds after the alert ends or if a different band is detected during Mute mode. Mute On displays on the R3 for a few (Although seconds.
-
Page 10: Oled Display
OLED DISPLAY The OLED display on the front of the unit changes depending on what events are happening. If GPS = ON, the OLED’s left display area shows the display selected in the menus (see page 16). If GPS = Off, the OLED’s left display area shows Volt regardless of user settings. The following table provides examples of the most common displays. -
Page 11: Install And Turn On R3
INSTALL AND TURN ON R3 You can mount the R3 on the windshield (1- and 2- cup suction brackets included) or on the dashboard (hook and loop tape included). INSTALL/POWER ON... -
Page 12: Dashboard
Attach the unit to the dashboard using the hook and loop fastener tape. Be careful not to cover any air vent holes with the hook and fastener tape. Plug the power cord RJ11 connector into the R3 and plug the cigarette lighter adapter into the vehicle’s cigarette lighter. - Page 13 MENU ITEM FUNCTION SETTINGS Highway (Default) Selected Mode Changes band sensitivity as displays. follows: City Highway - Full Sensitivity Advanced City - X and K sensitivity reduced. Ka band sensitivity same as Highway. Advanced - User adjusts X, K, and Ka band sensitivity from 100% - 30% in 10% intervals.
- Page 14 MENU ITEM FUNCTION SETTINGS On (Default) K Band Turn off to have the detector ignore K band frequencies. On (Default) Ka Band Turn off to have the detector ignore Ka band frequencies. On (Default) Laser Turn off to have the detector ignore lasers.
- Page 15 MENU ITEM FUNCTION SETTINGS Ka Narrow (Default) Ka Narrow/ Ka Narrow scans for Ka radar guns Wide/ used in the US only and reduces Ka Wide Segmentation false alarms. Ka Narrow also Segmentation (Default provides a fast response to Ka = On) POP radar guns.
- Page 16 MENU ITEM FUNCTION SETTINGS Color Select screen text color. Red (Default) White Purple Blue Amber Green Pink Grey Scan Mode Display Select what will display on the OLED, either scanning for Mode (Default) frequencies (see page 23), the Time (GPS on) mode (see page 24), or the time (see page 24).
- Page 17 MENU ITEM FUNCTION SETTINGS On (Default) Auto Mute Auto Mute reduces alarm level to 1 after 3 seconds and returns to normal operation (Auto Mute = OFF) 10 seconds after the alert ends. If the same alarm sounds within the 10 second period, Auto Mute remains at level 1.
- Page 18 Sounds a warning tone if the vehicle battery power drops Off (Default) below 11V. BAT Saver (GPS Turns off power to the R3 if the speed stays at 0 or if the GPS is Off (Default) not connected for more than an hour.
-
Page 19: Basic Operations
POWER. The unit turns on and runs through an initial self-check if Self Test is turned on. It displays the different bands and their settings. The R3 turns on automatically when you start the vehicle. Press VOL + to increase volume. The unit beeps and Adjust the volume displays a number increase. -
Page 20: Feature Details
MUTE/DIM button or the power cord’s MUTE button. Use this feature to set when the OLED changes brightness levels and to what brightness levels it changes. For example, you can set the R3 to shift to Bright level at 6:00 AM and then to Dimmer level at 6:00 PM. -
Page 21: Configure Auto From Menu
Press the MUTE/DIM button on the R3 device or the MUTE button on the power cord to change DIM levels until AUTO displays. The R3 device displays and, if volume is turned on, announces the current feature setting. Configure Auto from MENU Press MENU. -
Page 22: User Marks (Laser And Radar Sites)
When you are at a red light camera and an alert displays, you can delete that camera point. Once deleted, the R3 will not alert at that red light camera location again. To delete the RLC Point, press MUTE/DIM on the unit or MUTE on the power cord while the alert displays. -
Page 23: Pop Mode
If a band is turned off through the menus, it is off in all modes. POP MODE In POP mode, the R3 can detect short burst from radars that are too fast for many other detectors to catch. You can turn POP mode on and off in the Menu system. -
Page 24: Mode Display
MODE DISPLAY The OLED displays the voltage on the left side of the display and the mode on the right side. Set the mode through the Display Mode menu. 12.8 Highway Volt TIME DISPLAY The OLED displays the time in the center of the OLED if Time Display is selected in the menu. -
Page 25: Threats
Low Battery THREATS The R3 detects up to 4 radar band signals (threats) at a single time. The strongest rader signal is designated as the Priority signal, and its frequency displays on the OLED. The other signals (threats) are indicated in the left side of the display. In the following example, 2 K band, 1 X band, and 1 Ka band frequencies are detected. -
Page 26: User Speed Limit
(0 - 5) in the Auto Mute Volume menu (see page 17). If the current volume level is 0, the R3 will not change the volume to the Auto Mute Volume level; it will keep the volume level at 0. -
Page 27: Maintenance
MAINTENANCE MAINTAINING THE EQUIPMENT The R3 requires very little physical maintenance. Wipe it with a soft cloth to keep dust from accumulating. Check the power cord connections to keep them clean and free of corrosion. UPDATING THE FIRMWARE/DATABASE Uniden recommends that you update your R3 firmware and database periodically. -
Page 28: Specifications
SPECIFICATIONS Receiver Type: Antenna Type: Radar Double Conversion Super- Radar Linear Polarized E-vector heterodyne Self-Contained Vertical Antenna Laser Pulsed Laser Signal Laser Convex Condenser Lens Receiver Front Concave Condenser Lens Back Frequency: 10.525 GHz Dimensions 110.00 mm (D) x 69.00 mm (W) x 29.50 mm (H) 24.150 GHz Weight... -
Page 29: Ic Compliance
WARRANTOR: UNIDEN AMERICA CORP. (“UNIDEN”). ELEMENTS OF WARRANTY: Uniden warrants, for one year, to the original retail owner, this Uniden Product to be free from defects in materials and craftsmanship with only the limitations or exclusions set out below. WARRANTY DURATION: cThis warranty to the original user shall terminate and be of no further effect 12 months after the date of original retail sale. - Page 30 (E) used in any conjunction with equipment or parts or as part of any system not manufactured by Uniden, or (F) installed or programmed by anyone other than as detailed by the Operating Guide for this product.
Need help?
Do you have a question about the R3 and is the answer not in the manual?
Questions and answers