Spidem VILLA SUP 018M Operating Instructions Manual
Hide thumbs
Also See for VILLA SUP 018M:
- Operating instructions manual (96 pages) ,
- Operating instructions manual (25 pages) ,
- Operating instructions manual (17 pages)
Table of Contents
Advertisement
Available languages
Available languages
Quick Links
Advertisement
Table of Contents

Related Manuals for Spidem VILLA SUP 018M


Summary of Contents for Spidem VILLA SUP 018M
- Page 1 TYPE SUP 018M OPERATING INSTRUCTIONS INSTRUÇÕES DE USO...
- Page 2 Congratulations! Thank you for purchasing this highest quality espresso coff ee machine and for your confi dence in our company. Before operating the machine, we recommend carefully reading the operating instructions that explain how to use, clean and maintain it in perfect working order. Please refer to the dealer or to our company, if you have any questions.
-
Page 7: General Information
GENERAL INFORMATION - TECHNICAL DATA GENERAL INFORMATION How to use these operating instructions The coff ee machine is suitable to make espresso coff ee using coff ee beans and is equipped with a device for the distribution Keep these operating instructions in a safe place and of steam and hot water. -
Page 8: Safety Regulations
SAFETY REGULATIONS O I L sizes in millimeter... -
Page 9: Protecting Others
SAFETY REGULATIONS SAFETY REGULATIONS Do not use the coff ee machine outdoors. Do not place the machine on hot surfaces and close to open fl ames to prevent the body from melting or being damaged. Cleaning Never place live parts in contact with water: danger of Before cleaning the machine, the main power button (5) must short circuit! Steam and hot water may cause scalding! be switched to the -0- position and the plug must be removed... -
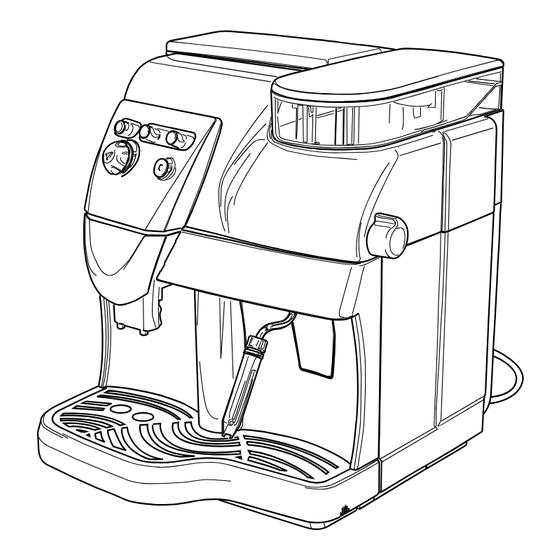
Page 10: Key To Machine Components
SAFETY REGULATIONS - INSTALLATION Key to machine components INSTALLATION For your safety and other people's safety, carefully follow the "Safety Regulations" in section 3. Coff ee bean hopper Coff ee bean hopper cover Grinder adjustment knob Packaging Coff ee dose adjustment knob The original packaging has been designed and constructed to Main power button (ON/OFF) protect the machine during transport. -
Page 11: Circuit Priming
INSTALLATION - COFFEE GRINDER • (Fig.24) - Remove the cover (2) and add the coff ee beans. 2 Place a container beneath the steam wand (Pannarello) (12) and turn the knob (14) counter-clockwise. Always add only coff ee beans in the coff ee bean 3 After 30 seconds (or when the container is full) stop dispen- hopper (1). -
Page 12: Hot Water Dispensing
COFFEE BREWING - HOT WATER DISPENSING coff ee blends for diff erent settings. Keep coff ee in a fresh place • Press the button (18) to brew coff ee. The brewing cycle in a sealed, airtight container. starts: press the button (18) once to brew 1 coff ee. Press it twice to brew 2 coff ees. -
Page 13: Cleaning And Maintenance
STEAM EJECTION - CLEANING AND MAINTENANCE STEAM EJECTION / PREPARING A CLEANING AND MAINTENANCE CAPPUCCINO General cleaning Steam may be used to froth milk for cappuccino and to heat • Maintenance and cleaning operations may only be carried beverages. out when the machine has cooled down and has been disconnected from the power supply. -
Page 14: Cleaning And Maintenance - Descaling
CLEANING AND MAINTENANCE - DESCALING (Fig. 25) - Clean the water tank on a daily basis. DESCALING - Remove the fi lter in the water tank and wash it under Limescale normally forms with the use of the appliance. drinking running water. Descaling is necessary every 1 - 2 months or if you notice a - Reinsert the fi lter into its seat by gently pressing and reduction in water fl ow. - Page 15 DISPOSAL steam wand (12) as described in section 8 "HOT WATER DISPENSING". 10 Repeat the rinse cycle (step 8 and 9) twice consecutively. Only once reached this step, the descaling cycle is complete. Note: if required, prime the circuit (Section 4.3). The descaling solution must be disposed of according to the manufacturer's instructions and/or regulations in force in the country of use.
-
Page 16: Control Panel Lights
CONTROL PANEL LIGHTS CONTROL PANEL LIGHTS Warnings Causes Solutions Green light (23) The machine is on. Fixed green light (19) The machine has reached the right temperature and is now ready: - for coff ee brewing; - for hot water dispensing. Flashing green light (19) The machine is warming up to brew coff ee and dispense hot water. -
Page 17: Problems - Causes - Solutions
PROBLEMS - CAUSES - SOLUTIONS Problems Causes Solutions The machine does not turn on The machine is not connected to the Connect the machine to the power supply. power supply. The service door is open. Close the service door. Coff ee is not hot enough The cups are cold. -
Page 19: Dados Técnicos
GENERALIDADES - DADOS TÉCNICOS GENERALIDADES DADOS TÉCNICOS A máquina de café é indicada para a preparação de café • Tensão nominal expresso, utilizando café em grãos e possui um dispositivo para Veja plaqueta posicionada no aparelho o fornecimento de vapor e de água quente. •... -
Page 20: Normas De Segurança
NORMAS DE SEGURANÇA O I L Medida en Milímetros... - Page 21 NORMAS DE SEGURANÇA NORMAS DE SEGURANÇA Utilize sempre as pegas ou os botões apropriados. Colocação Coloque a máquina de café em um lugar seguro, onde ninguém possa virá-la ou ferir-se por causa da própria máquina. Nunca ponha em contato com água as partes sob Não use a máquina de café...
-
Page 22: Legenda Componentes Da Máquina
INSTALAÇÃO Legenda componentes da máquina INSTALAÇÃO Para a sua segurança e a de terceiros, siga escrupulosa- mente as "Normas de segurança" indicadas no cap. 3. Recipiente de café em grãos Tampa recipiente de café em grãos Botão de ajuste da moagem Embalagem Botão de ajuste da dose A embalagem original foi projectada e realizada para proteger... -
Page 23: Carregamento Do Circuito
INSTALAÇÃO - MOINHO DE CAFÉ máquina em funcionamento sem água: assegure-se de 2 Introduza um recipiente debaixo do tubo de vapor (Pan- que há água sufi ciente dentro do reservatório. narello)(12) e vire o botão (14) no sentido contrário ao dos ponteiros do relógio. -
Page 24: Distribuição De Café
DISTRIBUIÇÃO DE CAFÉ botão para valores maiores; se a moagem for muito grossa será DISTRIBUIÇÃO DE CAFÉ necessário virar o botão para valores menores. A variação do grau de moagem notar-se-á só depois da distri- Nota: Se a máquina não distribuir café, certifi - buição de três/quatro cafés. -
Page 25: Distribuição De Água Quente
DISTRIBUIÇÃO DE ÁGUA QUENTE - PREPARAÇÃO DO CAPPUCCINO DISTRIBUIÇÃO DE ÁGUA QUENTE • Feche o botão (14). • Encha com leite frio 1/3 do recipiente desejado a ser utiliza- do para preparar o cappuccino. Atenção: no começo podem verifi car-se breves jatos de água quente: perigo de queimaduras. -
Page 26: Limpeza E Manutenção
LIMPEZA E MANUTENÇÃO LIMPEZA E MANUTENÇÃO (Fig.25) – Aconselha-se a limpar periodicamente o reservató- rio de água: - Retire o fi ltro posicionado no interior do reservatório e Limpeza geral limpe-o com água corrente potável. • A manutenção e a limpeza podem ser realizadas só quando - Reposicione o fi ltro no seu compartimento pressionan- a máquina estiver fria e desligada da rede elétrica. - Page 27 DESCALCIFICAÇÃO - DESMANTELAMENTO DESCALCIFICAÇÃO 7 Certifi que-se que a máquina esteja ligada. 8 (Fig.25) - Enxagúe o reservatório (7) com água limpa e encha-o completamente. A formação de calcário é uma consequência natural da utilização do aparelho; a descalcifi cação é necessária a cada 9 (Fig.26) - Realize o enxagúe dos circuitos do aparelho 1-2 meses ou quando se verifi ca uma redução da capacidade com água fresca esgotando o conteúdo do reservatório (7)
- Page 28 INDICADORES LUMINOSOS DO PAINEL DE COMANDO INDICADORES LUMINOSOS DO PAINEL DE COMANDO Sinalizações Causas Soluções Luz verde (23) Máquina ligada Luz verde (19) fi xa Máquina a temperatura pronta: - para distribuir café; - para distribuir água quente. Luz verde (19) a piscar Máquina em fase de aquecimento para a distribuição de café...
-
Page 29: Problemas - Causas - Soluções
PROBLEMAS - CAUSAS - SOLUÇÕES Problemas Causas Soluções A máquina não se liga A máquina não está ligada à rede Ligue a máquina à rede elétrica elétrica A portinhola de serviço está aberta Feche a portinhola O café não é bastante quente As xícaras estão frias Aqueça as xícaras Não sai água quente ou vapor... - Page 32 The manufacturer reserves the right to change the features of the product without prior notice. O fabricante reserva-se o direito de efetuar qualquer alteração sem aviso prévio. www.saeco.com...
Need help?
Do you have a question about the VILLA SUP 018M and is the answer not in the manual?
Questions and answers