V-ZUG GK46TIMS Operating Instructions Manual
Hide thumbs
Also See for GK46TIMS:
- Operating instructions manual (48 pages) ,
- Installation instructions manual (12 pages) ,
- Operating instructions manual (40 pages)
Table of Contents
Advertisement
Quick Links
Advertisement
Table of Contents

Related Manuals for V-ZUG GK46TIMS


Summary of Contents for V-ZUG GK46TIMS
- Page 1 Operating instructions GK46TIMS | GK46TIMXS | GK56TIMS Induction hob...
- Page 2 These operating instructions apply to: Type Product family GK56TIMSC, GK56TIMSCO, GK56TIMSZ, GK56TIMSZO 31081 GK46TIMSC, GK46TIMSCO, GK46TIMSZ, GK46TIMSZO, 31086 GK46TIMSU, GK46TIMUSO GK46TIMXSC, GK46TIMXSCO, GK46TIMXSZ, GK46TIMXSZO 31087 Variations depending on the model are noted in the text. © V-ZUG Ltd, CH-6301 Zug, 2018...
-
Page 3: Table Of Contents
Contents Safety precautions 4 Trouble-shooting 20 Symbols used............ 4 Error messages............. 20 General safety precautions........ 4 Other possible faults .......... 21 Appliance-specific safety precautions .... 4 Technical data 22 Instructions for use.......... 5 Product fiche ............ 22 Using for the first time 7 Disposal... -
Page 4: Safety Precautions
Safety precautions Symbols used Cleaning and user mainten- ance shall not be undertaken Denotes important safety precau- tions. by children without supervi- Failure to observe said precautions sion. can result in injury or in damage to ▪ If an appliance is not the appliance or fittings! equipped with a mains cable Information and precautions that... -
Page 5: Instructions For Use
1 Safety precautions ▪ WARNING: The appliance ▪ Do not operate the appliance and its accessible parts get using an external time switch hot during use. Be careful not or a separate remote control to touch the heating ele- system. ments. - Page 6 1 Safety precautions ▪ The heated surface will remain hot for ▪ Take particular care that sugary foods some time after it is switched off and or juices do not get onto the hot cook- will cool down only slowly to room tem- ing zones as it can damage them.
-
Page 7: Using For The First Time
Using for the first time The appliance must be installed and connected to the electricity supply in accord- ance with the separate installation instructions. Have a qualified fitter/electrician carry out the necessary work. During the first few hours of use, a cooking zone can give off an unpleasant smell. This is normal for brand new appliances. -
Page 8: Operating And Display Elements
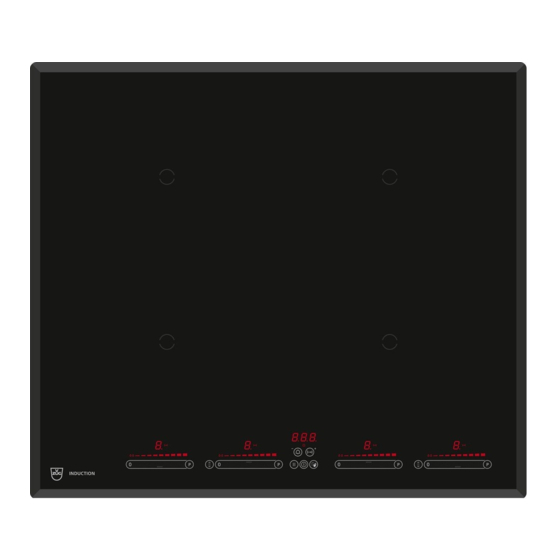
3 Your appliance Operating and display elements Never rest objects on the operating elements! This can cause damage to the appli- ance and unintended operating errors. Buttons Appliance ON/OFF Slider (for setting the power level) PowerPlus Wipe protection ON/OFF Pause cooking ON/OFF and restore Operating time / function as plus function button... -
Page 9: Pan Detection
3 Your appliance Pan detection Each cooking zone is equipped with pan detection. This detects suitable induction com- patible cookware with a magnetic base. ▪ If the cookware is removed during operation or if unsuitable cookware is used, – the power level selected flashes alternately with . ▪... -
Page 10: Optiglass
4 Operating the appliance OptiGlass Applies to GK56TIMSCO, GK56TIMSZO, GK46TIMSCO, GK46TIMSZO, GK46TIMSUO, GK46TIMXSCO, GK46TIMXSZO Hobs with OptiGlass have an additional coating on the glass surface. This coating makes the surface harder, tougher and more scratch resistant than non- coated glass surfaces. Under normal circumstances, significantly fewer scratches should occur on the glass surface during cooking. -
Page 11: Melting Function
4 Operating the appliance Power Cooking method level Simmering Water temperature stays below boiling point, approx. 94 °C Melting, gentle warming Butter, chocolate, gelatine, sauces Swelling Rice Continue cooking, reducing, Vegetables, potatoes, sauces, fruit, fish stewing, steaming Continue cooking, braising Pasta, soup, braised meat Gentle frying Rösti, omelettes, breaded fried foods, sausages Frying, deep frying... -
Page 12: Powerplus
4 Operating the appliance Switching the simmer function on ▸ Touch the button 3×. – The symbol illuminates. Switching the simmer function off ▸ Use the slider to set any power level or switch off via « ». PowerPlus All the cooking zones are equipped with the PowerPlus booster. When PowerPlus is switched on, the cooking zone selected works at extra high power for 10 minutes. -
Page 13: Bridging Function
4 Operating the appliance GK56TIMSC, GK56TIMSCO, GK56TIMSZ, GK56TIMSZO PowerPlus cannot be used with both cooking zones of a group (A or B) at the same time. If PowerPlus is activated with both cooking zones of a group, then the power output is reduced for the cooking zone that was first selected. -
Page 14: Operating Time
4 Operating the appliance The automatic boost function must be activated anew each time a cooking zone is switched on. Power level / function 0:40 1:15 2:00 3:00 4:15 7:15 2:00 3:15 Automatic boost in mins.:secs. If during the automatic boost a higher power level is selected, the duration will change automatically. -
Page 15: Timer
4 Operating the appliance If the setting is not changed, it will be automatically accepted after 5 seconds. Alternat- ively, the setting can also be confirmed manually by touching the slider for the corres- ponding cooking zone. Switching the operating time function off before time ▸... -
Page 16: Childproof Lock
4 Operating the appliance Changing the timer If no Cooking zone is in use, first switch the appliance on. ▸ Touch the button. – The time left on the timer flashes. ▸ Use the button to change the duration of the timer. Switching the timer off before time If no Cooking zone is in use, first switch the appliance on. -
Page 17: Wipe Protection
5 User settings – The power level of the cooking zone switched on changes to . – The operating time is interrupted. – The timer continues to run. – All buttons except are inactive. If the pause cooking function is not turned off within 10 minutes, the appliance switches off completely. -
Page 18: Changing User Settings
6 Care and maintenance Changing user settings ▸ With the appliance switched off, simultaneously hold the buttons de- pressed for 3 seconds. – An acoustic signal is emitted. ▸ Touch both sliders left of display 3. For appliances with only one slider, simply touch the available slider. -
Page 19: Optiglass
6 Care and maintenance ▸ Foods with a high sugar content, e.g. marmalade, that boil over should be removed while still hot using a glass ceramic hob scraper. The surface of the glass ceramic hob could otherwise become damaged. ▸ Remove melted plastic while still warm using a glass ceramic hob scraper. The sur- face of the glass ceramic hob could otherwise become damaged. -
Page 20: Trouble-Shooting
7 Trouble-shooting Trouble-shooting You may be able to trouble-shoot the following errors yourself. If not, note down the error message in full and the serial number (FN), which can be found on the identification plate, and call Customer Services. Error messages Display Possible cause Solution... -
Page 21: Other Possible Faults
7 Trouble-shooting Display Possible cause Solution illuminate. ▪ An object (e.g. paper) under- ▸ Remove any objects in the neath the hob is obstructing drawer underneath the the air intake. hob. ▸ Touch any button to can- cel the error. ▸... -
Page 22: Technical Data
8 Technical data Technical data Product fiche In accordance with EU Regulation No. 66/2014 Model number GK 31081 Type designation GK GK56TIMSC, GK56TIMSCO, GK56TIMSZ, GK56TIMSZO Number of cooking zones Heating technology Induction cooking zone Dimensions of cooking zone 18×20 18×20 ø28 18×20 18×20... - Page 23 9 Disposal Disposal Packaging Never allow children to play with packaging material due to the danger of injury or suffocation. Store the packaging material in a safe location or dispose of it in an environmentally-friendly way. Safety Render the appliance unusable to prevent accidents caused by improper use (e.g. through children playing): ▸...
- Page 24 Index Operating and display elements...... 8 Appliance Buttons.............. 8 Switching on and off ........ 10 Appliance disposal .......... 23 Displays ............ 8 Operating time..........14 Appliance overview ..........7 Changing............ 14 Appliance-specific safety precautions Finished ............ 15 ................ 4 Setting............ 14 Automatic boost ..........13 Several operating times......
- Page 25 10 Index User settings............. 17 Changing............ 18 Switching off before time ...... 18 Using for the first time........7 Validity..............2 Wipe protection ..........17...
- Page 26 Notes...
- Page 27 Your repair order Call the free service number 0800 850 850 to contact your nearest V-ZUG service centre. You can arrange an onsite visit by us by phone if you wish. General queries, accessories and service agreement V-ZUG will be happy to help you with any general administrative or technical queries, to accept your orders for accessories and spare parts and to inform you about our pro- gressive service agreements.
- Page 28 ▸ Touch on the slider. To switch the appliance off Touch the button. 1021059-R04 V-ZUG Ltd, Industriestrasse 66, CH-6301 Zug Tel. +41 58 767 67 67, Fax +41 58 767 61 61 info@vzug.com, www.vzug.com Service Centre: Tel. 0800 850 850...
Need help?
Do you have a question about the GK46TIMS and is the answer not in the manual?
Questions and answers