
Related Manuals for Capsa Healthcare CareLink XP


Summary of Contents for Capsa Healthcare CareLink XP
- Page 1 CareLink Mobile Nurse Station User Manual For RX and XP Models Elevating performance, every day.
-
Page 2: Warnings
Warnings IMPORTANT – Indicates a situation that does not present any hazard but is very important in maintaining a well functioning workstation. ATTENTION – Consult manual to avoid a potentially hazardous situation which may result in minor or moderate injury. ELECTRICAL –... - Page 3 Warnings • Keep power cord away from water. DO NOT PLUG CORD INTO OUTLET IF WET. • DO NOT OPERATE PRODUCT IF WET. If the WORKSTATION becomes wet, unplug it immediately, wipe off any excess liquid, and allow it to dry before using again. •...
-
Page 4: Table Of Contents
Table of Contents Warnings Introduction Box Contents ..............5 Specifications ..............6 Statement of Use..............6 Overall View ..............7 Get Started Plug in the Power Cord ............8 Charge the Battery ............8 Operation Quick Start Procedure ............9 Power the CareLink™ Cart ..........10 The Battery Charge Indicator ..........12 Using the Touchscreen .............14 Touchscreen Log In/Log out ..........15 Drawer Modules ...............16... -
Page 5: Introduction
Introduction BOX CONTENTS CareLink™ Cart Security Keys Power Cord CareLink™ User Manual Accessory Kit CareLink Mobile Nurse Station User Manual For Models XP, RX Power Cord Clip Mouse/Keyboard Cord Clips Elevating performance, every day. Security Bit Kit Drawer Module Lock Overide Key †... -
Page 6: Specifications
STATEMENT OF USE The CareLink™ Mobile Computer Cart is designed and manufactured by Capsa Healthcare. Capsa Healthcare is dedicated to providing innovative quality products. Our goal is to increase the capacity to care by improving productivity, ergonomics and compliance while enhancing your facility image. -
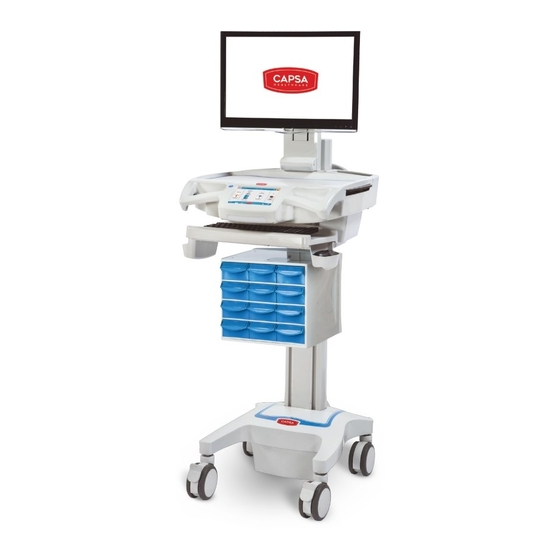
Page 7: Overall View
Introduction OVERALL VIEW Monitor ( customer provided ) Work Surface Light ( some models ) Work Surface Manual Height Handle ( some model s ) Keyboard ( customer provided ) Keyboard Tray Bi-directional Extended Drawer Module Work Surface Adjustable (some models) Mouse Tray Monitor Mount... -
Page 8: Get Started
Get Started PLUG IN THE POWER CORD Install the power cord. 1. Plug the power cord into the cart. 2. Stow the plug in the cord holder. Note: The supplied power cord is rated for medical use. Connecting the cord to an outlet that is not medical grade (indicated with a green dot) will not ensure... -
Page 9: Operation
Operation QUICK START PROCEDURE Good practice for starting the CareLink™ cart is as follows: 1. Turn on the cart (see Power the CareLink™ Cart page 10). 2. Note the condition of the battery (the cart may need to be plugged in). 3. -
Page 10: Power The Carelink™ Cart
Operation POWER THE CARELINK™ CART The Power button is located to the left of the touch screen. A color Power Off Power On Dark Blue band on the button indicates the power state of the cart. The power state band colors are as follows: •... - Page 11 Operation POWER THE CARELINK™ CART Standby Mode: 1. To switch the CareLink™ into Standby Mode, hold down the Power button for 5 seconds. • Power to the installed components is turned off • The power switch goes dark • The touchscreen stays active 2.
-
Page 12: The Battery Charge Indicator
Operation THE BATTERY CHARGE INDICATOR The battery charge indicator is located at the center of the touch screen. The indicator displays both a numeric listing and graphic representation of the remaining battery charge. The graphic indicator displays 4 charge states: •... - Page 13 Operation THE BATTERY CHARGE INDICATOR When the graphic indicator is Red: • Less than 10% (factory default) charge remains Note: This setting is configurable in N-Sight™. • If the cart is not plugged in, it must be plugged in very soon When the graphic indicator is clear: •...
-
Page 14: Using The Touchscreen
Operation USING THE TOUCHSCREEN The touchscreen uses sensitive optical technology to register touch. A touch will register just before a finger actually touches the screen surface. Lightly contacting the screen will register a touch. Keep the screen clean from foreign objects to achieve the best touch sensitivity. Avoid excessive dust accumulation on all sides of the border of the screen. -
Page 15: Touchscreen Log In/Log Out
Operation TOUCHSCREEN LOG IN/LOG OUT To log in to the touchscreen, touch the Log In / Unlock Drawers button to access the keypad. Log In New User Enter your PIN. When you type the correct number of digits: • The touchscreen will validate the PIN entered •... -
Page 16: Drawer Modules
Operation DRAWER MODULES Drawer Locks The drawers are accessible when a valid PIN is entered into the touchscreen. A user may lock the drawers by either touching the Drawer Lock button or by waiting until the drawer lock timer counts down (go to the Preferences screen to set the drawer lock timer.) The electronic drawer lock will not function when the battery is dead, conditioning or the cart is electrically de-energized. -
Page 17: Casters
Operation CASTERS To operate braking casters: 1. Lower the tab with your toe to lock a caster. 2. Lift the tab with your toe to unlock a caster. To operate tracking casters: 1. Lower the tab with your toe to engage tracking feature. -
Page 18: Extend The Keyboard, Mousepad And Work Surface
Operation EXTEND THE KEYBOARD, MOUSEPAD AND WORK SURFACE The CareLink™ cart features a retractable keyboard tray, mousepad and optional bidirectional work surface. The retractable surfaces shrink the overall size of the cart to allow passage through confined spaces. • To extend the keyboard tray, pull the keyboard tray out. - Page 19 Operation EXTEND THE KEYBOARD, MOUSEPAD AND WORK SURFACE To Extend the mousepad: Pull the mouse holder in the desired direction. To Retract the mousepad: Push the mouse holder toward the keyboard until the mousepad is centered to the keyboard tray. To Extend the bidirectional work surface: Pull the end of the bidirectional work surface in the desired direction.
-
Page 20: Adjustable Lcd Mount (Optional)
Operation ADJUSTABLE LCD MOUNT (OPTIONAL) The adjustable LCD monitor mount is designed to allow height adjustment of the monitor and to allow the monitor to pivot 180 degrees. To pivot the monitor: 1. Grasp the sides of the monitor, then slide the monitor to the desired side. -
Page 21: Lcd Monitor Rotation
Operation LCD MONITOR ROTATION If the feature is enabled, the LCD monitor may be rotated 90 degrees. Some configurations will only rotate 90 degrees clockwise or counter clockwise, not both. To rotate the monitor: 1. Grasp the sides of the monitor 2. -
Page 22: Electronic Work Surface Lift System (Some Models)
Operation ELECTRONIC WORK SURFACE LIFT SYSTEM (SOME MODELS) For CareLink™ carts equipped with the electronic lift system, adjust the work surface height in the following manner: Touch the Lift button located on the right side of the touchscreen. Note: Depending on the configuration of your cart, a login may be required to access this feature. -
Page 23: Electronic Work Surface Lift Height Presets (Optional)
Operation ELECTRONIC WORK SURFACE LIFT HEIGHT PRESETS (OPTIONAL) Lift Electronic lift height presets are available to users who are logged in. Individual users may set sitting and standing height presets to adjust the Presets CareLink™ cart for their personal comfort. To set height presets: 1. -
Page 24: Task Lighting
Operation TASK LIGHTING Task lighting is included to enhance cart usability in darkened patient areas. All CareLink™ carts are equipped with a standard keyboard light operated by using the Lighting button located at the left side of the touch screen. Optional task lighting configurations can include a work surface light and ground lights. - Page 25 Operation TASK LIGHTING The function of the optional Task Light buttons is further explained in the sections that follow: • The Keyboard button controls the lights located below the touch screen • The keyboard light is designed to illuminate the keyboard area. Note: When the keyboard tray is retracted, Work the keyboard light will illuminate the floor...
-
Page 26: Settings (Standard)/Preferences (Optional)
Operation SETTINGS (STANDARD)/PREFERENCES (OPTIONAL) The Cog button , located at the bottom left of the touchscreen, is Logout ICU Cart 9 12/25/11 12:34AM used to access both the Settings and 1:49 Time To Charge Preferences screens. If no user is Log In Lighting Lift... -
Page 27: Calculator (Optional)
Operation CALCULATOR (OPTIONAL) To access the CareLink™ calculator feature: Touch the Calculator button Logout ICU Cart 9 12/25/11 12:34AM The function of the calculator is Lift 1:49 Time Enter PIN - Drawers Locked To Charge Lighting described in the sections that follow: All On Work 123+... -
Page 28: Service Request (Optional)
Operation SERVICE REQUEST (OPTIONAL) The Service Request button is used to send requests from the cart. Logout ICU Cart 9 12/25/11 12:34AM A new request may be canceled Lift 1:49 Time Enter PIN - Drawers Locked To Charge Lighting until it is acknowledged. Once a All On request has been acknowledged, Work... - Page 29 Operation SERVICE REQUEST (OPTIONAL) To send a request from the cart: Logout ICU Cart 9 12/25/11 12:34AM Add Optional Comment <Select Request Type> Note: Make sure the Wi-Fi is Service Request History Logout ICU Cart 9 12/25/11 12:34AM Created Type Cart active.
-
Page 30: Notifications (Optional)
Operation NOTIFICATIONS (OPTIONAL) The Notifications button is used Logout ICU Cart 9 12/25/11 12:34AM to display a list of messages sent to Notifications Type From Subject Date a cart user. There are two types of Jane Doe Facilities Tornado Warning 12/29/11 3:54PM messages: ICU Dept... -
Page 31: External Usb Ports
Operation NOTIFICATIONS (OPTIONAL) To read a message: Note: Make sure Wi-Fi is active. Look for the Icon in the upper right hand corner of the touch screen. Note: If the Wi-Fi is not active, requests and notifications cannot be sent or received. •... -
Page 32: Help Screen
Operation HELP SCREEN The Help button is used to display the help screen. The help screen contains: • A listing of control system screen buttons and icons • The optional Battery Help button which explains the battery indicator states • The optional Reboot button used to reboot the computer when necessary •... -
Page 33: Preventative Maintenance
Preventative Maintenance INSPECTION CHECKLIST To protect optimal performance, Capsa Healthcare recommends a periodic inspection and preventative maintenance of your computing cart fleet. These simple steps can safeguard against breakdowns and help you realize uninterrupted workflow and cart availability. Items Action... -
Page 34: Maintenance
Maintenance DO NOT use the computer cart if pieces are missing or the unit is damaged. In these cases, immediately contact Capsa Healthcare Customer Service for more information: 1-888-859-8294. Cables: Always keep the cables neatly organized and be sure to route cables away from moving components with wire ties or cable clips. -
Page 35: Troubleshooting
Troubleshooting Problem Solution Cart is Hard to Push Check that the caster locks are in the unlocked (up) position. Check casters for obstructions. Cart is Hard to Turn Check that N-Stride™ is active. Computer/Monitor Will Check that cart power button is not orange and battery is Not Power Up disconnected from cart. -
Page 36: Cleaning
Cleaning CAUTION: Because of the close proximity of electrical power and equipment, flammable cleaners should never be used on the computer cart. To clean the cart: 1. Turn off the cart. a. Turn off any technology installed, on the cart. b. -
Page 37: Warranty
Warranty LIMITED WARRANTY FOR CARELINK™ COMPUTER CART Capsa Healthcare is pleased to offer a three-year warranty on durable components and a three-year warranty on electronic components. If, during the warranty period, this Capsa Healthcare product proves defective in materials or workmanship under normal use by the original purchaser, please contact Capsa... -
Page 38: Transport/Storage/Disposal
Contact your IT department, or file a service request at our website: www. capsahealthcare.com/request-service. SERVICE LEVEL COMMITMENT Capsa Healthcare is committed to providing best-in-class service. This document details our standard warranty and instructions on how to request service using our customer support system. -
Page 39: Standards Compliance
Standards Compliance TESTED TO COMPLY WITH: NRTL certified to o UL 60601-1 - Issued:2003/04/25 Ed:1 Rev: 2006/04/26 UL Standard for Safety Medical Electrical Equipment, Part 1: General Requirements for Safety o ANSI/AMMI ES 60601-1:2005/(R)2012 o CAN/CSA C22.2 No. 60601-1-08 (R2014), (Edition 3.1) Medical electrical equipment - Part 1: General requirements for basic safety and essential performance;... - Page 40 800.437.6633 www.CapsaHealthcare.com 07/2017 Part # 1817595 CareLink RX XP RXXP User Manual Rev E © 2017 Capsa Solutions Portland, OR 97230...
Need help?
Do you have a question about the CareLink XP and is the answer not in the manual?
Questions and answers