Advertisement
Quick Links
Product
Guide
User and
Maintenance
Information
IMPORTANT
INFORMATION:
Please save this
product guide.
CUSTOMER SERVICE:
United States
PO Box 2
Ulster Park, NY 12487
Office hours: 9-5 EST
Phone (800) 777-4244
Fax (800) 336-5948
(845) 572-3468
www.CommunityPlaythings.com
Sales@CommunityPlaythings.com
© 2010 by Community Products, LLC
BF32 DC 6783 Revision D
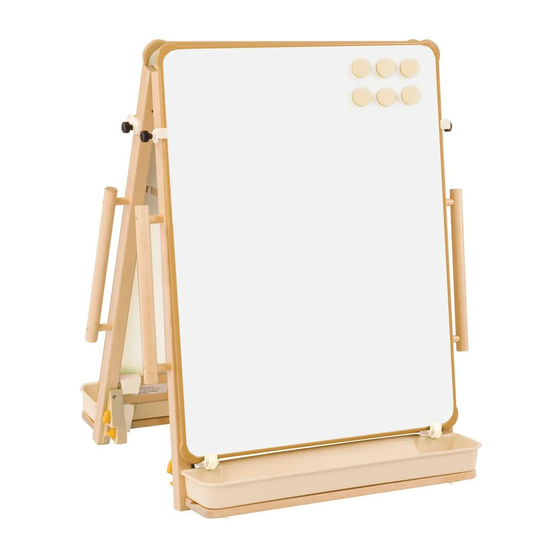
H505 Mini Art Island Top/ Floor Easel
Recommended Use
This easel supports a wide variety of activities:
• children's paintings
• dry-erase markers directly on the whiteboard
• big book display
• flip chart presentations
1 – 3 year olds.
Mini Floor Easel
2 – 5 year olds.
Mini Art Island
WARNING
c This product is intended for use by children of
immature judgment, therefore supervision is
required at all times.
c Never reconfigure the Art Island with
children nearby.
c Only use Floor Easel on the floor, not on a table-
top. It may slide off.
Assembly
Products consist of the following:
H505 Mini Floor Easel
• 1 H505 Mini Art Island Top / Floor Easel containing:
1 frame
2 whiteboards
2 trays
2 shelf assemblies
6 magnets (for attaching paper)
H500 Mini Art Island
• 1 H505 Mini Art Island Top / Floor Easel
• 1 H501 Mini Art Island Storage Unit containing:
1 low storage unit
1 plywood adjustable shelf
If your shipment is incomplete, please contact
Customer Service.
To assemble the Art Island:
1. Open the easel frame all the way so the stays
are straight.
2. Place the easel frame on the storage unit (if
applicable) making sure all four latches engage.
3. Hang the two shelf/tray assemblies on the
lower cross-member.
4. Place the bottom edge of the whiteboard panel
in the white hooks.
5. Secure the whiteboard by positioning and
screwing the white clips tight to catch the sides
of the board. (See Fig. A.)
H500 Mini Art Island
4
3
Figure A
Operation
WARNING
c Unit may tip when rolled sideways. Always push
from an end. Never move with children nearby.
Always disengage wheels after moving.
CAUTION
c Removing the easel frame or engaging the
mobility needs two people.
To
remove the easel frame,
buttons at the end and lift.
To
place it flat on the shelf and cen-
install the tray,
tered between the white brackets. Press back firmly,
one end at a time, until the tray snaps into place.
To
use fingers and thumb to lever
remove the tray
the tray away from the easel (see Fig B).
Figure B
5
1
2
press the two yellow
Advertisement

Related Manuals for Community Playthings H500 Mini Art Island


Summary of Contents for Community Playthings H500 Mini Art Island
- Page 1 Product H505 Mini Art Island Top/ Floor Easel H500 Mini Art Island Guide User and Recommended Use Maintenance This easel supports a wide variety of activities: • children’s paintings Information • dry-erase markers directly on the whiteboard • big book display IMPORTANT •...
- Page 2 (Fig. C) Floor Easel The whiteboards are steel with a foam core. H500 Mini Art Island The trays and other plastic parts are injection- molded. Packaging Recycling All our packaging is recyclable in two simple...