Table of Contents

Related Manuals for Community Playthings G770


Summary of Contents for Community Playthings G770
- Page 1 Product Guide The Nursery Gym Important Information: Keep instructions for future use. Read all instructions before assembly and use of product. G700-G770 Place Product Guide on inside of Storage Gate when you are done with it. Thank you.
-
Page 2: Table Of Contents
Your Safety ........3-4 Getting started ........4–6 Basic skills ..........7–10 G700 ............11 G710 ..........12–13 G718 ..........14-15 G720 ............16 G730 ...........17-18 G740 ..........19-20 G750 ..........21–23 G760 ..........24–27 G770 ..........28–30 Maintaining your gym ......31... -
Page 3: For Your Safety
For Your Safety WARNINGS Failure to follow these warnings and the Test the joints for stability before allowing assembly instructions could result in serious children to play on the structure. injury or death. Do not provide anything on the top level of your gym which children can use to climb This Product Guide contains important over the sides. -
Page 4: Getting Started
If any parts are broken or missing, do not try to assemble your gym. Call Customer Service right away (800-777-4244) and we’ll send you replacement parts. Use only replace- ment parts supplied by Community Playthings. - Page 5 Long post (with cap and four connector rings) Medium post (with cap and four connector rings) Short post (with plug and two connector rings) Plywood panel Slide entry panel Steering wheel panel Dowel panel Platform Large mirror Small mirror Large carpet Small carpet Stairs Slide...
- Page 6 Platform – Slide – – – Slide entry panel – – – Slide gate – – – Stair Banister brace Gate Ramp – – – Play house – – – – – Tunnel – – – – – Long posts Medium posts Short posts –...
-
Page 7: Basic Skills
Basic Skills We said no-tools assembly and we meant it. But you will need a friend to help you. It takes four hands to build a gym, but no tools at all! These basic skills are for building any of the Nursery Gym patterns in this book. - Page 8 To add the stairs or ramp you will need to unscrew the caps Lay all the platforms in place. The open circle where four platforms meet over a short post should be filled with the plug. and slide off three connector rings from the medium posts first.
- Page 9 Use tall panels to create the top layers, following the pattern Before the upper panels can be added you must unscrew the you have chosen. Replace the top connector rings as you go, cap and slide off the top connector ring. Lay them on the so each panel is captured by four connector rings.
- Page 10 Add the slide entry panel to the gym by flexing the top of the We provide a gate for the top of the slide for those moments handles inward while inserting into the lower connector rings. when you want more security for the very youngest, and are unable to give individual attention.
-
Page 11: G700
G700 Nursery Gym Stairs The Nursery Gym 1 is our smallest Nursery Gym Set. Simply a stair up and a stair down with safe clear banisters to steady the little guys as they learn how to climb up and down. When it is “time-out” for a while, the gates can be put in position to block off the stair entries. -
Page 12: G710
G710 Nursery Gym 1 with Slide There are two ways to set up Nursery Gym 1 with Slide: Gary’s Gym makes a compact right angle climber. There should be no extra parts for this layout. You can also flip a pattern so that it faces the opposite way. It’s easy if you photocopy the plan on a sheet of transparent overhead material. - Page 13 Julie’s Gym An easily accessible storage gate, mirror panel, and carpet panels make a nice face for this item. There should be no extra parts for this layout.
-
Page 14: G718
G718 Nursery Gym 1 with Ramp There are two ways to set up Nursery Gym 1 with Ramp: 54" Joe’s Gym makes a compact right angle climber. There should be no extra parts for this layout. You can also flip a pattern so that it faces the opposite way. 69"... - Page 15 Linda’s Gym 96" An easily accessible storage gate, mirror panel, and carpet panels make a nice face for this item. 26" There should be no extra parts for this layout.
-
Page 16: G720
G720 Nursery Gym 2 David’s Gym introduces all three entrances and exits to one platform area. This creates an interesting center of activity with choices of where to go next. Remember patterns can be flipped to face the opposite way. See page 12. -
Page 17: G730
G730 Nursery Gym 3 There are two ways to set up Nursery Gym 3: Sam’s Gym has a nice play area underneath the tunnel and play house. Crawling through the tunnel will create endless hours of fun. Look at page 12 to see how to flip your pattern so that it faces the other way. - Page 18 Becky’s Gym is another good layout for Nursery Gym 3. Children will enjoy looking in the mirror panel below the tunnel. The ramp up—slide down —and crawl back under the playhouse bridge will create an interesting traffic pat- tern. There should be no extra parts for this layout.
-
Page 19: G740
G740 Nursery Gym 4 There are two ways to set up Nursery Gym 4: In Angus’ Gym, a teacher can easily get up on the plat- form to interact more closely with the children. The carpet panel will provide a nice back rest for the teacher. - Page 20 Marie’s Gym is another interesting way of setting up Nursery Gym 4. The clear view banister panel will allow fun interaction between children going up the stair and children going down the ramp. The carpeted ramp provides excellent experience with negotiating inclined surfaces. This layout will have these extra parts: one medium post, one banister panel, and one plywood panel.
-
Page 21: G750
G750 Nursery Gym 5 There are three good ways to set up Nursery Gym 5: Senta’s Gym is ideal for placing in the middle of a large room. There are many spread out play areas on, under, and around Senta’s Gym. Notice how the steering wheel can be placed out of the line of traffic? This panel can also be put in the other way around so that driving is done while standing on the floor outside the gym. - Page 22 John’s Gym is the most compact way of setting up Nursery Gym 5. Children will enjoy seeing themselves in the mirror as they crawl through the tunnel. They will also enjoy fingering the scalloped edge of the play house roof. There should be one extra long post in this layout.
- Page 23 Joanne’s Gym is an interesting option for Nursery Gym 5. Notice how the tunnel leads to a nice quiet corner out of the line of traffic developed by the stair and slide. There is another cozy corner with mirrors underneath the playhouse bridge.
-
Page 24: G760
G760 Nursery Gym 6 There are four ways to set up Nursery Gym 6: Steven’s Gym has platform landings on both ends of the tunnel. The playhouse and tunnel create a bridge between two islands of play area. This layout will have these extra parts: one medium post, one short post, and one banister panel. - Page 25 Norma’s Gym has a cubical centered in the platform area for serious driving through heavy traffic. Placing the upper mirror at right angles to the steering wheel panel will allow the driver to see himself in action. This layout will have these extra parts: one long post, one medium post, one short post, and one banister panel.
- Page 26 Clem’s Gym is ideal for use in the middle of a larger room. There is a bit of everything on this spreading layout, creating many corners for play. Leave a platform under the tunnel, and the tunnel can be removed leaving a fun playhouse. This layout will have these extra parts: two long posts and one short post.
- Page 27 Lydia’s Gym is the most compact way to set up Nursery Gym 6. Having four platforms in a large square, it allows a caregiver to get up on the platform with the children—with room to spare. This layout will have these extra parts: two long posts, one medium post, and one banister panel.
-
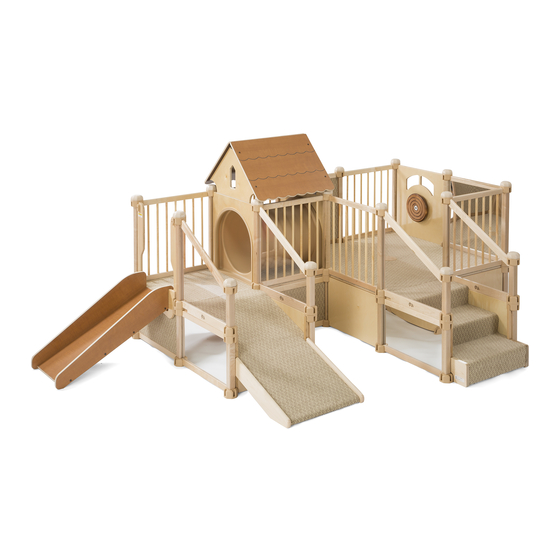
Page 28: G770
G770 Nursery Gym 7 There are three ways to set up Nursery Gym 7: Ron’s Gym enjoys enough platform space to allow a plat- form under the tunnel. This allows you to remove the tunnel and use the house opening on three sides. - Page 29 Logan’s Gym The aisle between the gym and the wall of the room is an ideal passage for children learning to walk. They use the dowels as hand grips to support themselves as they cruise down the aisle. There should be no extra parts for this layout.
- Page 30 Sara’s Gym is the most compact way of setting up Nursery Gym 7. The clear view banister separating the ramp and stair makes an interesting point of interaction for those going up with those going down. The upper panel on the side of the house can be removed only when the tunnel is not in use, allowing three entrances to the house.
-
Page 31: Maintaining Your Gym
Use only replacement parts supplied by If you plan to store your gym, remember it is made Community Playthings. of wood, and needs to be stored in a dry place. For berry, blood, 1. - Page 32 Customer Service: PO Box 2 Ulster Park, NY 12487 Office hours: 9-5 EST Phone (800) 777-4244 Fax (800) 336-5948 (845) 572-3468 www.CommunityPlaythings.com Sales@CommunityPlaythings.com © 2010 by Community Products, LLC WW54 DC 6272 Revision 23...
Need help?
Do you have a question about the G770 and is the answer not in the manual?
Questions and answers