
Related Manuals for Bartlett Genesis LT3140


Summary of Contents for Bartlett Genesis LT3140
- Page 1 Operation Manual Genesis Model LT3140 & Genesis Mini Model LT1120 BARTLETT INSTRUMENT COMPANY 1032 Avenue H Fort Madison, IA 52627 319-372-8366 www.bartinst.com...
-
Page 2: Table Of Contents
Table of Contents Introduction ..............................2 Precautions ..............................2 Home Screen Overview ..........................3 Quick Start ..............................4 First Firing of the Kiln ............................ 5 Program the Controller ..........................5 Review Program Before the Firing ......................5 Start The First Test Firing .......................... 6 Review the Results ............................ -
Page 3: Introduction
Introduction This manual covers the operation of the Genesis 3140 & Genesis 1120 kiln controllers. The Genesis is a versatile touch screen controller that regulates the temperature in your kiln so you can fire a variety of products like ceramics, glass, jewelry, and more. The Genesis has preset ceramic programs with cone fire programming, preset glass firing profiles, and 30 custom programs, along with Wi-Fi capabilities for software updating, built in diagnostics, and maintenance logging among other new features. -
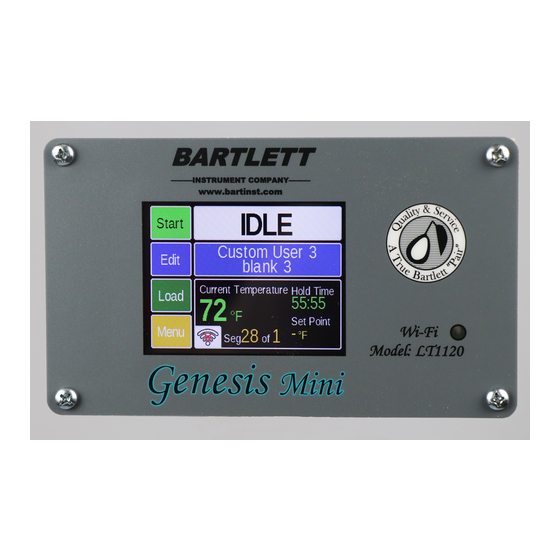
Page 4: Home Screen Overview
Home Screen Overview Current Temperature Start Status Displays the current Press to begin firing Displays the current temperature of the process. status of the kiln. kiln. Current Program Displays the program Edit or View Menu currently loaded Press to edit or view (novice mode) the currently loaded Fire Time... -
Page 5: Quick Start
Quick Start Step 1: Load A Program (See Pages 7-13) Press the Load button. Select the type of program. o Ceramic (Bisc or Glaze) o Glass o Custom Step 2: Review or Edit the Program (See Pages 7-13 ) ... -
Page 6: First Firing Of The Kiln
First Firing of the Kiln The purpose of the first firing is to put a protective oxide layer on the elements and thermocouple. The first firing is done without ware in the kiln that might give off fumes that contaminate the elements. This first firing should have shelves and witness cones. -
Page 7: Start The First Test Firing
Start The First Test Firing Step Display Shows Key Press What This Selection Means Home Screen Start The kiln is ready to be fired. Start Firing 1-Start This kiln is ready to be fired and the start code must be CERAMIC BISC entered. -
Page 8: Ceramics Programming (Bisc Or Glaze)
Ceramics Programming (Bisc or Glaze) Programming in Novice mode is the easiest method to program the controller to fire ceramics. Programming consists of choosing a cone number, firing speed, and a preheat time. The firing speed is chosen by the type of firing and thickness of the clay used. All 4 speeds below will calculate the firing rate at the end of a firing and adjust the final temperature for correct heat-work. - Page 9 Ceramics Programming - Novice Mode Off: Step Display Shows Key Press What This Selection Means You’re ready to load a different program into the controller Home Screen Load memory. Load Program Choose between 1-Bisc, 2-Glaze, 3-Glass, or 4-Custom The default bisc program will be loaded to the controller. 1-Bisc Any saved changes made to the bisc program will overwrite the default program.
-
Page 10: Glass Programming
Note: When a preheat is selected, the temperature ramps up at 60°F/hour (33°C/hr) to 200°F (93°C) for the amount of time programmed. When the copy function is used and Copy is selected, the controller will return to the IDLE screen. The loaded program will become the copied program in its new user location. -
Page 11: Custom Programming
Glass Programming – Novice Mode OFF: Step Display Shows Key Press What This Selection Means You’re ready to load a different program into the controller Home Screen Load memory. Load Program 3-Glass Choose between 1-Bisc, 2-Glaze, 3-Glass, or 4-Custom Choose the type of glass firing, either Slump, Tac Fuse, Full Glass Fuse, or Cast. - Page 12 Custom Programming – Novice Mode ON: Step Display Shows Key Press What This Selection Means You’re ready to load a different program into the controller Home Screen Load memory. What are you Choose from Ceramics, Glass, and Other. Choose Other for 3 - Other Firing? custom firings...
-
Page 13: Calculating Ramp Rates For Custom Firing
Press the Segment number Press to change the custom for options: firing name. A 2 screen will Press to activate the 1-Insert Segment (Adds one appear, make the changes, fan for that segment. above selected segment) and press “Save.” See Output 4 Options 2-Add Segment (Adds one to on page 20 for more the end) -
Page 14: Custom Ceramics Program
227°F/hr). If you want to add another segment to go from 750°F to 1000°F in 4 hours, the same procedure is used. Take the end temperature minus the starting temperature (1000 – 750 = 250) and divide this number by the number of hours to reach 1000°F (250°F ÷ 4 hrs = 63°F/hr). Custom Ceramics Program Writing your own ceramics program combines the versatility of the Custom program and the heat-work calculation of a ceramics firing. - Page 15 CONTROLLER KILN POWER RELAY SWITCH PLUG Sensor (thermocouple) Heating Element Relay off when temperature above traveling set point TRAVELING SET POINT Relay on when temperature below traveling set point CONTROL OUTPUT TO RELAY Figure 8: Kiln Operation Step 1 Read temperature inside kiln Step 2 Controller compares temperature to the...
-
Page 16: Adjustments During A Firing
The diagram and flow chart show that the kiln control system, in its simplest form, works like your thermostat at home – when the temperature is too cool the heater comes on; when the temperature is too hot the heater turns off. The major components of the control system are the Genesis controller, thermocouple temperature sensor, relay switch, power source, and heating elements. -
Page 17: End Of Firing - Complete
Changes or adjustments to the firing can’t be made here once the firing has started. To make adjustments, press the Adjust button. Graphing Key: Item On Graph Meaning Orange Vertical Line W/ Number Segment of the firing Green Vertical Line W/ Time Current firing time. -
Page 18: Care Of Thermocouple
Care of Thermocouple The small metal rod protruding into the firing chamber is the temperature sensor, or thermocouple. Do not let shelves, posts, or ware touch the thermocouple; this could affect the temperature reading. Bumping the thermocouple during loading can damage it or push it out of the firing chamber. It should protrude into the firing chamber about 1 -1/2”. -
Page 19: Diagnostics
Kiln Info Contains the firmware version plus the serial number and mac address for registering and viewing your kiln at www.bartinst.com. Updating firmware will NOT affect the firing programs. Diagnostics Board Temperature Displays the current board temperature. Displaying the board temperature is a diagnostics function to check the operation of the board. -
Page 20: Configuration
Thermocouple Offset Thermocouple offset is used to raise or lower the temperature indicated by the thermocouples. This is generally used to balance the heat-work in a zone controller kiln. The maximum TC Offset is 99°F (37°C). To correct an under-firing set a negative TC Offset. To correct an over-firing, set a positive TC Offset. - Page 21 Enable Wi-Fi – Enable or disable the Wi-Fi feature. Off turns Wi-Fi capabilities off at all times. On When Firing enables Wi-Fi only when a firing is in progress. Always On turns the Wi-Fi on anytime it is within range of a setup Wi-Fi connection. Wi-Fi Setup –...
- Page 22 Output 4 Options – (Usually set as a factory option) Output 4 has 3 modes for running vent fans (Options A, B, & C), one mode that uses Output 4 to indicate the alarm has triggered (Alarm), and one mode for running elements in the lid or floor of the kiln (Percent).
-
Page 23: Restore Presets
Restore Presets Restore all preset programs and offsets to factory settings. Restore User Programs Restore individual User Programs 1-12 back to factory setting. Select the User Program to be restored and press “RESTORE”. This will clear any changes made to that user program from factory settings. -
Page 24: Appendix A: Error Codes
Appendix A: Error Codes If you get an error code, it is important to note the error letter or number. It will help you in diagnosing any problem with the kiln. When an error code is displayed, it will give a short description of the error. -
Page 25: Full Power Test
Reprogram all segments of the program being fired. If ERROR A Invalid program variable error persists, controller may need to be returned to factory for service. The control box temperature may be too hot or the limit temperature may need to be reset. If the room ERROR bd Board temperature too high temperature is very hot, aiming a fan at the control box... -
Page 26: Appendix B: Cone Fire Temperature Profiles
Appendix B: Cone Fire Temperature Profiles Firing Profiles for Cone 04, Temperature 1945°F (1063°C) Ceramics – Slow (Bisc Hand Thrown) Ceramics – Medium (Glaze Larger Pieces or Bisc Thin) Segment Rate/hr Temperature Stage Time Segment Rate/hr Temperature Stage Time 2.25 1.20 1000 3.75... -
Page 27: Appendix C: Custom Firing Default Programs
Appendix C: Custom Firing Default Programs The custom firing programs will change based off the users customization settings. If Novice mode is off, you can write over them to create your own programs. See Programming for Custom Firings to make changes to a preloaded program. For all programs, the alarm is set to off (9999). When the alarm temperature is changed, it only changes for the loaded program, not all programs. - Page 28 Custom Programs: Heat Treat User 7 – Draw 500 User 1 –154CM ATS34 Rate Temperature Hold Rate Temperature Hold 9999 2:00 9999 1900 0:30 User 8 – Draw 400 User 2 – AISI 0-1 Rate Temperature Hold Rate Temperature Hold 9999 2:00 9999...
- Page 29 Custom Programs: PMC User 7 – Bronze Clay User 1 –PMC Stand Rate Temperature Hold Rate Temperature Hold 1550 2:30 9999 1650 2:00 User 8 – Bronze Fast Fire User 2 – PMC + Rate Temperature Hold Rate Temperature Hold 1525 1525 1:00...
-
Page 30: Appendix D: Blank Firing Program
Appendix D: Blank Firing Program Keep this page as a Master and photocopy as needed. Firing Program Number: ________ Segment Rate Per Hour Temperature Hold Firing Program Number: ________ Segment Rate Per Hour Temperature Hold... -
Page 31: Appendix E: Common Questions And Situations
Q. Who do I contact for parts for my kiln? A. For replacement parts for your kiln (relays, elements, etc.), contact the kiln manufacturer. For any issues with your controller contact us at Bartlett Instrument Co. for a solution. -
Page 32: Appendix F: Zone Control
Appendix F: Zone Control Your kiln must have multiple thermocouples and be wired for multiple zones to take advantage of these features. 1. Features and Enhancements 3 separately controlled zones (3 T/C inputs, 3 outputs) Adjustable offsets for each thermocouple (T/C) ... -
Page 33: Three Thermocouples
5. Three Thermocouples Besides better measuring of the temperature, the zone control also offers security through its three thermocouples. With a single zone controller, a firing will be stopped if the thermocouple fails. The zone control with 3 T/C’s will continue to fire if one or two of its thermocouples fail during a firing. If the top or bottom thermocouple fails, that section will be controlled by the top T/C. -
Page 34: Appendix G: Genesis Connection Diagram
Appendix G: Genesis Connection Diagram With a single thermocouple (single zone control), Output 2 is connected to all relays and 10 Pin Housed Output 1 & 3 do not have wires Header for Thermocouple Header – 2 pins connected. computer and Type K –... -
Page 35: Appendix H: Genesis Mini Connection Diagram
Appendix H: Genesis Mini Connection Diagram...
Need help?
Do you have a question about the Genesis LT3140 and is the answer not in the manual?
Questions and answers