Advertisement
Quick Links
Walnut Ridge
Walnut Ridge
Cabinetry
Cabinetry
®
®
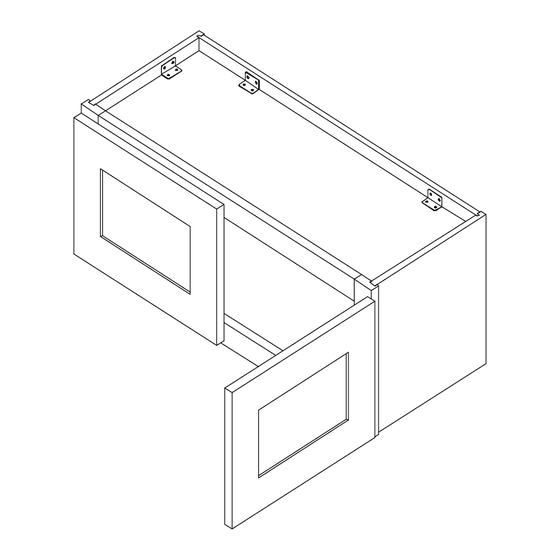
W3012,W3612,W3015,W3615,W361524,W3018,W3618
W3012,W3612,W3015,W3615,W361524,W3018,W3618,W361824
ASSEMBLY INSTRUCTIONS
ASSEMBLY INSTUCTIONS
You Will Need:
Getting started:
screwdriver, protected surface to assemble cabinet on
prepare a protection layer, a screwdriver
STEP 1: Attach side panels to back panel
STEP 1: Joint side panel with back panel
STEP 2: Attach top panel for support
STEP 2: Joint side panel with back panel and attahching top panel for giving support
STEP 3: Joint back panel with side panel and back panel
STEP 3: Attach bottom panel
STEP 4: Attach face frame
STEP 4: Attach frame on
STEP 5: Fix door onto the frame and adjust the cover-space
STEP 5: Attach door onto the frame and adjust the spacing
7
1 1/2" SOFTCLOSE HINGE
6
3/4" ROUND HEAD SCREW
5
BUMPER
4
DAMPER
3
9/16"ROUND HEAD SCREW
2
CLEAT
1
1"FLAT HEAD SCREW FOR CARCASS
NO.
Description
HARDWARE LIST
4
1 1 /2 " hinge
A
4
3 /4 " round head screw
4
Bumper
2
Damper
D
56
9/16" round head screw
14
Cleat
8
1" flat head screw
QTY
PICTURE
STEP:1
A
B
B
STEP:4
C
E
C
A
PARTS LIST
NO.
Description
A
SIDE PANEL
B
BACK PANEL
C
TOP&BOTTOM PANEL
D
FACE FRAME
E
CABINETS DOOR
STEP:3
A
STEP:2
C
A
STEP:5
C
How To Fix Soft Close Hinge
D
A
E
www.brokeringsolutions.com
QTY
2
1
2
1
2
C
C
A
Screw
Damper
Hinge
Advertisement

Related Manuals for Brokering Solutions W3012


Summary of Contents for Brokering Solutions W3012
- Page 1 Walnut Ridge Walnut Ridge Cabinetry Cabinetry ® ® www.brokeringsolutions.com W3012,W3612,W3015,W3615,W361524,W3018,W3618 W3012,W3612,W3015,W3615,W361524,W3018,W3618,W361824 PARTS LIST ASSEMBLY INSTRUCTIONS ASSEMBLY INSTUCTIONS Description You Will Need: Getting started: SIDE PANEL screwdriver, protected surface to assemble cabinet on prepare a protection layer, a screwdriver BACK PANEL...
- Page 2 Walnut Ridge Walnut Ridge Cabinetry Cabinetry ® ® www.brokeringsolutions.com W3024,W3324,W3624,W362424 ASSEMBLY INSTRUCTIONS You Will Need: screwdriver, protected surface to assemble cabinet on STEP 1: Attach left side panel to back panel STEP 2: Attach top panel to side and back panels STEP 3: Attach bottom panel and right side panel STEP 4: Attach face frame STEP 5: Put in adjustable shelves...
- Page 3 Walnut Ridge Walnut Ridge Cabinetry Cabinetry ® ® www.brokeringsolutions.com W0930,W1230,W1530,W1830,W2130, W0936,W1236,W1536,W1836,W2136, W0942,W1242,W1542,W1842,W2142 ASSEMBLY INSTRUCTIONS You Will Need: screwdriver, protected surface to assemble cabinet on STEP 1: Attach left side panel to back panel STEP 2: Attach top panel to side and back panels STEP 3: Attach bottom panel and right side panel STEP 4: Attach face frame STEP 5: Put in adjustable shelves...
- Page 4 Walnut Ridge Walnut Ridge Cabinetry Cabinetry ® ® www.brokeringsolutions.com W2430,W2730,W3030,W3330,W3630, W2436,W2736,W3036,W3330,W3636, W2442,W2742,W3042,W3342,W3642 ASSEMBLY INSTRUCTIONS You Will Need: screwdriver, protected surface to assemble cabinet on STEP 1: Attach left side panel to back panel STEP 2: Attach top panel to side and back panels STEP 3: Attach bottom panel and right side panel STEP 4: Attach face frame STEP 5: Put in adjustable shelves...
- Page 5 Walnut Ridge Walnut Ridge Cabinetry Cabinetry ® ® www.brokeringsolutions.com WDC2430, WDC2436, WDC2442 WDC2430, WDC2436, WDC2442 ASSEMBLY INSTRUCTIONS You Will Need: screwdriver, protected surface to assemble cabinet on STEP 1: Attach right side panel to front face frame STEP 2: Attach top panel to face frame and side panel STEP 3: Attach bottom panel and left side panel STEP 4: Attach back panel pieces STEP 5: Slide back panel through groove, then tighten screws...
- Page 6 Walnut Ridge Walnut Ridge Cabinetry Cabinetry ® ® www.brokeringsolutions.com WBC2430, WBC2436, WBC2442 WBC2430, WBC2436, WBC2442 ASSEMBLY INSTRUCTIONS You Will Need: screwdriver, protected surface to assemble cabinet on STEP 1: Attach left side panel to back panel STEP 2: Attach top panel to side and back panels STEP 3: Attach bottom panel and right side panel STEP 4: Attach face frame STEP 5: Put in adjustable shelves...
- Page 7 Walnut Ridge Walnut Ridge Cabinetry Cabinetry ® ® www.brokeringsolutions.com B12,B15,B18,B21 ASSEMBLY INSTRUCTIONS You Will Need: screwdriver, protected surface to assemble cabinet on STEP 1: Attach back panel to side panel STEP 2: Attach bottom panel to side and back panels STEP 3: Attach remaining side panel STEP 4: Attach face frame and toe kick STEP 5: Assemble drawer box and install glides...
- Page 8 Walnut Ridge Walnut Ridge Cabinetry Cabinetry ® ® www.brokeringsolutions.com B24, B27, B30 B24, B27, B30 ASSEMBLY INSTRUCTIONS You Will Need: screwdriver, protected surface to assemble cabinet on STEP 1: Attach back panel to side panel STEP 2: Attach bottom panel to side and back panels STEP 3: Attach remaining side panel STEP 4: Attach face frame and toe kick STEP 5: Assemble drawer box and install glides...
- Page 9 Walnut Ridge Walnut Ridge Cabinetry Cabinetry ® ® www.brokeringsolutions.com B33, B36 B33, B36 ASSEMBLY INSTRUCTIONS You Will Need: screwdriver, protected surface to assemble cabinet on STEP 1: Attach back panel to side panel STEP 2: Attach bottom panel to side and back panels STEP 3: Attach remaining side panel STEP 4: Attach face frame and toe kick STEP 5: Assemble drawer boxes and install glides...
- Page 10 Walnut Ridge Walnut Ridge Cabinetry Cabinetry ® ® www.brokeringsolutions.com DB12-3, DB15-3, DB18-3, DB21-3, DB24-3, DB30-3, DB36-3 DB12-3, DB15-3, DB18-3, DB21-3, DB24-3, DB30-3 ASSEMBLY INSTRUCTIONS You Will Need: screwdriver, protected surface to assemble cabinet on STEP 1: Attach back panel to side panel STEP 2: Attach bottom panel to side and back panels STEP 3: Attach remaining side panel STEP 4: Attach face frame and toe kick...
- Page 11 Walnut Ridge Walnut Ridge Cabinetry Cabinetry ® ® www.brokeringsolutions.com SB33, SB36, SB42 SB33, SB36, SB42 ASSEMBLY INSTRUCTIONS You Will Need: screwdriver, protected surface to assemble cabinet on STEP 1: Attach back panel to side panel STEP 2: Attach bottom panel to side and back panels STEP 3: Attach remaining side panel STEP 4: Attach face frame and toe kick STEP 5: Attach blocks in top corners...
- Page 12 Walnut Ridge Walnut Ridge Cabinetry Cabinetry ® www.brokeringsolutions.com ® WP2484, WP2490, WP2496 WP2484, WP2490, WP2496 ASSEMBLY INSTRUCTIONS You Will Need: screwdriver, protected surface to assemble cabinet on STEP 1: Attach top panel to side panel STEP 2: Attach middle and bottom panels to side panel STEP 3: Attach back panel STEP 4: Attach remaining side panel STEP 5: Attach face frame and toe kick...
- Page 13 Walnut Ridge Walnut Ridge Cabinetry Cabinetry ® www.brokeringsolutions.com ® OC3384 S/D, OC3390 S/D, OC3396 S/D OC3384 S/D, OC3390 S/D, OC3396 S/D ASSEMBLY INSTRUCTIONS You Will Need: screwdriver, protected surface to assemble cabinet on STEP 1: Attach top panel to side panel STEP 2: Attach back panel STEP 3: Attach middle and bottom panels STEP 4: Attach remaining side panel...
- Page 14 Walnut Ridge Walnut Ridge Cabinetry Cabinetry ® www.brokeringsolutions.com ® BBC39-42 BBC39-42 ASSEMBLY INSTRUCTIONS You Will Need: screwdriver, protected surface to assemble cabinet on STEP 1: Attach back panel to side panel STEP 2: Attach bottom panel to side and back panels STEP 3: Attach remaining side panel STEP 4: Attach face frame and toe kick STEP 5: Assemble drawer boxes and install glides...
- Page 15 Walnut Ridge Walnut Ridge Cabinetry Cabinetry ® ® www.brokeringsolutions.com BLS36 BLS36 LSB33,LSB36 PARTS LIST ASSEMBLY INSTRUCTIONS ASSEMBLY INSTUCTIONS Description You Will Need: Getting started: SIDE PANEL prepare a protection layer, a screwdriver screwdriver, protected surface to assemble cabinet on BACK PANEL STEP 1: Joint right side panel with right back panel STEP 1: Join left side panel with left back panel TOP&BOTTOM PANEL...
Need help?
Do you have a question about the W3012 and is the answer not in the manual?
Questions and answers