
Subscribe to Our Youtube Channel
Related Manuals for PolyScience WB05A11B


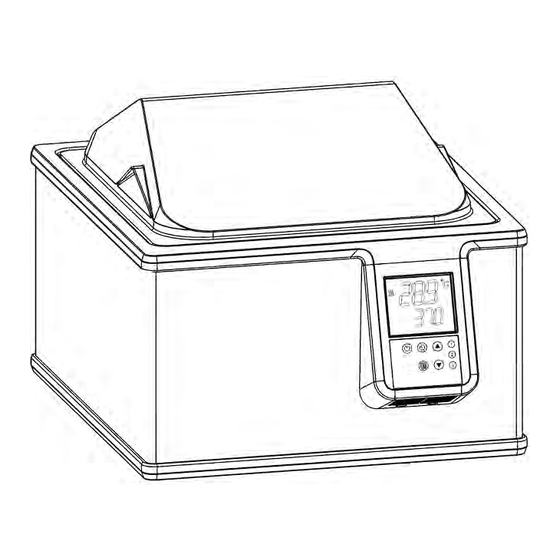
Summary of Contents for PolyScience WB05A11B
- Page 1 Operator’s Manual General Purpose Water Baths 110-031 PSC/EN 25 February 2014 110-031 PSC/EN GlobalTestSupply www. .com Find Quality Products Online at: sales@GlobalTestSupply.com...
-
Page 2: Table Of Contents
Table of Contents Introduction ................... 2 General Safety Information .............. 2 Safety Recommendations ..............3 Regulatory Compliance & Testing ............ 4 Unpacking Your Water Bath ............. 4 Contents ................... 4 LCD Display ..................5 Keypad ..................... 5 Installation and Startup ................. 6 General Site Requirements ............... -
Page 3: Introduction
Introduction Thank you for choosing this Water Bath. It is designed to handle a wide range of laboratory procedures including: incubation, inactivation and ag- glutination as well as most pharmaceutical, serological, biomedical and industrial procedures. To ensure optimium temperature uniformity, your Water Bath features an energy efficient, large-area heater and thermostatic control. -
Page 4: Safety Recommendations
This symbol on the Power Button indicates that it places the unit in a standby mode. IT DOES NOT fully disconnect the unit from the power supply. This symbol indicates a protective conductor terminal. Read all inst r uc t ions p er t aining to saf et y, set- up and op erat ion. -
Page 5: Regulatory Compliance & Testing
Regulatory Compliance & Testing This product has been tested to the requirements of CAN/CSA-C22.2 No. 61010-1, second edition, including Amendement 1, or a later version of the same standard incorporating the same level of testing requirements. ETL (60 Hz units) UL 61010-1 / CSA C22.2 No. -
Page 6: Lcd Display
LCD Display Calibration Mode Indicators High Limit Warning Lit when unit Indicator calibration offset is Flashes if you being set attempt to enter a Version Indicator set point higher than Lit when firmware the High Limit value. version ID is being Lit steady when High displayed on the Limit value is being... -
Page 7: Installation And Startup
Installation and Startup Your Water Bath is designed to be simple to setup and install. All that is required is a container for adding water or another suitable fluid to the bath reservoir. General Site Requirements Locate your Water Bath on a level surface in an area that is free from drafts and wide ambient temperature variations, such as near heater or air conditioning vents. - Page 8 WARNING: Always drain all fluid from the reservoir before moving or lifting your Water Bath. Be sure to follow your organization’s procedures and practices regarding the safe lifting and relocation of heavy objects. WARNING: To avoid the potential for burns, allow the Water Bath to cool completely before cleaning or performing any maintenance.
-
Page 9: Electrical Power
Electrical Power WARNING: The Water Bath’s power cord must be connected to a properly grounded electrical receptacle. Make certain that this electrical outlet is the same voltage and frequency as your Water Bath. The correct voltage and frequency of your Water Bath are indicated on the identification label on the rear of the unit. -
Page 10: Setting The High Limit Value
Setting the High Limit Value This menu item allows you to enter a high temperature alarm value, and can establish a temperature above which a set point temperature cannot be entered. If you try to increase the set point to a temperature higher than the High Limit value, further increases will be blocked and the words HIGH LIMIT on the LCD will flash. -
Page 11: Normal Operation
Normal Operation Keypad Controls Power Turns the Controller On and Off. Used to select and set temperature units, timer time duration, high limit Menu temperature and calibration offset. Also used to display the firmware version ID. Used to start, pause and reset the Timer timer. -
Page 12: Setting And Using The Timer
Setting and Using the Timer 1. Press until TIMER appears on the LCD; the two left hand digits in the lower readout will begin flashing. 2. Use the buttons to set the time duration in hours; this value may be set anywhere from 00 to 99 hours. 3. -
Page 13: Entering A Calibration Offset
Entering a Calibration Offset This menu item allows you to offset all bath temperature readings by -7 to +7ºC. For example, if the Calibration Offset is set to +0.5º the bath will display temperature readings of 20ºC, 50ºC and 70ºC as 20.5ºC, 50.5ºC and 70.5ºC, respectively. -
Page 14: Resetting The Factory Default Values
Resetting the Factory Default Values 1. Press to turn the Circulator Off. 2. Place the Mains Switch on the rear of the unit in the Off position. 3. Return the Mains Switch to the On position while pressing and holding either the button. -
Page 15: Display Messages And Alarms
Display Messages and Alarms Symbol and/or Word Description Comments/Corrective Action Warning: The operator is attempting Increase the High Limit temperature value or HIGH LIMIT to enter temperature set point that decrease the set point temperature. (flashing) is above the High Limit temperature value. -
Page 16: Routine Maintenance & Troubleshooting
Symbol and/or Word Description Comments/Corrective Action Warning: Sensor Failure Turn the Water Bath Off. Place mains switch - - - in the Off position. Unplug the unit and contact Beeping Pattern Routine Maintenance & Troubleshooting WARNING: Hazardous voltages may be present. Disconnect power before performing maintenance. -
Page 17: Cleaning The Bath
Cleaning the Bath Thoroughly clean the bath before each use. Use only mild soap and water when cleaning. Do not use steel wool as damage to the unit may result. Non-steel scouring pads are acceptable. The entire unit is housed in a tough, well-insulated powder-coated steel casing that is corrosion and chemical resistant. -
Page 18: Technical Information
Technical Information Performance Specifications Working Temperature: Ambient +5ºC to 100ºC (ambient +10º to 212ºF) 60ºC (140ºF) without cover Temperature Uniformity: ±0.2°C @ 37°C (±0.4°F @ 98.6°F) Temperature Stability: ±0.1°C (±0.2°F) Electrical Requirements Reservoir Reservoir Dimensions Heater Size (L x W x D) Wattage 120 V, 60 Hz 240 V, 50 Hz... -
Page 19: Reservoir Fluids
Reservoir Fluids WARNING: Do not operate unit with any potentially flammable materials, as a fire hazard may result. Specific Heat Normal Extreme Fluid Description Temperature Temperature @ Fluid BTU/lb KJ/Kg °C Range Range Temperature °F distilled water 50°C 1.00 4.18 10°... -
Page 20: Application Notes
CAUTION: Fumes from acidic solutions may cause corrosion of the stainless steel reservoir. Care should be taken to maintain a neutral pH at all times. Stay within the fluid’s normal range for best temperature stability and low vaporization. At fluid’s high temperature extreme: •... -
Page 21: Equipment Disposal (Weee Directive)
Equipment Disposal ( WEEE Directive) This equipment is marked with the crossed out wheeled bin symbol to indicate it is covered by the Waste Electrical and Electronic Equipment (WEEE) Directive and is not to be disposed of as unsorted municipal waste. Any products marked with this symbol must be collected separately, according to the regulatory guidelines in your area. -
Page 22: Service And Technical Support
The warranty shall not apply if the defect or malfunction was caused by accident, neglect, unreasonable use, improper service, acts of God, modification by any part other than PolyScience or other causes not arising out of defects in material or workmanship.
Need help?
Do you have a question about the WB05A11B and is the answer not in the manual?
Questions and answers