Table of Contents
Advertisement
A/C-D/C
Battery Backup
Sump Pump System
Instruction Manual & Safety Warnings
Table of Contents
Instructions
1
1
1
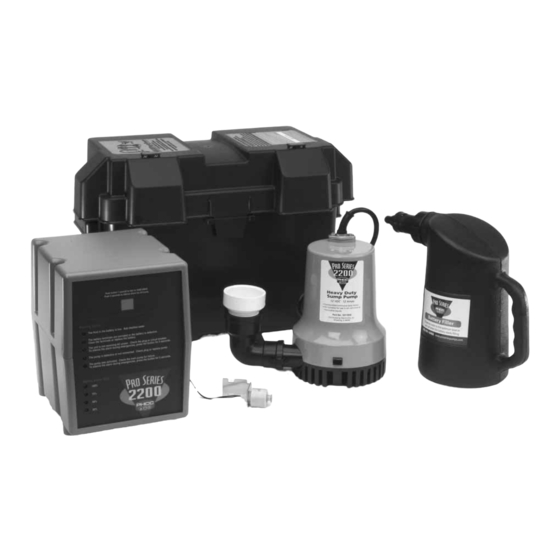
Items included in system
2
Additional items needed
2
2
2
Installation options
3
4
5
Direct discharge for narrow sumps 6
Connection to existing discharge
for narrow sumps
7
8
9
Connecting the pump
9
Installing the battery fluid sensor 9
Connecting the battery
9
Connecting to AC power
10
Understanding the Warning
Lights and Alarms
Silencing the alarm
10
Battery fluid is low
10
Battery problem
11
Cleaning battery terminals
11
Replacing the battery
12
Power failure
13
Pump failure
13
Pump was activated
13
13
Battery power level
13
Testing the System
14
Technical support
14
14
15
IMPORTANT: Even if you have the Pro Series backup sump pump
system installed by someone else, you must read and follow the
safety information contained in this manual. Failure to do so
could result in property damage, serious injury, or death.
Advertisement
Table of Contents

Related Manuals for PHCC Pro Series 2200


Summary of Contents for PHCC Pro Series 2200
-
Page 1: Table Of Contents
A/C-D/C Battery Backup Sump Pump System Instruction Manual & Safety Warnings Table of Contents Important Safety Warnings and Direct discharge for narrow sumps 6 Battery problem Instructions Connection to existing discharge Cleaning battery terminals Electrical precautions for narrow sumps Replacing the battery Battery preparation Power failure Battery Instructions... -
Page 2: Important Safety Warnings And
Important Safety absolutely necessary. If an extension cord • Battery posts and terminals contain lead and must be used, be sure the plug has the same lead compounds, chemicals known to the State Warnings & Instructions configuration as the plug on the control unit. of California to cause cancer and reproductive •... -
Page 3: Introduction
Introduction The Pro Series 2200 A/C-D/C backup sump pump Battery Box system is battery-operated. It is designed as an emergency backup system to support your regular AC sump pump, and it will automatically begin pumping if your main AC pump fails. -
Page 4: Pump & Pipe
NORMAL SUMP PIT Pump & Pipe INSTALLATIONS Installation Instructions FLOOR JOIST FLOOR JOIST There are two basic methods that can be used to SLOPE PIPE install the pump, a direct discharge to the DOWN outside of the building, or a connection to an existing discharge pipe. -
Page 5: Direct Discharge To Outside
Pump & Pipe be placed under the pump if there are rocks CAUTION CAUTION or other debris on the sump floor that may If you use more than a total of 20 feet of pipe Installation Instructions clog the pump. in the installation, install a check valve in place of the union. -
Page 6: Connection To Existing Discharge
Pump & Pipe valve on the discharge pipe for the main AC pump. Installation Instructions 4. Secure the pump wire so that the plug on the end will not fall into the sump. Attach the INSTALLATION B: wire to the pipe with a piece of tape. CONNECTION TO AN EXISTING DISCHARGE PIPE (Diagram B) 5. - Page 7 Pump & Pipe & nut, attach the strainer to the “L” bracket. possible to avoid the return of CAUTION (c) Once the strainer is attached, simply press discharged water to the sump. Be Installation Instructions If you use more than a total of 20 feet of pipe in the the pump body onto the mounted strainer.
- Page 8 Pump & Pipe pump from operating, and the basement will flood. Installation Instructions 5. If there is no check valve on the main AC pump, one must be installed at this time. INSTALLATION D: Then install a “Y” connector above the check CONNECTION TO EXISTING DISCHARGE PIPE valve on the discharge pipe for the main AC FOR NARROW SUMP PITS...
-
Page 9: Battery Instructions
1. Remove the battery box top by pushing in the tabs on the front and back of the box and lifting A new Pro Series 2200 Standby Battery will run this system for a minimum of 7.5 hours continuously. 2. Place the battery box on the floor. Place the dry However, most of the time the pump will turn on (unfilled) battery into the battery box. -
Page 10: Control Unit Connections
Control Unit Connections 3. Installing the battery fluid sensor: Remove the cover of the battery box by pushing in the DANGER tabs on the front and back, then Risk of electrical shock or battery explosion, lifting up. Fan the area around which can cause serious injury or death. - Page 11 5. Immediately plug the AC power cord into a To silence the alarm for 24 hours, hold down the BATTERY FLUID IS LOW 2. Fan the area around the top of the battery grounded AC wall outlet. (A surge protector GRAY button for 5 seconds.
- Page 12 the battery. (In most cases, the pump does not then lifting up. 7. Plug the power cord into the wall outlet. (You run continuously, and therefore, you actually can provide additional protection for the have a longer time to replace it.) You will not 3.
- Page 13 1. Unplug the power cord from the wall outlet. 4. Remove the fluid sensor from the battery cap, 7. Clean any corrosion off of the ring connectors and then remove the YELLOW battery cap. Save on the end of the battery cables. Use a wire 2.
-
Page 14: Replacing The Pump
Your Pro Series 2200 has a 20-amp DC safety Once the AC power is restored, the battery will fuse in the back of the cabinet to protect the recharge, unless it is old or damaged. -
Page 15: Testing The Float Switch
TESTING THE FLOAT SWITCH Troubleshooting Guide It is important to manually test the float DANGER Read safety warnings & instructions before attempting any repairs or maintenance. switch periodically. BATTERY FLUID LOW Lift the float up and let go. This will activate Possible Reasons Remedies the pump. -
Page 16: Warranty
NOT EXCLUDED HEREIN, SHALL BE LIMITED TO REPAIR OR REPLACEMENT OF THE PRODUCT. For information or service contact: Glentronics, Inc. 640 Heathrow Drive Lincolnshire, IL 60069 800-991-0466 Model # PHCC-2200 Serial # _____________________ Purchase Date__________________ © 2005, Glentronics, Inc. 1806022 Page 15...
Need help?
Do you have a question about the Pro Series 2200 and is the answer not in the manual?
Questions and answers