Table of Contents
Advertisement
Quick Links
333 Bayview Avenue, Amityville, New York 11701
For Sales and Repairs, (800) 645-9445
For Technical Service, (800) 645-9440 or visit us at
http://tech.napcosecurity.com/
(Note: Technical Service is for security professionals only)
Publicly traded on NASDAQ
Symbol: NSSC
Description
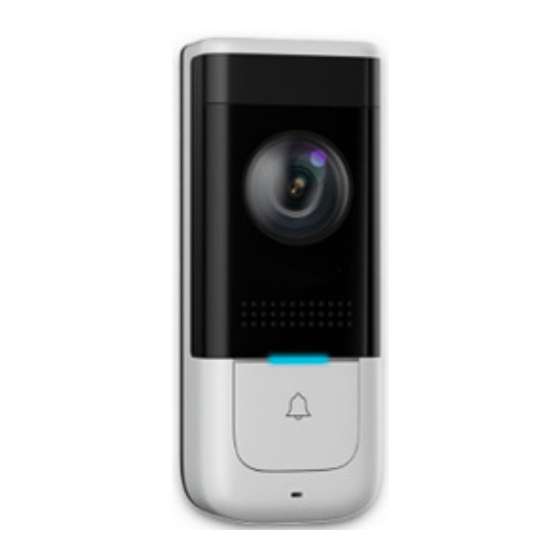
The NAPCO IBV-DBELL is an HD Infrared power-wired Wi-
Fi outdoor motion-activated Video Doorbell that allows the
viewing of live and recorded video clips through the iBridgeVi-
deo App (Android or iOS). Its integral PIR and two-way
audio connects to your smartphone, allowing for motion-
triggered video clip email notifications. To activate the door-
bell, you first need an active NAPCO ComNet Dealer account
at www.NapcoComNet.com.
Up to 1080P HD video talk with 140° horizontal angle
IR powered night vision
PIR detection with 3 configurable zones
Work with existing mechanical/electronic chime
Easy installation (Wi-Fi), wide voltage power supply
2-Way talk over the Internet, cloud storage
Included Components
IBV-DBELL Video Doorbell
Chime Kit Module
Mounting Hardware
Mounting Bracket
Mounting Tools
Quick Install Summary:
a. Activate doorbell at www.NapcoComNet.com.
b. Remove power to the doorbell at the breaker.
c. Wire the doorbell and install the Chime Kit module.
d. Power the doorbell (do not mount fully).
e. Install the iBridgeVideo app on your smart device.
f. Launch the iBridgeVideo app and log in.
g. Use the iBridgeVideo app to add and configure the door-
bell.
h. Fully mount the doorbell (finish step "d").
Doorbell and Chime Kit Installation
Installing the Door Bell
1. Remove power to the doorbell at the breaker.
2. Remove the existing wired external doorbell push but-
ton from its installation surface and disconnect its two
wires.
3. Place the oval hole in the Mounting Bracket over the
two doorbell wires. Ensure the Mounting Bracket's two
mounting holes are at the top. Using the level to en-
sure horizontal mounting, mark the location of the three
mounting holes.
4. On brick, stucco, or concrete, use a small drill bit to drill
holes in the mounting surface, and install the anchors
(anchors not needed if mounting on wood or siding).
Secure the Mounting Bracket to the mounting surface
NAPCO iBridgeVideo IBV-DBELL Installation Guide
NAPCO iBridgeVideo IBV-DBELL
Video Doorbell
Installation Guide
© NAPCO 2018
(see
Installation
Exploded
View on page 7).
5. Connect the existing doorbell
wiring to the IBV-DBELL ter-
minals, then feed the wires
back into the wall.
Wires
are
non-polarized,
therefore either wire can be
connected
to
either
DBELL terminal.
Installing the Chime Module
Installing the Chime Kit module (used only when connect-
ing IBV-DBELL to a wired doorbell chime) helps main-
tain the correct power to trigger your existing home wired
doorbell chime mechanism.
1. Ensure that the doorbell circuit is unpowered (remove
power at the breaker).
2. Locate the existing internal doorbell chime mechanism
and remove its cover.
3. On the side of the Chime Kit module is a socket; insert
the harness plug into this socket until it snaps in place.
4. Inside the existing internal doorbell chime mechanism
are two wires that are connected to two terminals (one
terminal is usually labeled "FRONT" and the other is
usually labeled "TRANS" or "COMM"). Without remov-
ing the existing wires, simply loosen each terminal and
connect one Chime Kit wire to one terminal, and the
other Chime Kit wire to the other terminal.
5. Restore power at the breaker. Ensure the LED at the
front of the IBV-DBELL lights. Note: It might take a
couple of minutes for the IBV-DBELL to fully power
up.
Follow the Doorbell Enrollment process (detailed in the
next section, below) to enroll your IBV-DBELL into
your iBridgeVideo account.
After the IBV-DBELL is fully enrolled, secure the IBV
-DBELL to its Mounting Bracket by sliding the top
of the unit into the protruding tab at the top of the
Mounting Bracket, and secure the bottom of the unit
with the screw provided.
WI2304LF 7/18
Note:
IBV-
Non-Polarized Terminals
Bottom Screw
1
Advertisement
Table of Contents

Related Manuals for NAPCO iBridgeVideo IBV-DBELL


Summary of Contents for NAPCO iBridgeVideo IBV-DBELL
- Page 1 Wires non-polarized, triggered video clip email notifications. To activate the door- therefore either wire can be bell, you first need an active NAPCO ComNet Dealer account connected either IBV- at www.NapcoComNet.com. DBELL terminal.
- Page 2 2. Open the iBridgeVideo app. Type a Username (use your full email address) and Password and tap Login. 5. Tap Next to connect the doorbell to the Wi-Fi network. 3. Tap "+" to add the doorbell. NAPCO iBridgeVideo IBV-DBELL Installation Guide...
- Page 3 Then return to the app (the screen shown under step as shown in the image below. 7) and tap Next. 8. Tap to select the name of the 2.4GHz Wi-Fi network to which you wish to connect your doorbell. NAPCO iBridgeVideo IBV-DBELL Installation Guide...
- Page 4 Add Again. Note: It may take up to a minute to establish a connection. 12. Test the system by pressing the "Call Push Button" (see diagram on page 7). Live video feed will appear. NAPCO iBridgeVideo IBV-DBELL Installation Guide...
- Page 5 Link Chime. 16. Tap to select the type of wired doorbell chime mecha- 14. Tap + New Link. nism, either Electronic Chime or Mechanical Chime, then tap OK. NAPCO iBridgeVideo IBV-DBELL Installation Guide...
- Page 6 You can disable a particular zone by tapping it; tap again to re-enable the zone. 4. When finished, tap the "save" (floppy disk icon) lo- cated at the top right to save your settings. NAPCO iBridgeVideo IBV-DBELL Installation Guide...
- Page 7 4. Loudspeaker 5. Indicator LED 6. Call Push Button 7. Microphone 8. "Protruding tab" for mounting 9. Micro SD Card Slot (not used) 10. QR Code 11. Reset Button 12. Screw Terminals for Power Input NAPCO iBridgeVideo IBV-DBELL Installation Guide...
- Page 8 NAPCO will, within said period, at its option, repair In no event shall NAPCO be liable for an amount in excess of or replace any product failing to operate correctly without charge NAPCO's original selling price of the product, for any loss or to the original purchaser or user.
Need help?
Do you have a question about the iBridgeVideo IBV-DBELL and is the answer not in the manual?
Questions and answers