V-ZUG De Luxe eco Operating Instructions Manual
Hide thumbs
Also See for De Luxe eco:
- Service instructions manual (61 pages) ,
- Service manual (55 pages)
Table of Contents
Advertisement
Advertisement
Table of Contents

Related Manuals for V-ZUG De Luxe eco


Summary of Contents for V-ZUG De Luxe eco
-
Page 1: Operating Instructions
Operating instructions De Luxe | De Luxe eco | Perfect | Perfect eco Refrigerator... - Page 2 Size system Perfect 51053/51054 SMS 55 Perfect eco 51055/51056 SMS 55 De Luxe eco 51060 SMS 55/Euro 60 De Luxe 51063/51064 SMS 55/Euro 60 Variations depending on the model are noted in the text. © V-ZUG Ltd, CH-6301 Zug, 2015...
-
Page 3: Table Of Contents
Contents 1 Safety precautions 5 Symbols used ..................... 5 General safety precautions .............. 6 Instructions for use .................. 7 2 Disposal 10 3 Using for the first time 11 4 Appliance description 12 Structure.................... 12 Operating and display elements ............ 13 5 Operation 14 6 Special functions 16... - Page 4 13 Warranty 31 14 Technical data 32 14.1 Note for testing institutes ............... 32 14.2 Temperature measurement .............. 32 14.3 Product fiche .................... 33 15 Index 35 16 Notes 37 17 Service & Support 39...
-
Page 5: Safety Precautions
Safety precautions Symbols used Denotes important safety precautions. Failure to observe said precautions can result in injury or in dam- age to the appliance or fittings! Information and precautions that should be observed. Information on disposal Information about the operating instructions ▸... -
Page 6: General Safety Precautions
1 Safety precautions General safety precautions ▪ Read the operating instructions before using the appliance for the first time! ▪ This appliance can be used by children aged 8 and above and by persons with reduced physical, sensory or mental cap- abilities, or lack of experience and/or knowledge, provided they are supervised or have been instructed on the safe use of the appliance and have understood the hazards involved. -
Page 7: Instructions For Use
1 Safety precautions Instructions for use Before using for the first time ▪ The appliance must be installed and connected to the electricity supply in accordance with the separate installation instructions. Have a qualified fitter/ electrician carry out the necessary work. ▪... - Page 8 1 Safety precautions ▪ The appliance corresponds to recognized technology standards and the rel- evant safety regulations. Proper use of the appliance is essential to avoid damage and accidents. Please therefore follow the precautions given in these operating instructions. Note on use ▪...
- Page 9 1 Safety precautions How to avoid damaging the appliance ▪ Only use water or a mild alkaline solution when cleaning the appliance. ▪ Do not use pointed or sharp-edged objects when removing layers of ice or frozen-on food. ▪ No mechanical or artificial means other than those recommended may be used to accelerate defrosting.
-
Page 10: Disposal
Disposal Packaging ▪ All packaging materials (cardboard, plastic film (PE) and polystyrene (EPS)) are marked and should, if possible, be collected for recycling and disposed of in an environmentally friendly way. Disconnection ▪ Disconnect the appliance from the mains. With a fixed appliance, this is to be carried out by a qualified electrician! Safety ▪... -
Page 11: Using For The First Time
Using for the first time Before operating the newly installed appliance for the first time, the following steps should be taken: ▸ Remove packaging and transport material, as well as protective film, if any, from the interior. ▸ Clean the interior and accessories with lukewarm water or a mild alkaline solution, and dry completely. -
Page 12: Appliance Description
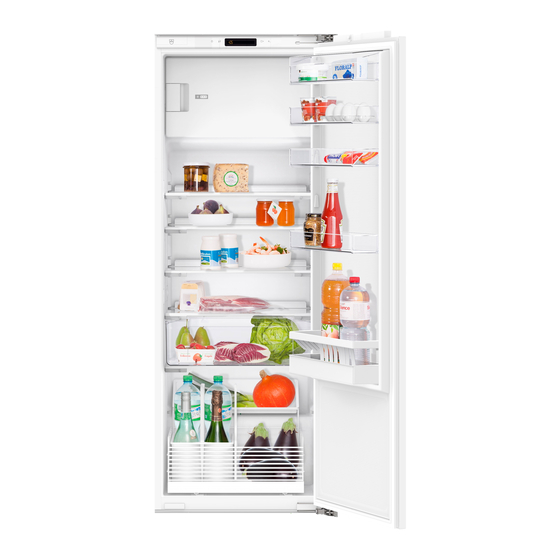
Appliance description Structure The appliance door can be set to open to the left or to the right. Our Customer Services can make the necessary adjustments to the appli- ance. Product family: 51060/51063/51064 51053-51056 Bottle drawer Freezer compartment Vegetable drawer Operating and display elements Temperature sensor... -
Page 13: Operating And Display Elements
4 Appliance description Operating and display elements Buttons ON/OFF button Temperature setting button Preselection button Special functions button Displays Rapid cooling Cooling compartment temperature display Display Appliance switched off... -
Page 14: Operation
Operation Switching the appliance on ▸ Plug in the appliance at the mains. – «off» is shown on the right-hand side of the display for 30 seconds. ▸ Depress the button for 3 seconds. – The appliance is switched on. An appliance that has been started up for the first time takes around 15 hours (with food inside) to reach its normal operating temperatures. - Page 15 5 Operation Button lock The button lock prevents the temperature from being adjusted unintentionally. To override the button lock: ▸ Depress the desired button for 3 seconds until the corresponding display/ symbol flashes. ▸ Press another button or make settings within 5 seconds. –...
-
Page 16: Special Functions
Special functions Switching the special function on Special function Symbol Remarks ▸ Depress the Rapid cooling next to the button for cooling compart- 3 seconds. ment temperature display ▸ Press the Sabbath mode on the cooling is illuminated for button again compartment tem- 30 seconds after perature display... -
Page 17: Rapid Cooling
6 Special functions Rapid cooling The rapid cooling function allows you to cool large quantities of food more quickly, e.g. after a shopping trip. The function lowers the target temperature of the cooling compartment to the coldest target temperature (2 °C) for 24 hours. -
Page 18: Glass Shelves And Door Trays
Glass shelves and door trays The height of the glass shelves in the cooling compartment and the door trays on the inside of the cooling compartment can be adjusted. Positioning door trays ▸ Push the door tray up and remove ▸... -
Page 19: Bottle Drawer
Bottle drawer Only available in the product families 51060, 51063 and 51064. The temperature in the bottle drawer is 4–5 °C higher than the temperature in the rest of the cooling compartment. The bottle drawer can be used to cool items such as drinks and delicate vegetables to 10 °C. Removing the bottle drawer ▸... -
Page 20: Tips And Tricks
Tips and tricks General information on using the appliance ▪ When closing the door make sure that it forms a seal all the way round. This is supported by the self-closing hinges (dependent on model), as the appli- ance doors shut themselves if the opening angle is between 20–30°. ▪... -
Page 21: Notes On Storing Food
9 Tips and tricks Notes on storing food ▪ Store oil and grease in closed containers. They must not come into contact with the plastic parts or the door seal. ▪ The coldest areas of the cooling compartment are the rear wall and the area above lowest shelf, regardless of the temperature setting. -
Page 22: Notes On Freezing
9 Tips and tricks Notes on freezing ▪ Check packaging for damage. Damp patches or swollen packaging may in- dicate that the contents have defrosted. ▪ Food to be frozen should not come into contact with goods that are already frozen or it may cause them to defrost. -
Page 23: Care And Maintenance
Care and maintenance 10.1 Cleaning For hygienic food storage, the interior should be kept as clean as possible. Do not use abrasive cleaning agents or cloths. This may damage the appliance. ▸ Every so often, use a mild alkaline solution to wipe the interior and dry com- pletely. -
Page 24: Defrosting
10 Care and maintenance 10.2 Defrosting Defrosting the cooling compartment The cooling compartment defrosts once a day automatically. During defrosting, the temperature in- side the cooling compartment in- creases so that all of the ice on the rear wall melts. The water created when the ice melts collects in the de- frost channel, flows through the drain hole and evaporates outside the appli-... - Page 25 10 Care and maintenance Defrosting the freezer compartment A thick layer of ice will prevent the cold from being transferred to the frozen food. Therefore, the freezer compartment should be defrosted if a lot of ice has formed. When defrosting, keep frozen food as cold and insulated as pos- sible, e.g.
-
Page 26: Changing The Led Lighting
10 Care and maintenance 10.3 Changing the LED lighting Only use original LED lighting from the manufacturer. ▸ Disconnect the electrical supply by pulling out the mains plug or switching off the fuse. ▸ Remove the LED lighting. ▸ Disconnect plug and socket connection 1 for the LED lighting. -
Page 27: Noises And Alarms
Noises and alarms 11.1 Operating noise The compressor and the cooling circuit make various noises while the appli- ance is running. Although the appliance is fitted with a quiet compressor and a noise-optimised cooling circuit, some noises cannot be completely avoided. The volume of these noises depends on the size of the appliance, how it is installed and the cooling requirement (e.g. -
Page 28: Warning And Alarm Signals
11 Noises and alarms Unusual noises caused by improper installation Unusual noises are often caused by improper installation. The appliance must be installed on a level and stable surface. The pipework on the back of the ap- pliance must never be routed across walls or other furniture. The pipes must not touch each other. -
Page 29: Trouble-Shooting
Trouble-shooting This section lists faults that can be solved simply by following the instructions given. If another fault is displayed or the fault cannot be remedied, please call Customer Services. Before calling Customer Services, ▸ please note down the serial number (FN; see identification plate in «Tech- nical data») and the malfunction message in full, e.g. - Page 30 12 Trouble-shooting ...the following appears in the temperature display Possible cause Solution ▪ The temperature in the ▸ Press any button. cooling compartment is – The current average temperature above 20 °C. appears in the temperature display..the following appears in the temperature display Cause Solution ▪...
- Page 31 Warranty The appliance is covered by warranty from the day it is delivered. Any faults that may occur during this time when the appliance is used according to the applicable regulations and which can be traced back to a material or manu- facturing fault will be rectified by customer services under this warranty.
-
Page 32: Technical Data
Technical data External dimensions ▸ See installation instructions Electrical connection ▸ See identification plate 1 14.1 Note for testing institutes In order to freeze the maximum quantity (see identification plate), compartment above the grille must be used. In this case the special function must be ac- tivated immediately before putting the food into the appliance. - Page 33 14 Technical data 14.3 Product fiche In accordance with EU Regulation No. 1060/2010 Brand – V-ZUG Ltd Model name – De Luxe De Luxe eco Category – (refrigerator/ (refrigerator/ freezer) freezer) Energy Efficiency Class – A+++ Annual Energy Consumption (AEC)
- Page 34 14 Technical data In accordance with EU Regulation No. 1060/2010 Brand – V-ZUG Ltd Model name – Perfect Perfect eco Category – (refrigerator/ (refrigerator/ freezer) freezer) Energy Efficiency Class – A+++ Annual Energy Consumption (AEC) kWh per year Storage volume, refrigerator com-...
- Page 35 Index Bottle drawer ..........19 Notes ............37 Button lock ..........15 ON/OFF ............. 13 Care and maintenance ......23 Operating and display elements... 13 Cleaning............. 23 Operating noise........27 Construction..........12 Operating the appliance ......14 Cooling compartment temperature dis- play ..............
- Page 36 Tips ............. 20 Type............... 2 Using for the first time......7, 11 Validity............2 Warning and alarm functions ....28 Warranty............. 31...
- Page 37 Notes...
- Page 39 Your repair order Call the free service number 0800 850 850 to contact your nearest V-ZUG service centre. You can arrange an onsite visit by us by phone if you wish. General queries, accessories and service agreement V-ZUG will be happy to help you with any general administrative or technical queries, to accept your orders for accessories and spare parts and to inform you about our progress- ive service agreements.
- Page 40 J51053013-R02 V-ZUG Ltd, Industriestrasse 66, CH-6301 Zug Tel. +41 58 767 67 67, Fax +41 58 767 61 61 info@vzug.com, www.vzug.com Service Centre: Tel. 0800 850 850...
Need help?
Do you have a question about the De Luxe eco and is the answer not in the manual?
Questions and answers