Table of Contents
Advertisement
INDIRECT FIRED HEATING CONTROLLER
CANADIAN
HEAD OFFICE
AND FACTORY
1401 HASTINGS CRES.
SE
CALGARY, ALBERTA
T2G 4C8
Ph: (403) 287-2590
Fax: 888-364-2727
SALES OFFICES ACROSS CANADA AND USA
Retain instructions with unit and maintain in a legible condition.
Please give model number and serial number when contacting
IOM‐17
USER OPERATION
MANUAL
FOR
DJM3
UNIT MODEL NO. _________________
UNIT SERIAL NO. _________________
SERVICED BY: ___________________
TEL. NO: ________________________
USA
HEAD OFFICE
AND FACTORY
32050 W. 83
DESOTO, KANSAS
66018
Ph: (913) 583-3181
Fax: (913) 583-1406
factory for information and/or parts.
.
WWW
ENGINEEREDAIR
EASTERN FACTORY
rd
STREET
1175 TWINNEY DRIVE
Ph: (905) 898-1114
Fax: (905) 898-7244
.
COM
CANADIAN
NEWMARKET,
ONTARIO
L3Y 5V7
M
99
AR
R3
Advertisement
Table of Contents

Subscribe to Our Youtube Channel
Related Manuals for EngA DJM3


Summary of Contents for EngA DJM3
- Page 1 USER OPERATION MANUAL DJM3 INDIRECT FIRED HEATING CONTROLLER UNIT MODEL NO. _________________ UNIT SERIAL NO. _________________ SERVICED BY: ___________________ TEL. NO: ________________________ CANADIAN CANADIAN HEAD OFFICE HEAD OFFICE EASTERN FACTORY AND FACTORY AND FACTORY 1401 HASTINGS CRES. 32050 W. 83...
- Page 2 DJM3 DJM3 The DJM3 has been certified by Intertek (ETL) for use with Engineered Air appliances only. It has been evaluated to CSA C22.2 No. 24 Temperature‐Indicating and Regulating Equipment and UL 873 UL Standard for Safety Temperature‐Indicating and Regulating Equipment. This is a User Operation Manual and therefore not subject to evaluation. If any errors or omissions are noted please contact the nearest Engineered Air Technical Service Department. To ensure warranty is honored, only qualified personnel should be employed for service and troubleshooting. If further information is required please contact the nearest Engineered Air office. There are two sets of electrical drawings and unit function sheets provided with the appliance. One set is in an envelope which also contains the Operation, Installation and Maintenance manual(s). This package is for copying, then should either be returned to the appliance or stored in a safe place. The other set is attached to the control panel door and should never be removed. Please report any omissions to the national service manager. Warning: Improper installation, adjustment, alteration, service or maintenance can cause property damage, injury or death. Read the installation, operating and maintenance instructions thoroughly before installing or servicing this equipment. Warning: This unit is connected to high voltages. Electrical shock or death could occur if instructions are not followed. This equipment contains moving parts that can start unexpectedly. Injury or death could occur if instructions are not followed. All work should be performed by a qualified technician. Always disconnect and lock out power before servicing. DO NOT bypass any interlock or safety switches under any circumstances. IOM-17 2 of 27...
- Page 3 DJM3 IOM-17 3 of 27 Mar 99 R3...
-
Page 4: Table Of Contents
DJM3 TABLE OF CONTENTS INTRODUCTION ................................ 5 CONTROLLER RATINGS .............................. 5 CONTROLLER DESCRIPTION .............................. 6 TERMINALS .................................... 6 SWITCHES .................................... 7 INDICATION DIAGNOSTIC LIGHTS ............................ 7 ADJUSTMENT POTS .................................. 8 MULTIMETER TEST POINTS ................................ 9 ... -
Page 5: Introduction
DJM3 INTRODUCTION The DJM3 is an independent controller for Engineered Air DJ style gas fired heating equipment designed to provide the majority of control requirements. The DJM3 modulates a variable speed combustion blower in conjunction with an modulating gas valve. The combustion blower speed and the gas valve flow rate are both modulated to maintain the required discharge air temperature. The information used in this manual should be used in conjunction with the unit function sheet(s) and the DJ(E,S) & DG or DJX series Installation, Operation, and Maintenance manuals. The DJM3 is designed to control only Engineered Air equipment. Various upgrades and improvements have been made over time. Always include any suffix letters and numbers for troubleshooting and/or replacement. Note: It is necessary that all of the remote wiring and controls be complete and operational before starting the appliance. CONTROLLER RATINGS Power requirements: 24 Vac, 40 VA. Contact Rating: 120V 5A inductive 0‐10 Vdc input impedance: 2 k Environment: ‐40 to 120°F (‐40 to 50°C) non‐condensing. Fuse Rating: 1.5 GDC slow‐blow IOM-17 5 of 27 Mar 99 R3... -
Page 6: Controller Description
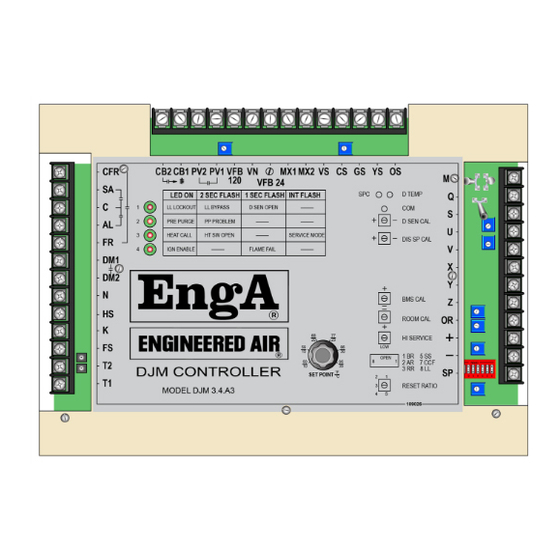
DJM3 CONTROLLER DESCRIPTION TERMINALS TABLE 1 Terminal Description T1 Board power supply. (HOT) 24 Vac isolated. T2 Board power supply. (NEUTRAL) 24 Vac isolated. FS Fan switch (or Day mode) enable input (24 Vac). K Night (unoccupied) mode enable input (24 Vac). HS Heat enable input (24 Vac). N Grounded 24 Vac neutral (reference to FS, K, HS). DM1, DM2 Damper motor output contacts (dry). FR, CFR Flame relay output contacts (dry). AL Alarm output. C Contact common input power (to AL and SA). SA Supply air fan enable output. CB1 Combustion blower motor input. CB2 Combustion blower motor speed control output. PV1, PV2 Pilot valve disable contact (dry). VFB120 Main gas valve feedback (SSOV) hot input for 120V valves. VFB24 Main gas valve feedback (SSOV) hot input for 24V valves. VN ... -
Page 7: Dip Switches
DJM3 DIP SWITCHES The DJM3 options are configured by DIP switch selection and/or wiring connections. TABLE 2 DIP SW Description 1 Enable Vdc or mA temperature reset if ON. 2 Enable ambient reset if ON. 3 Enable room/return temperature reset if ON. 4 Not used. 5 Service mode (must be left OFF for normal operation). 6 Not used. 7 Constant combustion air purge mode if ON. 8 Enable low limit discharge temperature sensing if ON Note: The DJM3 will only accept one type temperature reset signal. INDICATION AND DIAGNOSTIC LIGHTS There are 4 status lights on the DJM3 labeled 1 to 4. They operate in 4 patterns: constant on, 2 second flash (on for 1 second, off for 1 second), 1 second flash (on for ½ second, off for ½ second) and an irregular flash (flashes twice, then off, repeat). TABLE 3 LIGHT LED ON 2 SEC FLASH 1 SEC FLASH INT FLASH 1 LL LOCKOUT LL BYPASS D SEN OPEN ‐‐‐‐‐‐‐‐‐‐ ... -
Page 8: Adjustment Pots
DJM3 The discharge sensor is below calculated setpoint (SPC) and the DJM3 has 3 ON initiated the heating sequence. Normal operating status: ON for heating. There is a call for heating, however the heating has been disabled from no 3 2 SEC input into terminal HS (24Vac). Normal operating status: OFF. Unit is in service mode, allowing the technician to manually set the heating INT 3 from low to high fire with the service pot. FLASH Normal operating status: OFF. FR and CFR contacts have closed, enabling the ignition control to fire the 4 ON burner. Normal operating status: ON for heating. Burner ignition was unsuccessful. The DJM3 did not receive a main gas valve 4 1 SEC (SSOV) feedback signal into terminals VFB24 or VFB120. Normal operating status: OFF. ADJUSTMENT POTS There are a number of setting and calibration potentiometers (POT’s) located on the front of the DJM3. Modifications to these should only be done by experienced and qualified personnel. TABLE 4 POT Description D SEN CAL Discharge sensor calibration. DIS SP CAL Discharge setpoint calibration. BMS CAL ... -
Page 9: Multimeter Test Points
DJM3 MULTIMETER TEST POINTS The DJM3 has readout terminals for measuring the discharge sensor temperature and the calculated discharge setpoint. These 3 test points are located near the M and Q terminals. Measurements are made using a Vdc multimeter using a scale of 1Vdc = 10°C. For example, a reading of 2.1Vdc = 21°C (or 70°F). Refer to the table below for Celsius to Fahrenheit conversion. TABLE 5 Voltage Reading (Vdc) °C °F 1.0 10 50 1.5 15 59 2.0 20 68 2.5 25 77 3.0 30 86 3.5 35 95 4.0 40 104 SYSTEM TIMINGS The times listed are general, and may be affected by external time delay devices. TABLE 6 Pre‐purge ... -
Page 10: Discharge Temperature Sensor (Dtemp)
DJM3 The DJM3 is designed to use either of the following as a setpoint: The setpoint mounted on the face of the DJM3 (range of 50‐95°F (10‐35°C)). If the DJM3 face mounted set‐point is used, terminals “SP and S” must be jumpered; or The Johnson Controls TE 6100‐960 set‐point (range of 50‐85°F (10‐29°C)). If the TE 6100‐960 is used as a set‐point, “S to SP” is not jumpered and the TE 6100 must be wired: TABLE 7 TE 6100 Wires DJM3 Terminals Violet (not used) ‐ Red (not used) ‐ Grey Wired to terminal U Blue Wired to terminal M Orange Wired to terminal S DISCHARGE TEMPERATURE SENSOR (D TEMP) The DJM3 uses the discharge sensor for both temperature control and low limit. Because of this, the DJM3 will not operate with a faulty discharge sensor. If the discharge sensor resistance is greater than 4000‐ohms or less than 880‐ohms, the unit will lock out either on low limit or bad temperature sensor. MODULATING ROOM RESET (continuous blower operation only) DIP switch 3 must be "on". This option also requires a TE 6100 wired: TABLE 8 TE 6100 Wires DJM3 Terminals Red (not used) ‐ GREY Wired to terminal V VIOLET Wired to terminal X ORANGE ... -
Page 11: Multiple Room Sensors
DJM3 To determine the amount of reset available refer to Table 9. EXAMPLE: DJM3 setpoint 70°F; pot #5 set at 3; room thermostat set 75°F. If room thermostat sensor is at 75°F ‐ no reset, discharge at 70°F. If room sensor is 3°F cold (72°F), discharge is reset up full amount of its authority (+20) to 90°F. If room thermostat was at 73°F then of the reset would be used ( * 20 is approx. 14°F), added on to the set‐point of 70°F giving discharge of 84°F. If room sensor is 3°F hot (78°F) full reset down will lower the discharge 13° (57°F discharge). Multiple Room Sensors Four sensors can be wired to give an average reading of room temperatures to the DJM3 control. They must be wired in a series/parallel arrangement. Refer to main or field electrical diagram for appropriate wiring. ROOM RESET AUTHORITY TABLE TABLE 9 Reset Reset Reset Discharge Maximum Minimum Band Maximum Minimum Band Ratio Set‐Point Temp. °C Temp. °C Width Temp. °F Temp. °F Width Pot °C °F 1 ... -
Page 12: Bms Reset
DJM3 BMS RESET (continuous blower operation only) DIP switch one must be on to activate BMS reset. This option requires an analog voltage or current signal to be wired to the optically isolated + and ‐ terminals. The analog input signal proportionally increases the calculated discharge air set‐point. The calculated discharge set‐point equals the dial discharge set‐point plus the input signal multiplied by a reset ratio factor. The maximum amount of reset is adjustable from 15°F (8°C) to 60°F (33°C). The maximum discharge temperature (dial set‐point plus reset) is limited to 120°F (49°C). The BMS reset option is activated by DIP switch 1. Note: As standard, the DJM3 is designed to operate with 4‐20 mA or 2‐10 Vdc into a 500‐ohm input impedance. Some BMS devices may not have enough power (Volt‐Amps) to provide a full 10 VDC when connected to a 500‐ohm load. The input resistance for this operation can be increased to 1500 ohms by cutting resistor R43. To cut this resistor you must turn the board over. It is located on the back of the larger board, just below the DIP switch block and beside Pot Reset Ratio. This is a 1‐watt, 680‐ohm resistor colours blue, grey, brown, gold. BMS reset is not truly linear. Reset will usually begin at about 4 volts. Following, is an example of reset from one application that gives a 13°C or 24°F reset. CALCULATED SETPOINT FROM BMS RESET APPLIED TO + AND – TABLE 10 Current Voltage Calculated Setpoint Reset Reset °F mA Vdc °C ‐ 0 13 55 3 ... -
Page 13: Make/Break Reset And Override
DJM3 It is possible to obtain an extended temperature range by placing a 120‐ohm resistor in series with the ambient temperature sensor. Note: With this resistor the discharge temperature will be at its maximum when ambient is at ‐15°F. With this resistor, the calculated discharge air set‐point equals the dial set‐point at 35°F (different from above). Above 40°F the calculated discharge air temperature will be below the dial set‐point. TABLE 11 Reset Ratio Pot Reset Amount °F Reset Amount °F Setting (no resistor) (with a 120 ohm resistor in series) 1 10 18 2 11 20 3 13 24 4 16 30 5 21 37 MAKE/BREAK RESET and OVERRIDE “OR” and “V” Override (Day Operation only) To activate this feature DIP switch 3 must be off. If a thermostat or contact is closed across terminals “OR” and “V”, the discharge temperature is set at 120°F (49°C). When thermostat or contact is open, the discharge temperature is set at the dial setpoint plus any other resets being used. “X” and “Z” Override (Day and Night Operation) To activate this feature DIP switch 3 must be on. During day operation, if a thermostat or contact is ... -
Page 14: Operation
DJM3 OPERATION DAY / NIGHT OPERATION The DJM3 supports a variety of fan, damper, and temperature control operating schemes. The exact operation depends on the status of terminals “FS, HS”, and “K”. Night operation is not suitable for 100% make‐up air applications, due to the equipment having to open outside air dampers and heat outside air. To operate in Night mode, a room thermostat or make/break reset must be used. TABLE 12 Terminal Status Blower Damper Control Control Source Operation Operation Mode HS FS K XXX Off Off Off Off N/A Off XXX On Off Constant Powered Discharge/Room/BMS Day N/A Off XXX On Off Off ... -
Page 15: Low Limit
DJM3 LOW LIMIT The low limit set point is fixed at 40°F. There are two low limit bypass timers, start‐up and anti‐noise. The start‐up auto bypass low limit timer is started every time terminal “K”, “SA” or “FS” energized status changes (on/off). The start‐up timer will bypass the low limit for 5 minutes. After the 5 minute start up bypass, a 30‐second anti‐noise low limit bypass timer is started every time a low limit condition is detected. This timer is designed to prevent nuisance trips caused by any electrical noise picked up by the discharge sensor. If the low limit condition exists for more than 30 seconds, a low limit lockout will occur. This will activate the alarm contact on the DJM3, terminal “AL”. Resetting Low Limit To reset the low limit, cycle power to the DJM3 control terminals "T1" and/or "T2"; or interrupt power to terminals "FS, HS, and K" all at the same time. SERVICE SERVICE MODE Placing the DJM3 into service mode allows for direct control of the burner firing rate. DIP switch 5 will activate service mode and enable the heat immediately. The service POT, located to the right of the setpoint dial, will manually set the burner to any firing rate. When in service mode, the supply air fan may need to be activated manually. Note: DO NOT leave DJM3 in service mode, burner will not cycle off. Service mode should only be used for combustion set‐up and operational checks. BURNER SET UP Service Pot This pot is designed to allow a service technician to manually set the burner to any firing rate he chooses. If the service switch (dipswitch 5) is on and the blower switch (terminal FS) is powered, the burner firing rate is controlled by the Service Pot. The Service Pot is located close to the “+" terminal and above the dipswitches. Rotating this pot will allow the firing rate to be set at any rate between low and high fire. Low Fire Pot The low fire pot is located below the PV1 terminal. The low fire pot is used to adjust the combustion air at low fire. The low fire speed is adjustable from 1150 to 1400 RPM (high turndown) or 1800 to 2000 (standard burner). The low fire pot is to be adjusted by a qualified service technician only Curve Matching Pot The curve matching pot is located below the CS terminal. The DJM3 can be used with several different ... - Page 16 DJM3 Burner Selection The DJM3 is designed to operate with both the standard (round burner plate) and high turndown (rectangular) burners. The selection is made by cutting a jumper wire R100 which is located on the small board. (The DJM3 must be turned over to access the jumper wire.) NOTE: Jumper wire R100 is cut only for the high turndown burner operation. Caution – do not cut resistor R100 on the large board. NOTE: Do not adjust any other pots located on the small board, which are not accessible from the front of the DJM3 Combustion Set Up When measuring combustion gases, ensure probe of analyser inserts fully into the flue connection to the heat exchanger. Measuring at the flue outlet may be a diluted reading due to air mixing into the flue. NOTE: f combustion is not set correctly it can result improper burning which may produce products of combustion that smell, carbon and or an excessive amount of water in the flue. Care should be taken to set burners up properly. Note that temperature of the air and fuel may have a great affect on the set up selected. If both the combustion air and the fuel are at a constant temperature throughout the heating season, once combustion is set it should remain similar through the season. High Turndown (Rectangular) Burner Most high turndown DJ units will employ on of the following Maxitrol modulating DC volt gas valves. Series 20 420, M520, M620. These valves do not have high fire regulators. High fire pressure is set up at the appliance regulator. Series 50 550, M650, ES350. These valves do not have high fire regulators. High fire pressure is set up at the appliance regulator ES345D‐L This valve has a built in high fire regulator. Typically used on DJ140 models. ...
- Page 17 DJM3 High Fire Set Up 1. Turn on the service switch (dipswitch 5). 2. Set the Service Pot to high fire. Adjust the high fire input to the correct clocked rate. Adjust combustion air slider or inlet damper until the high fire O reading is between 3.5 and 4.2%. Low Fire Set Up Ensure that there is aluminium tubing connected from the top of the modulating gas valve vent connection to the burner box. This is to guarantee that the varying burner box air pressure allows the proper gas flow rate through the modulating gas valve. Also ensure that the small vent hole under the oval shaped cover is sealed off with silicone or Tremco tape. When doing combustion analysis it is important that the top of the valve be sealed by either reinstalling the cap after each adjustment, or placing your finger fully over the top to seal the open top on the valve. The reason for this requirement is that the valve is “top loaded” which means that the valve is having pressure from the combustion fan added to the top of the valve’s diaphragm thus increasing the gas flow through the valve, especially at higher flow. Series 20/M420, M520 and M620 (High Turndown Burner) These valves have 2 low fire adjustments the following procedure should be followed carefully. Once the high fire pressure and combustion has been set up, turn the Service Pot fully counter‐ clockwise to achieve low fire. Adjust the Low Fire Pot until the low fire speed on the combustion fan motor is 1250 RPM ±10 RPM (20.8 Hz) for 10:1 set up or 1195 RPM ±5 (19.91 Hz) for 15:1 turndown. At this point the DC voltage reading at the modulating gas valve terminals should be 0 VDC. Under the cover on the Maxitrol series 20 valve is an adjustment screw (brass or silver) that has a lock ring which uses a special tool (two very small holes) to loosen it. 1. The lock ring needs to be loosened first. Turn it fully CCW (up) now turn the slot screw in the centre of the lock ring (spring activated low fire adjustment) full CCW (up). Caution: Do not over torque this screw at the top or bottom of its adjustment or it will break the “c‐clip” inside the valve, thus allowing the spring to ride free. 2. Adjust the low fire bypass screw at the bottom side of the valve body until the O reading is between 16.0% to 16.5%. (16.5 to 17.5% oxygen for 15:1 turndown.) At these settings the turndown will be very close to 10:1. The maximum CO at low fire is 80 PPM. 3. Adjust the Service Pot up very slowly until the DC volts at the modulating gas valve ...
- Page 18 DJM3 5. Curve Matching Procedure Turn Service Pot to high fire (approximately 3450 RPM or 57.5 Hz) for 1 minute. Adjust the Service Pot down very slowly until the combustion motor speed is about 3060 RPM (51 Hz). If the pot is adjusted below 51Hz return to high fire and attempt to lower without passing 51Hz. Let the burner stabilize for 2 minutes, then re‐check O reading. If O has dropped to less than the original high fire O reading, adjust the Curve Matching pot. Adjusting CCW increases the O reading by reducing the voltage to the Maxitrol modulating gas valve. The Curve Matching pot only changes the voltage to the gas valve; it does not affect fan speed. If the curve matching pot is adjusted to the fully CCW position and the O reading is still not within 10% of the original high fire O reading, add a 180‐ohm 2 watt resistor across the ...
- Page 19 DJM3 2. Bring voltage to gas valve at 2.25 VDC and adjust the spring activated low fire adjustment located in the head with the electric modulator (smaller screw under cap) to achieve the same O reading as the one achieved at 0 VDC (16.8% to 17.5% O ). After this is complete then adjust the Curve Matching pot as described in point 5 above. Pilot Set Up (High Turndown Burner) 1. On high turndown units, ensure air tube to pilot is free of debris and blockages and then set pilot pressure to 3.5" WC. 2. Pilot set up is not as critical on the high turndown burner as there is not as much heat on it as on the regular burner. Standard (Round) Burner Most standard turndown DJ units will employ one of the following Maxitrol modulating DC volt gas valves. Series 20 M520, M620 These valves do not have high fire regulators. High fire pressure is set up at the appliance regulator. If used on the standard burner, the low fire adjustment located on the bottom side of the valve is to be adjusted fully clockwise ...
- Page 20 DJM3 Pilot Set Up (Standard Burners) Do not set up pilot until you are confident the burner is operating with correct air/fuel mixture. Ensure the pilot tube is free of debris and blockages. On standard round burners, set pilot as per the following procedure. 1. Install a 10,000‐ohm resistor in series with the flame Ignition rod circuit. MV meter Control 2. Connect a DC voltmeter across the resistor. 3. The reading will be in millivolts if your meter does not auto scale. 4. Connect a manometer to the pilot line. 5. Run the burner on main flame for a few minutes to have the burner plate warm. 10,000 ohms 6. Leave the pilot on but turn the main gas off. You will have to jumper the DJM3 terminals PV1 and PV2 to do this and remove the wire from terminal VFB 120 or VFB 24 (depending on valve voltage). 7. As low pilot gas pressure can damage the ceramics, reduce the pilot gas pressure to 2.5 inches and immediately return it to a higher pressure. This is to ensure the pilot gas regular responds properly. 8. Adjust the pilot valve regulator to a pressure in excess of 4.5 inches pressure. 9. Slowly reduce the pilot gas pressure while watching both the pressure and the voltmeter. The millivolt reading should be increasing. At the point where it begins to fall you should stop reducing pressure and return to the high spot. : The fall in pressure could only be as small as a couple of millivolts. This point should be NOTE between 4.5 and 2.5 inches pilot pressure. ...
- Page 21 DJM3 Propane Gas Combustion set up for propane fuels for either the high turndown or the standard burner are similar to the above. The only modification suggested is it may be desirable to increase the oxygen settings by 1% to 1.5% above those for natural gas. Due to the quantity of fuel that can be drawn off a propane tank, it is often necessary to equip a propane fuel system with a vaporizer. The usual sign that a vaporizer is required is that the equipment fuel supply falls off as the line “freezes”. The following could be observed: Lack of temperature rise, Rumbling or shaking burner due to air/fuel mix, After turning the unit off for a period of time the fuel line thaws and restarting it, all appears to be normal. High turndown burners operating on propane fuel will generally exhibit the following: High Fire At 3.5% O ...
-
Page 22: Temperature Control
DJM3 TEMPERATURE CONTROL Modulation of the firing rate is gradually made until the discharge air temperature is within 1.5°F of the “calculated” set‐point. When the heat load is light and the burner is cycling between low fire and off there will be small temperature swings. AIR BALANCING Installation and air balancing is often done during warmer weather than that experienced in the cold of winter. If the air balancer did not allow for the changes that will occur in air volume in cold weather then the unit will appear to be short of temperature rise. As the fan is a constant volume device and as it is located before the heat exchanger, air will expand as it is heated. The amount of change will be about 20% increase in air volume from ‐30°F to +70°F. PRE‐PURGE PROBLEM If a Pre‐Purge problem is found, typically the DJM3 is receiving a signal from the tachometer sensor (Hall Effect sensor) that is not consistent with the combustion blower status. If there is a call for heat and the combustion blower is not running the DJM3 has likely detected a false or grounded tachometer signal. Remove all three wires to terminals O, YS, and G. If the combustion blower fails to start, check the combustion motor and or motor wiring. Magnet Magnet Retainer Ring Blower Shaft Hall Effect Sensor 1/8” Gap If the combustion blower is running and the tachometer signal is absent, weak, or grounded. With a digital AC voltmeter, measure the AC volts present on terminals “YS to G”. When the combustion blower is running there should be 4 to 6 Vac present. If the AC voltage is not present, check the tachometer sensor to magnet gap. It should be 1/16 to 1/8 inch. If the gap is satisfactory, attempt to repair by flipping the magnet over, then flipping the tachometer sensor over, before replacing the tachometer sensor to correct the problem. Note: No part of the speed sensor’s sensing element should be located over the end of blower motor shaft. IOM-17 22 of 27... -
Page 23: Induced Voltage On Remote Control Wiring
DJM3 INDUCED VOLTAGE ON REMOTE CONTROL WIRING The DJM3 control is calibrated at the factory and this calibration will satisfy most applications. Occasionally impedance from long wiring runs or induced voltage on the remote wiring cause it to be out of calibration. To recalibrate refer to the following section. To check for induced voltages, disconnect all of the field wiring in question from the DJM3.2 while the unit is left operating, and check for AC volts across each questionable wire and ground. CALIBRATION Discharge Sensor 1. Accurately measure the discharge air temperature at the temperature sensor in °C. 2. Read the DJM3 discharge temperature by reading the voltage at multimeter test point DTEMP. Using a DC voltmeter 3. If a difference is found adjust the D SEN CAL Pot to match to the two values Discharge Setpoint Calibration 1. Record the settings of DIP switches 1, 2, and 3. Turn off DIP switches 1, 2, and 3. If the “OR” terminal is used, the wire to terminal “OR” must be removed. 2. Depending on which setpoint control method is used: a) Johnson Controls TE 6100 i) Set Johnson Controls TE 6100 setpoint to 21°C ii) Read the DJM3 Discharge setpoint at multimeter test point SPC using a DC voltmeter. iii) Adjust the DIS SP CAL POT to match the reading. b) DJM3 Built in Dial i) Turn setpoint dial to 21°C. ii) Read the DJM3 Discharge setpoint at multimeter test point SPC using a DC voltmeter. iii) Loosen the set‐screw on the setpoint knob and move the knob marker to match with the ... -
Page 24: Bms Signal Calibration
DJM3 BMS Signal Calibration 1. Apply 100% mA or Vdc signal to the DJM3 “+” and “‐” terminals (i.e. 10 Vdc or 20 mA). 2. Record the settings of DIP switches 1, 2, and 3. Turn off DIP switches 1, 2, and 3. 3. Measure the DJM3 calculated setpoint at multimeter test point SPC using a DC voltmeter. 4. Turn DIP switch 1 on. 5. Measure the DJM3 calculated set‐point DC voltage again and adjust the BMS CAL Pot until the voltage is equal to the number of °C maximum reset. 6. Return the DIP switches to their normal position. SENSOR TABLE Sensor Resistance Chart for TE 6100‐960 and TE6000EA3. Table 13 ˚C ˚F Resistance Ω ˚C ˚F Resistance Ω ˚C ˚F Resistance Ω ‐40 ‐40 597 4.4 40 877 48.9 120 1229 ‐34.4 ‐30 629 ... -
Page 25: Fan Operation Flowchart
DJM3 FAN OPERATION FLOWCHART Main Supply power ‘ON’ Service Switch ‘ON’ Fire alarm contact ‘CLOSED’ 24Vac on terminals T1, T2 24Vac on terminals FS,HS Equipment in 24 Vac on Heat call Fan Starts Night mode, terminal light ’ON’? after 30s? fan operation ‘K’? is intermittent. Fan Starts 24 Vac on Restore power Normal after 30s? terminal to terminal Operation ‘FS’? ‘FS’. If burner fires for Fan Starts 30s but fan does ... -
Page 26: Heat Operation Flowchart
DJM3 HEAT OPERATION FLOWCHART Main Supply power ‘ON’ Service Switch ‘ON’ Heat call Any lights Fire alarm contact ‘CLOSED’ light ’2 SEC Flashing? 24Vac on T1,T2 FLASH’? 24Vac on FS,HS Restore 24Vac Indicates Heat call No heat call to ‘HS’ possible light ’ON’? lockout Faulty combustion fan PP light Combustion No output from terminal ’ON’? fan started? ’CB’ Pre‐Purge 10 Vdc on ... -
Page 27: Upgrading Djm3.2 Or 3.3 To Djm3.4
DJM3 UPGRADING DJM3.2 OR 3.3 to DJM3.4 IOM-17 27 of 27 Mar 99 R3...
Need help?
Do you have a question about the DJM3 and is the answer not in the manual?
Questions and answers