
Related Manuals for Siemens Hicom 300E


Summary of Contents for Siemens Hicom 300E
- Page 1 Hicom cordless E Convenience mobile unit 2000C for Hicom 300E Operating instructions...
-
Page 3: Table Of Contents
Safety notes Notes on mobile unit use ... 6 Notes on battery use ... 6 Meaning of symbols: ... 6 General Operating elements, unit parts ... 7 Explanation of display, display keys ... 8 Hicom cordless E ... 9 Features ... 9 Environmental conditions ... - Page 4 Second Call Waiting ... 20 Timed Reminder ... 21 Number redial - last 5 numbers ... 22 System Abbreviated Dialling ... 22 Night service ... 23 Switching functions Automatic callback ... 24 Transfer ... 24 Consultation during a call ... 25 Toggle - switching between 2 users ...
- Page 5 Contents Tones - keys, battery, range..43 Overview - Tones ... 44 Appendix Fault clearance ... 45 Add-ons ... 46...
-
Page 6: Safety Notes
Warning! Please read safety note in the instructions. Use rechargeable batteries only and observe polarity. Avoid contact with water and fire. Do not use non-Siemens charging devices. This could damage the batteries. Suitable add-on charging shells are available from Siemens. -
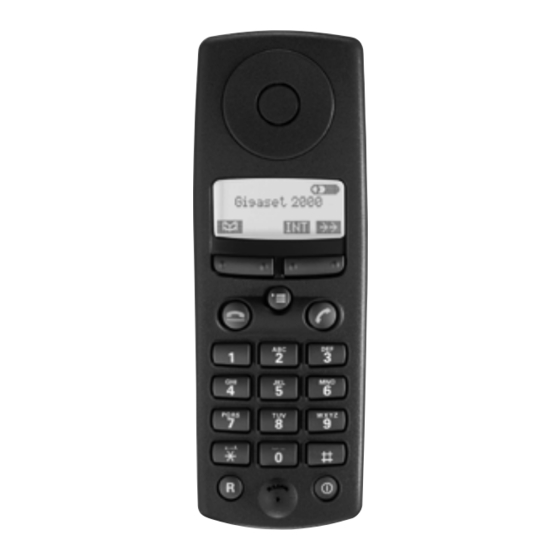
Page 7: General
Front Receiver inset Display (illuminated) Display keys Menu key End call key Talk key Alphanumeric keypad Figure 1: Operating elements, unit parts General Rear Recall key Microphone 10 On/Off/Protect key 11 Ringer loudspeaker 12 Battery compartment/lid 13 Attachment clip... -
Page 8: Explanation Of Display, Display Keys
The mobile unit features a 4-line display with 16 characters per line. Depend- ing on the situation, the display shows: digits, e.g. dialled numbers text, e.g. the current station (system) or call options symbols, e.g. ringing or battery symbol and in the last line the current functions of the two display keys Note: The display texts are displayed in German (default setting), English, French, Italian, Spanish or Dutch. -
Page 9: Hicom Cordless E
The Hicom® cordless E DECT* telephone system comprises the radio switching module for the Hicom 300E system base stations (transmitter/receiver) 2000C or 2000S mobile units (cordless telephones) and the Gigaset 2000L charging shell (optional) Each mobile unit can log on to and be used by up to 4 DECT systems, e.g. -
Page 10: Environmental Conditions
Please read the safety notes on page 6. Make sure that the mobile unit is at least one meter away from medical equipment, fire alarm equipment and other radio equipment (e.g. radio telephones or radio pagers), otherwise its performance may be im- paired, e.g. -
Page 11: Radio Range
The device offers a high level of privacy. No protection can be guaran- teed against illegal bugging using other radio receivers. Depending on the environment, the range in the open is up to 300 m. In buildings the range extends to up to 50 m (depending on the room and building layout and construction). -
Page 12: Cleaning Your Mobile Unit
To clean the mobile unit and the charging shell, simply wipe them with a damp or antistatic cloth. Never use a dry cloth (since this can generate electrostatic charges and discharges) or abrasive cleaning agents. If you lend your mobile unit to someone else, please make sure you include the operating instructions with it. -
Page 13: Putting Into Service
Putting into service Read the safety notes on page 6 first! Hold the mobile unit with the dialling keypad facing downwards. A battery compartment for 2 batteries is located in the lower part of the mobile unit. To open the battery compartment, slide the lid upwards in the direction of the arrow (see Figure 2). -
Page 14: Charging The Batteries
Putting into service Batteries supplied are not charged. Note: New batteries should be initially charged for a minimum period of 16 hours without interruption – irrespective of any messages on the display. In order to maintain max. battery storage capacity for as long as possible, the mobile unit should only ever be inserted in the charging shell when the batteries are empty. -
Page 15: Logging Mobile Units Onto A Telephone System
System Administrator. Note: In the case of Hicom cordless E, the mobile units are not logged on to stations (base stations), but rather to the Hicom 300E telephone system. In this case, Activating the mobile unit: Deactivating the mobile unit: This allows you to protect your mobile unit against inadvertent key activation, e.g. -
Page 16: Telephone Functions
Telephone functions Call Ending a call: Note: You can cancel the dialling operation by pressing The dialled number is automatically stored for number redial, see page If the called party is busy or does not answer, you can store an auto- matic callback request by pressing e.g. -
Page 17: External Dialling
Telephone functions External code e.g. Call Ending a call: Note: You can cancel the dialling operation by pressing Digit size is reduced in the case of longer numbers. Internal calls only can be conducted if The dialled number automatically stored for number redial. Enter the "External code", e.g. -
Page 18: Answering Calls
Telephone functions The mobile unit’s ringing tone is audible. Depending on the user (internal/ external), the number and the name of the caller is displayed. The mobile unit is in the charging shell: The mobile unit is not in the charging shell: Call Ending a call: Simply remove the mobile unit from the charging shell. -
Page 19: Call Pickup
Telephone functions The Call Pickup feature allows you to answer any ringing extension in your pickup group from your telephone. Activate Call Pickup An extension within your pickup group is ringing a ping ring will alert you to an incoming call Display shows Dial Press the “Green”... -
Page 20: Second Call Waiting
Telephone functions This feature allows a second call to camp on your extension when you are busy on a call. The caller will receive ringing tone instead of busy tone. Activate Second Call Waiting > S W ITCHE S S E CO ND CA LL A CTIV A TE Deactivate Second Call Waiting >... -
Page 21: Timed Reminder
Telephone functions Timed reminders or alarms can be programmed to remind you of meetings or appointments. Set Timed Reminder (e.g. 3:30 PM) > RE M INDE R RE M INDE R S AVE Display Timed Reminder > RE M INDE R NE XT Cancel Timed Reminder >... -
Page 22: Number Redial - Last 5 Numbers
Use the System Abbreviated Dialling The system will dial the required external number, the time taken will vary according to the type of main exchange to which your Hicom 300E is connected. Press the display key – the 5 stored numbers are displayed. -
Page 23: Night Service
Telephone functions Check with System Administrator if any other type of Night Service is operational. Dial Press the talk key. You are now connected to the caller... -
Page 24: Switching Functions
Switching functions If a dialled internal user is busy or if your call is not answered, you can program an automatic callback request: CA LLB A C K Note: The system calls you back - when the user becomes free or - when the user makes another call or - executes the callback request stored in the mailbox. -
Page 25: Consultation During A Call
Switching functions You are conducting an internal or external call and would like to obtain some information from an internal or external user: CO NS ULT Ending consultation: RE TURN Note: Consultation can be cancelled while dialling or if the user is busy by scrolling to and pressing TO W A IT. -
Page 26: Conference
Switching functions This function allows you to set up a conference with up to 8 users. You are conducting a call and wish to set up a telephone conference with another user: Setting up a 3 Way conference CO NS ULT >... - Page 27 Switching functions Consultation during conference Consult with an extension or external party when you are busy with a conference. CO NS ULT G O TO CO N F . Release conference party RE LE A S E P A RTY Transfer conference You have set up a conference and wish to transfer the conference to another user:...
-
Page 28: Call Forwarding
Switching functions You can forward all calls that arrive during your absence to another Hicom 300E telephone. Hicom cordless E offers fixed call forwarding – destination is stored permanently, e.g. to your mailbox (voice mail) variable call forwarding – variable destination. Storing/modifying destination for fixed call forwarding: DE S TINA TIO NS >... - Page 29 Switching functions Call forwarding to a variable destination: DE S TINA TIO NS V A RY FO RW A RD S AVE Deactivating variable call forwarding: > S W ITCHE S > F O R W A RD DE A CTIV A TE Note: Once variable call forwarding is deactivated (cancelled), your fixed call forwarding destination will be restored.
-
Page 30: Service Menu
Switching functions A connection to Hicom is set up when the invoke or execute the functions via the Hicom service menu by scrolling with and pressing the required display key. > DE S TINA TIO NS S W ITCHE S S P E E D DIA L NO V O ICE INFO P IN/CO S... -
Page 31: Telephone Book
Telephone book Your mobile unit features a telephone book for storing up to 100 entries. The stored numbers can be simply dialled and modified or deleted at any time. Access to the telephone book is locked if the mobile unit is locked. Note: Numbers from the number redial memory can also be transferred to the telephone book, see page 33. -
Page 32: Entering Letters/Characters And Digits
Telephone book Entering letters/characters Three or four letters/characters are assigned to each digit key. Blanks, full stops and hyphens are assigned to the "0" key. The muted vowels Ä, Ö and Ü can be entered with the key "1" (language setting: German). Input procedure: To enter a letter, press the appropriate key a number of times in quick succession. -
Page 33: Dialling A Number From The Telephone Book
Telephone book E R AS E e.g. You can store the 5 numbers saved in the redial memory in the mobile unit’s telephone book under a given name. DIA L NUM B E R NA M E S A V E E NTRY Press the display key –... -
Page 34: Deleting / Editing An Entry
Telephone book You can delete the saved entries (numbers and/or names). Deleting an entry DIA L NUM B E R Delete entry Editing an entry e.g. M ILLE R M ILLE R S A V E E NTRY Press the directory key. Scroll to the required name or enter the initial letters. -
Page 35: Deleting The Telephone Book
Telephone book You can also delete the entire telephone book in one go, e.g. if you are lending the mobile unit to another user. This function is also protected by the mobile unit PIN. DIA L NUM B E R DE LE TE DIRE CTO RY E NTE R P IN YE S... -
Page 36: Pin Features
This feature allows you to lock your extension by dialling your PIN, which prevents unauthorised use of your extension. The PIN assigned to your extension will be provided by your System Administrator. Lock your Extension Your extension will now be restricted to local or internal calls only. Special dial tone will be heard to remind you that the feature is activated. -
Page 37: Mobile Class Of Service
This feature allows you to activate your own Class of Service (barring level) on any extension. Activate Mobile Class of Service Call will now register against your name on the Telephone Management System Cancel Mobile Class of Service Note: Should you forget to cancel your PIN at the remote extension, contact the extension and ask them to dial automatically cancelled if the extension is not used for a predetermined time. -
Page 38: Saving/Modifying The Mobile Unit Pin
The mobile unit PIN protects your mobile unit against misuse. The mobile unit PIN is required for the following functions: – saving/modifying the mobile unit PIN – deleting the telephone book Important: If you forget your mobile unit PIN, you will need a service technician to access the device. -
Page 39: Settings
l l a – – c t i – t s i a t I a i l c i t g i l c i t l l a n i l c i t l l e t i n s i l Settings c t i... -
Page 40: Overview - Settings
e.g. E ins tellungen LOK A LE E INS TE LLUNG S prac he S prac he e.g. e.g. E NG LIS H S ettings Handset volume Settings Press the Menu key. Scroll to with the down arrow key and confirm with key. - Page 41 You will then jump back to the higher-level display. The language setting only refers to the display texts stored in the mobile unit. The system text language, e.g. when a call is in progress, corresponds to the Hicom 300E system setting. Settings Scroll to Confirm tone ringing volume –...
-
Page 42: Setting The Station
If your mobile unit is logged onto more than one station (systems ), you can set it to a particular station or a "best station" (automatic station changeover). Setting the station: NE XT S earc h s tation NE XT e.g. - Page 43 NE XT - - - - - - - - - - - - Example: activating/deactivating range tone NE XT Range tones Range tone O FF S AVE Settings Press the menu key. Scroll to and confirm. Explanation of the individual tones, see Overview – tones on page 44.
- Page 44 Settings y l l y l l e l i t i n ” - ” d...
-
Page 45: Appendix
You should try to clear the fault yourself before resorting to your service administrator n i l l a i n i l a l f , e l s l l . e l v i t v i t . - Page 46 Gigaset 2000H headset Simply plug the headset into Gigaset 2000C using adapter provided. Gigaset 2000L charging shell For charging the mobile unit batteries and 2 spare batteries. Further information available on request. Please contact your nearest Siemens Sales office. Appendix...
- Page 48 Siemens Telecommunications (Pty) Ltd. Private Bag X71 Halfway House 1685...