Advertisement
Feed Lead
Top
Feed Lead
Base
Pusher
Assembly
Long
Pusher
Step 1: Place Feed
Lead Base slightly left
of center and turn right
Step 5: Slicing Disc is
installed over Dicing
Grid
Step 8:
Place Long
Pusher in
round slot of
Pusher
Assembly.
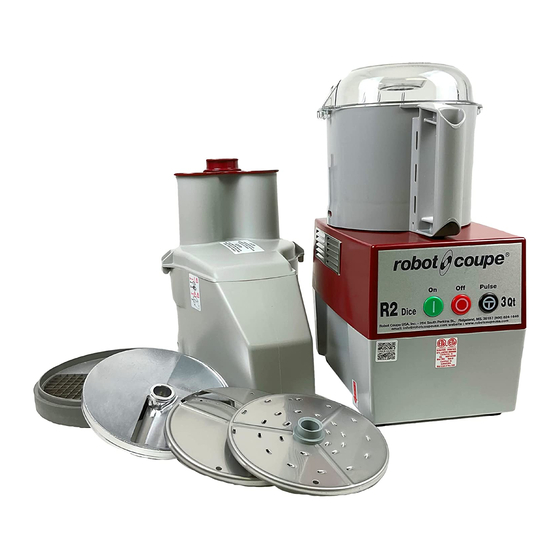
R2Dice Continuous
Feed Assembly
Instructions
Step 2: Place
Discharge Plate on
Motor Shaft.
Step 6: Tighten Screw
Assembly by Turning
Clockwise until snug but
not locked.
Discharge Plate
Step 3: Turn Discharge
Plate until it drops.
Step 7: Place Top of Continuous
Feed (making sure the tabs are inside
the feed lead base) slightly left of
center and turn right locking it in place.
Step 9:
Place Pusher
Assembly into
half moon slot
of Top half of
Feed Lead.
Motor
Shaft
Motor Base
Screw Assembly
Slicing Disc
Dicing Grid
Step 4: Place Dicing
Grid with tab facing
rear of machine.
Step 10: Prop-
erly Assembled
R2Dice with
Continuous Feed
Attachment.
Now the unit can
be started.
Advertisement
Table of Contents

Related Manuals for Robot Coupe R2Dice


Summary of Contents for Robot Coupe R2Dice
- Page 1 R2Dice Continuous Feed Assembly Feed Lead Instructions Motor Shaft Feed Lead Motor Base Base Screw Assembly Pusher Assembly Slicing Disc Long Dicing Grid Pusher Discharge Plate Step 1: Place Feed Step 2: Place Step 4: Place Dicing Step 3: Turn Discharge...
- Page 2 R2Dice Bowl Assembly Instructions Motor Shaft Motor Base Bowl “S” Blade Bowl Lid Step 3: Place “S” Blade on Step 2: Rotate bowl Step 1: Place bowl over motor shaft inside bowl and counter clockwise until motor shaft positioned with spin counter clockwise until it handle is centered in front.
Need help?
Do you have a question about the R2Dice and is the answer not in the manual?
Questions and answers