Table of Contents
Advertisement
Quick Links
Advertisement
Table of Contents
Troubleshooting

Related Manuals for wingtra Wingtra ONE


Summary of Contents for wingtra Wingtra ONE
-
Page 2: Table Of Contents
Table of Contents Introduction Quick Start Guide WingtraOne Package Content WingtraOne Deliveries Meet-WingtraPilot Image Sensors WingtraOne QX1 WingtraOne RX1 WingtraOne RedEdge Safety Safe Flying Failsafe Scenarios Charging of WingtraOne Charging WingtraOne Flight Batteries Charging Acessories Flight Preparation Handling of WingtraOne Download-Maps-for-Offline-Use Create-a-New-Flight-Plan Preflight-Checklist... - Page 3 Preflight Checklist Troubleshooting 10.2 Preflight Checklist Troubleshooting 10.3 Handling of WingtraOne Troubleshooting 10.4 Failsafe Scenarios Troubleshooting 10.5 Charging WingtraOne Flight Batteries Troubleshooting 10.6 WingtraOne 40MP RX1 Troubleshooting 10.7 WingtraOne 20MP QX1 Troubleshooting 10.8 Announcements and Release Notes Wingtra Release 11.1...
-
Page 4: Introduction
Introduction WingtraOne User Manual — Release 1.5 Congratulations and a warm thank you! for being a Wingtra Customer. We hope you get the best out of your new aerial data collection tool! To get started, make yourself familiar with the... - Page 5 Introduction Tips and Tricks Tips and Tricks Tip 1: Search this Knowledge Base for Help Most of your questions are likely answered in one of the chapters in this knowledge base. Please try different search terms if you cannot find your answer. Tip 2: Go through the Quick Start Guide Reassess the WingtraOne Quick Start...
- Page 6 Quick Start Guide WingtraOne Quick Start Guide The following 10 easy steps guide you to collect high-end aerial imagery with your WingtraOne. Check before you leave the Office 1. Check Flight Conditions Do not fly if wind Do not fly if gusts higher than Do not fly in rain, temperature is...
- Page 7 "Create a new Flight Plan" and follow the interface. Make sure you selected the correct camera model. You can go back to the welcome menu at any time by pressing the orange Wingtra icon on the top left of the screen.
- Page 8 Quick Start Guide STEP 2 Set Home: Place WingtraOne at your desired takeoff and landing point. Set Home on WingtraPilot by clicking on the first item on left side (A). If you are connected to WingtraOne, Home is automatically placed to WingtraOne's location.
- Page 9 Quick Start Guide STEP 3 Add Area(s): You can add one or more areas that you want to map by clicking on the area item on the left side (A). Choose your desired ground sampling distance (or alternatively, your desired altitude) on the right side (C), and adjust the flight direction and overlaps if needed.
- Page 10 Quick Start Guide already turned on. 3. Adjust settings via Sony'a Play Memories app (QX1) or via the camera itself (RX1), see chapter about your sensor for details. 4. To save the settings you have to manually turn off the camera by switching the on/off button. In case of the RX1 make sure to turn on the camera afterwards again.
- Page 11 Quick Start Guide 8. Flight Observation Always observe WingtraOne during flight. A: Information about remaining battery and GPS quality. B: Change display options (center map, change map tiles) C: Options to take over (after clicking a button, you have to confirm with a slider). Engage "Return-to-Home"...
- Page 12 Quick Start Guide After landing, WingtraPilot will start downloading the geotags automatically. If the download fails, click on "Retry" and walk towards WingtraOne to get better connection. STEP 2: Geotag Images on the Tablet After the download is successful, click on "Geotag Images". Then power off WingtraOne, get SD card from the camera and insert the SD card to your tablet.
- Page 13 Quick Start Guide...
-
Page 14: Wingtraone Deliveries
WingtraOne Deliveries WingtraOne Deliveries Your WingtraOne is shipped with the following accessories. Pilot Box 1. Remote Controller (RC) 2. Tablet 3. Flight Batteries (2 flight sets) 4. Telemetry 5. Charger 6. Charging cables, Wind measuring tool 7. Pitot covering tool, SD card adapter, Hex-wrench tool WingtraOne Bottom View... - Page 15 WingtraOne Deliveries 1. Flaps 2. Middle Stand 3. Airspeed Sensor (Pitot Tube) 4. Propellers 5. Battery Compartment 6. Sensor Compartment WingtraOne Top View...
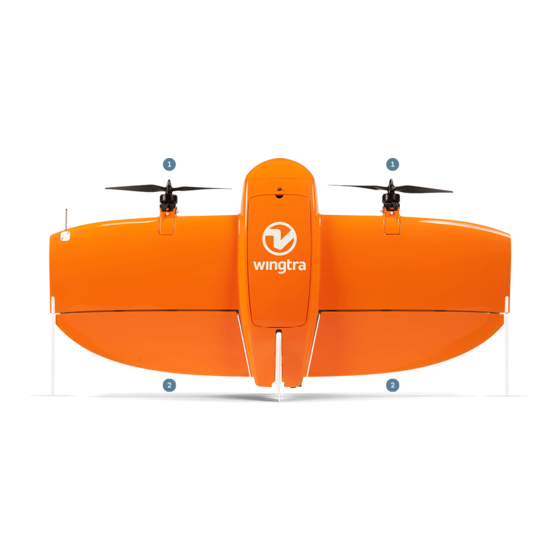
- Page 16 WingtraOne Deliveries 1. Flaps 2. Middle Stand 3. Propellers 4. Battery Compartment 5. Airspeed Sensor (Pitot Tube) 6. Cover - Access to Camera, Electronics 7. Ready-To-Fly Button...
-
Page 17: Meet-Wingtrapilot
WingtraOne firmware. Starting WingtraPilot on your tablet, you will see the welcome menu. You can always go back to the welcome menu by clicking on the orange Wingtra icon on top left of the screen. What you can do with WingtraPilot 1. - Page 18 Meet-WingtraPilot 2. Open an existing Flight Plan You cannot modify a Flight Plan that has been flown already. If you want to refly an already flown Flight Plan, click onto the first option "Create a new Flight Plan" and choose "Based on existing Flight Plan".
- Page 19 On the settings tab, you can change the user mode under the "General" button on the left side. Please always use the Basic mode and only switch to Wingtra mode if you are told to by the Wingtra Support. Basic You get all functionality that is needed to plan and conduct a data collection flight in basic mode.
-
Page 20: Wingtraone Qx1
WingtraOne QX1 WingtraOne 20MP QX1 1. SD card slot 2. Battery compartment (the camera is powered externally from WingtraOne) 3. Wi-Fi button 4. Closure lid 5. Power on / off button The SD card can be inserted in the wrong direction - always check if you insert it as displayed on the figure. - Page 21 WingtraOne QX1 Camera Light Shutter Aperture, Image Program Conditions Speed [s] f-Number Settings Quality Mode Shutter default 1/2000 auto 1000 fine Priority The default settings give good results in large range of light conditions. In case of very dark conditions you can increase shutter time (do not go beyond 1/1000s) and ISO (do not go beyond 3200).
- Page 22 WingtraOne QX1 The 15mm lens has a calibrated mechanical focus. Turn the focus ring to infinity and the images will be perfectly sharp. WingtraOne QX1 test pictures in preflight procedure. WingtraOne takes a series of test pictures after you press the Ready-To-Fly button during the preflight procedure to check if the camera is setup correctly, i.e.
-
Page 23: Wingtraone Rx1
WingtraOne RX1 WingtraOne 40MP RX1... - Page 24 WingtraOne RX1 1. SD card slot (use at least 128GB SD card size) 2. Battery compartment (the camera is powered externally from WingtraOne) 3. Closure lid - has to stay open 4. Mode dial - default "3" 5. Power ON/OFF switch - default "ON" 6.
- Page 25 ISO. Go to the settings menu and save the settings to memory recall "1" or "2". Make sure not to overwrite the default settings by Wingtra on "3". Then turn off and on the camera via the Power switch on the camera. To use the desired exposure settings set the Mode Dial to the respective setting.
-
Page 26: Wingtraone Rededge
WingtraOne RedEdge WingtraOne RedEdge The WingtraOne RedEdge offers a multispectral image acquisition. The camera aquires 5 individual images at the same time in spectral bands of blue, green, red, red edge and near IR. For camera specifications, technical details and camera related support please refer to the Knowledge base of Micasense... - Page 27 WingtraOne RedEdge 1. Reflectance tag 2. Transportation cover 3. RedEdge camera 4. SD card slot 5. On/Off (pressing >3s) and trigger (press <1s) button 6. Status LED Make sure to use the provided 32GB SDHC SD card. SD cards wth high capacity (type SDXC) or lower read/write speeds are not compatible with RedEdge.
- Page 28 WingtraOne RedEdge 1. Power WingtraOne 2. Connect via Wifi to the RedEdge camera (SSID = rededge // passwort = micasense) 3. Open the browser app (Chrome) and access the page http://192.168.10.254 4. Go to status tab (house tab). Check free space on SD card, GPS signal reception and time 5.
- Page 29 WingtraOne RedEdge Calibrate RedEdge camera Before and after each flight the RedEdge camera needs to be calibrated with the provided reflectance tag. Only a timely calibration guarranties reliable spectral information of your covered flight area To calibrate RedEdge camera: 1. Make sure a SD-card is inserted in the Rededge camera 2.
- Page 30 WingtraOne RedEdge 4. Trigger at least one image of the reflectance tag by pressing the button on the front of the camera. Place WingtraOne back on ground...
- Page 31 WingtraOne RedEdge Further Information For further information about RedEdge camera please refer to Micasense RedEdge Manual Executing a flight with WingtraOne RedEdge Remove transportation Cover from Camera On WingtraPilot Welcome Menu, create a new flight plan and select "Micasense RedEdge" as camera.
-
Page 32: Failsafe Scenarios
Failsafe Scenarios Failsafe Scenarios There are several scenarios where WingtraOne will take action by itself and engage a certain failsafe routine. Return-to-Home... - Page 33 Failsafe Scenarios RTH is triggered when the geofence is violated, when both telemetry and RC connection are lost, or when battery charge triggers this failsafe. It can also be triggered manually. You can take over manually during Return-to-Home by switching to Assisted Mode.
- Page 34 Failsafe Scenarios Hover Less than 80m Hover Less than 80m *This parameter (Minimum RTH Altitude) can be adjusted on the "Safety: Geofence and RTH" menu on the right side of the flight planning tab (E). Warning Warnings are issued acoustically and visually on the tablet. The mission can still be continued, but caution is advised depending on the foreseeable flight plan of the plane.
- Page 35 Failsafe Scenarios Land on Spot / hover down This is the most extreme failsafe, as it forces WingtraOne to perform a backtransition and land on the spot where it is at currently. It is triggered on GPS loss, or if battery voltage drops very low. If it is triggered by the battery, you can take over manually by switching to Assisted Mode.
-
Page 36: Charging Wingtraone Flight Batteries
Charging WingtraOne Flight Batteries Charging WingtraOne Flight Batteries Before going to the field you have to charge the flight batteries, the remote control (RC) and the tablet. The following sections describe how to charge the flight batteries. Li-Ion Batteries The WingtraOne is powered by a pair of 4S3P Lithium-Ion batteries. For a charging manual see below. - Page 37 Charging WingtraOne Flight Batteries Charging Li-Ion 4s3p batteries You can use the included charging system either on a power plug or on the field using car battery for charging. Set up your charging system as shown below and follow the following instructions: * Select the mode by clicking on “Batt Type”, navigate to Li-Ion mode with the “Dec”...
- Page 38 Charging WingtraOne Flight Batteries Charger Setup (Car Battery):...
- Page 39 Charging WingtraOne Flight Batteries...
-
Page 40: Charging Acessories
Charging Acessories Charging Accessories Operating WingtraOne safely requires fully charged accessories. In particular the tablet running WingtraPilot and Remote Control need to be sufficiently charged to allow for monitoring WingtraOne during flight and to trigger the appropriate failsafe actions if necessary. Charging WingtraPilot Tablet The tablet can be charged at any standard USB port via the supplied USB-A to micro USB cable. - Page 41 Charging Acessories Charging Remote Control (RC) The remote control is charged with the included 12V power adapter. Plug in the power adapter and connect it to the RC. Make sure the RC is turned off. A small green LED on the backside should be on.
-
Page 42: Handling Of Wingtraone
Handling of WingtraOne Handling of WingtraOne Carry WingtraOne You can carry the WingtraOne easily if you hold it at the wing area between the propellers and the battery compartment or at the motor mounts. Attach and detach Middle Stand The middle stand is not symmetric. Make sure that the shape of the midsection of the middle stand matches the shape of the airframe. - Page 43 Handling of WingtraOne Once WingtraOne is in Ready-To-Fly state and all preflight checks have been fulfilled successfully, it's only then that you can start the flight from tablet. During flight, the button is not blinking but solid on (-- ---------). After landing, the LED changes back to blinking (-- -- -- --), which means that WingtraOne can be approached without risk.
-
Page 44: Download-Maps-For-Offline-Use
Download-Maps-for-Offline-Use Download Maps for Offline Use On the settings tab, select “Offline Maps” and “Add new set”. Navigate to the desired location, choose the right map type, zoom options (defaults of 14-20 should normally be fine), give the set a descriptive name, and download. -
Page 45: Create-A-New-Flight-Plan
WingtraPilot. You can open the welcome menu by clicking on the orange Wingtra icon on the top left. Follow the interface to setup the high-level settings of the Flight Plan — Do you want to start from... - Page 46 Create-a-New-Flight-Plan Add Home by clicking on the first button on the left (A). If you are on the field and the WingtraOne is powered and connected to the tablet, Home is set to WingtraOne's current position automatically. If you plan the flight beforehand in office, you can move it to the place where you intend to takeoff —...
- Page 47 Create-a-New-Flight-Plan Step 3 (Optional) Adjust Geofence and Minimum RTH Altitude You can adjust the geofence by clicking on the respective menu on the right side (E). Click on the triangle to unfold the menu. By default, horizontal geofence is set to 1200m and vertical geofence is set to 400m.
- Page 48 Create-a-New-Flight-Plan...
-
Page 49: Flight Modes And Flight Regimes
Flight Modes and Flight Regimes Flight Modes and Flight Regimes The flight mode defines if WingtraOne is flying autonomously (Auto), if you are flying in Assisted Mode, or if Return-to-Home (RTH), is engaged. The flight regime of WingtraOne is either Hover or Cruise. Hover is the vertical mode that is used during takeoff and landing, Cruise is the horizontal, forward flight mode, where WingtraOne flies like a fixed-wing aircraft. -
Page 50: In Flight Interactions
In Flight Interactions In-Flight Interactions The following table summarizes your options to interact during flight. Possible Interactions Action Consequence Emergency Kill all motors and spiral down. Stop: RTH (Return- The plane flies back autonomously at the current altitude, performs the to-Home): planned landing procedure and lands. - Page 51 If you are flying in cruise, transition back to hover by using the transition button (6.) at a safe distance and altitude. Change heading after back transition such that the Wingtra logo is facing you. Direct WingtraOne to its intended landing position. WingtraOne will use its distance sensor to detect landing and switch-off the engines at 10cm distance above ground.
- Page 52 In Flight Interactions 1. Menu navigation buttons, to navigate the RC's settings - don't change them. 2. On / off switch, turns RC on / off 3. Navigation stick right 4. Navigation stick left 5. Engage Assisted Mode: allows you to take manual control of WingtraOne 6.
- Page 53 In Flight Interactions Left Stick: Up & Down gain and lose altitude Input Result Left Stick: Left & Right change heading (turn around central axis) Input Result Right Stick: Up & Down back and forth (pitching) Input Result...
- Page 54 In Flight Interactions move left and right (move aircraft along the Right Stick: Left & Right wing) Assisted Mode - Cruise Input Result Left Stick: Up & Down gain (stick up) or lose (stick down) altitude Input Result Left Stick: Left & Right perform turns in the respective direction Input Result...
- Page 55 In Flight Interactions increase / decrease flight speed Right Stick: Up & Down (velocity will stay within safe boundaries) Flight Feedback WingtraPilot shows you some information which you can use to inspect your flight. A: Information about remaining battery and GPS quality. B: Change display options (center map, change map tiles) C: Options to take over.
- Page 56 In Flight Interactions...
-
Page 57: Geotagging
Geotagging Geotagging The collected images are saved on the SD card in the camera without assigned GPS information (geotags). The current workflow includes some user input to assign the geotags to the images. Leave WingtraOne powered after landing until the geotags are downloaded to the tablet (**Step 1: Download Geotags**). - Page 58 Geotagging A: Section for the Geotag Download (normally not needed). B: Section for the Geotagging itself. Wait for the feedback "Success! ...". Be patient! Geotagging the images can take several minutes (for huge sets with thousands of images it can take up to 20 minutes). WingtraPilot creates a folder in the image directory (on the SD card) containing the original images, the tagged images, the Flight Plan file and a json text file with the geotags including attitude tags (see below).
- Page 59 Geotagging Results of Geotagging on the SD Card As a result you get a folder named after your Flight Plan in the image directory on your SD card. It contains the following objects: * /ORIGINAL subfolder: Unmodified images * /TAGGED subfolder: All images of the flight with geotags in metadata * /date_time.flightplan file: The Flight Plan that was flown.
-
Page 60: Update Wingtrapilot & Wingtraone To 1.5.0
Update WingtraPilot & WingtraOne to 1.5.0 Update WingtraPilot & WingtraOne to 1.5.0 You will profit from all software improvements Wingtra achieves (for WingtraPilot and the Autopilot) by getting the newest software updates. Please follow the instruction below to update your WingtraPilot and WingtraOne. - Page 61 Update WingtraPilot & WingtraOne to 1.5.0 Ensure you have the newest WingtraPilot. Start WingtraPilot. In the welcome menu, click on "Update the WingtraOne firmware or WingtraPilot" On the left side (A) you will see the release information of the latest release and the information that this release hasn't been downloaded yet.
- Page 62 Update WingtraPilot & WingtraOne to 1.5.0 Connect the end of the connector which is marked with "OTG" to your tablet and the other end to the microusb port on WingtraOne (shown in the picture below). If there is a dialog asking for permission, click “Use by default for this USB device” and "OK".
- Page 63 Update WingtraPilot & WingtraOne to 1.5.0 Wait for the Update dialog box and click "OK" to start the update. Wait for up to 5 minutes as WingtraOne firmware is updated You will receive a message “Update completed” and hear the buzzer of WingtraOne. The dialog box asking for permission to the USB port may pop up again.
- Page 64 Update WingtraPilot & WingtraOne to 1.5.0 Step 5: Open the manual Ensure you have downloaded the latest release in Step 3. Go to My Files app and open the Manual_v1.5.0.pdf located in /device storage/WingtraPilot/Releases/v1.5.0/ make sure you use Adobe Acrobat Reader App to open the manual.
- Page 65 Update WingtraPilot & WingtraOne to 1.5.0...
-
Page 66: Geotagging Troubleshooting
Geotagging Troubleshooting Geotagging - Troubleshooting Q: At the end of geotagging, I get "WARNING: generating a map using this dataset might fail" The message "WARNING: generating a map using this dataset might fail" is followed by one or several of the following explanations. In many of the cases geotagging worked as expected but anything was not as usual. - Page 67 Geotagging Troubleshooting Geotagging fails if images of several flights are on the SD Card. In case you forgot to geotag the images from a first flight after flight, and you collected additional images in a second flight, you can use the following workaround: 1.
-
Page 68: Preflight Checklist Troubleshooting
Preflight Checklist Troubleshooting Preflight Checklist - Troubleshooting Known Issue: Initialization Failure of WingtraOne In rare cases, WingtraOne fails to initialize the sensors correctly during boot up. In this situation you either fail on the even ground preflight check, see WingtraOne heavily drifting or rotating in the map, or get the following warning: "PREFLIGHT FAIL: Gyro inconsistency. -
Page 69: Preflight Checklist Troubleshooting
Preflight Checklist Troubleshooting In rare cases airspeed calibration is not very accurate (e.g. if there was airspeed or other induced pressure spike during calibration. If you get the following warning when trying to start the flight, re- calibrate airspeed sensor by clicking on the respective preflight check again. "Negative pressure difference detected! Please re-do the airspeed calibration. -
Page 70: Handling Of Wingtraone Troubleshooting
Handling of WingtraOne Troubleshooting Handling of WingtraOne - Troubleshooting Q: What happens if I click Ready-to-Fly button again? You should not do so. If you press Ready-to-Fly button a second time, WingtraOne will go back to neutral state (- - - - - -). This action is not recommended and you will hear a beeping sound. Repower WingtraOne in this situation. -
Page 71: Failsafe Scenarios Troubleshooting
Failsafe Scenarios Troubleshooting Failsafe Scenarios - Troubleshooting Known Issue: WingtraPilot does not reconnect to WingtraOne after the telemetry was unplugged If the usb connection between tablet and telemetry is disconnected hardware-wise, WingtraPilot is not able to regain connection automatically. If this happens, reconnect the telemetry to the tablet and press the "disconnect"... -
Page 72: Charging Wingtraone Flight Batteries Troubleshooting
Charging WingtraOne Flight Batteries Troubleshooting Charging WingtraOne Flight Batteries - Troubleshooting Q: I unplugged the balancer cables from charger. To which ports do I have to re-attach? Re-attach them as shown in the image below. -
Page 73: Wingtraone 40Mp Rx1 Troubleshooting
WingtraOne 40MP RX1 Troubleshooting WingtraOne 40MP RX1 - Troubleshooting Q: The images are over or underexposed. Check whether you use the memory recall function 3 with the correct default settings, see chapter Check whether the EV correction dial is set to +-0 EV Q: The images look blurry The focus is not set to infinity. -
Page 74: Wingtraone 20Mp Qx1 Troubleshooting
WingtraOne 20MP QX1 Troubleshooting WingtraOne 20MP QX1 - Troubleshooting Q: Camera: My camera does not connect over WiFi Make sure that your camera is powered (green LED on the camera housing) Restart the PlayMemories App and see if you can connect now. Take camera out of the foam (you have to diconnect the violet cable) and look at the tiny screen. - Page 75 WingtraOne 20MP QX1 Troubleshooting foam (you have to disconnect the violet cable) and adjust the focus manually to infinity. To do that point the camera towards a remote object and turn the focus ring clockwise (looking into the camera) for a whole turn followed by slowly turing the ring back (counterclock wise) by 5 to 10°. By carefully observing the image displayed on the tablet you can find the point of maximum sharpness for remote objects.
- Page 76 WingtraOne 20MP QX1 Troubleshooting...
-
Page 77: Wingtra Release
New compatibility check for WingtraPilot and WingtraOne firmware versions. New in-app update page for downloading and updating new Wingtra releases (includes WingtraPilot, WingtraOne firmware and Manual releases). Selection of camera model when creating a new Flight Plan to configure WingtraOne according to the correct sensor. - Page 78 Wingtra Release Improvements in flight behavior (e.g. descending in winds) Improvements in WingtraPilot stability New Return-to-Home logic Removed in-flight replanning of landing based on wind Changed RC stick assignment for cruise flight (Assisted Mode) Changed Emergency swich logic (new: click 3 times within 2 seconds)
Need help?
Do you have a question about the Wingtra ONE and is the answer not in the manual?
Questions and answers