wingtra WingtraOne Manual
Hide thumbs
Also See for WingtraOne:
- Quick start manual (71 pages) ,
- Manual (60 pages) ,
- Manual (6 pages)
Table of Contents
Advertisement
Advertisement
Table of Contents

Related Manuals for wingtra WingtraOne


Summary of Contents for wingtra WingtraOne
-
Page 2: Table Of Contents
Table of Contents Introduction Quick Start Guide Quick Start Guide Package Package Content Safety No-fly Conditions Li-Ion Battery Handling Hardware Manual WingtraOne Battery Charging Sensor Sony QX1 Remote Control Wingtra Pilot Overview Settings Flight Geotagging Workflow... - Page 3 Survey Mission Manual Flight Camera WingtraPilot Contact Contact us...
-
Page 4: Introduction
Introduction WingtraOne User Manual Congratulations and a warm thank you! for being one of the early Wingtra Beta Customers! We hope you get the best out of your new aerial data collection tool. To get started, make yourself familiar with the support and feedback setup, and have a look at our quick start guide. Support and Feedback Setup We want you to get the best experience possible with your WingtraOne! Wingtra will support you depending on your needs. This manual should always be your first point of contact and we hope that most questions should be answered herein. Adhoc Support If you are on the field and not able to take-off due to technical reasons, please check the Tips and Tricks section below first. If your issues are still not solved, you can chat with us through your personal Skype Group, where a Wingtra employee will respond immediately during working hours (8am - 6pm, CET). General Support and Feedback... - Page 5 Introduction For all questions that are not time-critical, and can't be answered by the manual, please write an email to our support team under support@wingtra.com. We would be very happy to get your feedback about our product. Emergency Situations Please contact us directly in case of an emergency situation (crash, injury, physical damage, ...). You can reach us under +41 79 633 10 01 (Julian Surber) +41 76 724 17 38 (Maximilian Boosfeld) +41 44 632 57 76 (Office) Tips and Tricks Tip 1: Search this Manual for Help Most of your questions are probably answered in one of the manual's chapters or in the FAQ. Please try different search terms if you can't find your answer. Tip 2: Go through the Quick Start Guide Reassess the Quick Start Guide. The troubleshooting tips for the specific checkpoints in the preflight checklist solve most of the problems that can be faced before flying. Tip 3: Repower the WingtraOne Especially as a beta product, there are some corner cases which can lead to an unexpected situation that prevents the drone from taking off. In case you can't solve your issue with tip 1, repower the WingtraOne and try again. Structure of User Manual On the left side you can see all the chapters and sections of this manual. The Quick Start Guide should help you get started and serve as the first step in troubleshooting. Manuals with detailed how-to's can be found in Hardware Manual and Wingtra Pilot. The Workflow chapters summarize the steps you have to go through for standard operation of the WingtraOne, and the FAQ section answers frequently asked questions.
- Page 6 Introduction...
-
Page 7: Quick Start Guide
Quick Start Guide Quick Start Guide This Quick Start Guide covers the most important part of the official Wingtra Training. Please reconsider this guide if you are unsure about the operation of your WingtraOne. Arriving at the field, we recommend to setup and power the WingtraOne first, boot up the groundstation (laptop or tablet), start WingtraPilot and connect the telemetry to the ground station. Preflight Checklist You are guided through the process of setting up your drone by the preflight checklist within WingtraPilot. As the operator, you have to go through the preflight checklist within WingtraPilot before you can start the mission. If any of the preflight checks fails (e.g. sensor failure), the respective preflight check turns red and starting the mission is not possible. Below you can find an explanation for every checkpoint in the preflight checklist and troubleshooting advice if a check fails. Check that no critical parts are damaged. - Page 8 Quick Start Guide Particularly check whether motor mounts are in a good condition and flaps can be moved. Confirm by pressing the checkpoint in the checklist. Do not fly if any part of the drone is damaged. Check whether propellers are well-attached and colors match motor mount colors The propellers turn in opposite directions and have different shapes. Make sure that the propellers are attached correctly by comparing the color (green/red) on the propellers with the color on the motor-mounts (on the ESC's). Confirm by pressing the checkpoint in the checklist. Distance sensor clean Check if the distance sensor is dusty or is covered by something (snow, tape, ...). The distance sensor is located at the tail of the WingtraOne, next to the middle stand. If it is not clean or if you are not sure if it is clean, take the time to clean it with a clean blanket. Confirm by pressing the checkpoint in the checklist. Power WingtraOne After the WingtraOne is powered, it automatically tries to connect to WingtraPilot. This point in the checklist is an automated test. Connect manually if you do not get connection automatically. Check if you have inserted the autopilot SD card correctly if the WingtraOne plays strange tunes and blinks unexpectedly. Check Battery Voltage This is an automated test. WingtraPilot checks whether the battery voltage is above 30V. If voltage is below 30V take-off is prevented and you have to switch batteries. Check GPS signals This is an automated test. Depending on weather, it can happen that your drone does not receive GPS lock for several minutes. If GPS lock can't be established after more than 5 minutes, try to repower the WingtraOne. If you still fail to establish connection, open the front cover and see if the cable to the GPS module is well connected. If you still fail to get reception, chat with the Wingtra Support. Calibrate Airspeed Take the pitot covering out of the pilot box and cover the pitot tube with it. Start airspeed calibration by clicking on the checkpoint in the checklist. You will receive the instruction "Cal, ensure sensor is not measuring wind". Wait until you hear the confirmation of WingtraPilot:...
- Page 9 Quick Start Guide "Cal, blow across front of pitot without touching". Then, remove the pitot covering and blow into the tube. If Airspeed calibration fails, you can restart it by clicking onto the respective checkpoint again. You have to blow directly into the tube. Upload planned mission to WingtraOne After you have planned the mission, make sure you review the mission. Click on this checkpoint in the preflight checklist to upload the planned mission to the vehicle. It is good practice to save the mission additionally to file. If you plan on flying the WingtraOne manually, you can skip this checkpoint. Check if actual heading of WingtraOne on ground matches the displayed heading in WingtraPilot There can be different reasons why WingtraPilot displays a wrong heading compared to the actual drone. The magnetic field could be distorted on your take-off point, connection between the drone and WingtraPilot could be corrupted or something could be severely wrong with the drone. In either case try to repower the WingtraOne and check again. If the deviation between actual heading and displayed heading is still significant (> 45 degrees) chat with the Wingtra Support. Pre-arm the WingtraOne You pre-arm the WingtraOne by pressing the arming button for 2 seconds. There will be a confirmation sound and the arming button will start to blink with double blinks ( -- -- -- -- ). By pre-arming the WingtraOne, you allow for signals to the motors and flaps, and start a routine that checks the camera by taking some test pictures. This point in the checklist is an automated test. If pre-arming does not work, try again and make sure that you hold the button for 2 seconds. If it still does not work, repower the WingtraOne. "Un"-pre-arming is not recommended. Please repower the WingtraOne in case you want to "un"-pre-arm. Check attitude This is an automated test. The pitch and roll angles need to be near zero and stable to be sure that the take-off can be performed successfully. If the WingraOne is placed on even ground and this check fails (remains red), you can rotate the drone a bit around pitch and roll axes and place it on the ground again. If it remains red, repower the WingtraOne.
- Page 10 Quick Start Guide Check startup flap movement (right after pre-arming) After pre-arming, the flaps perform a startup routine (see GIF "10. Pre-arm the WingtraOne"). Check if it is run correctly and confirm by pressing this checkpoint. DO NOT FLY if the routine does not run properly (e.g. one flap is not moving at all) and chat with the Wingtra Support. Remove lens cover and check for camera shutter sound from initialization routine (right after pre-arming) After pre-arming, the WingtraOne triggers 5 test pictures within one minute. Listen if you can hear the camera's shutter. If you hear the shutter you can be sure that you get images during flight. If you do not hear the shutter sound, check if the SD card is inserted correctly. For more help on sensor issues see also our FAQ. Check whether there are no people within 10m around the plane, weather conditions suitable to fly. See the No-fly Conditions and make sure no people are close to the drone. Confirm by pressing this checkpoint in the checklist. Turn the Remote Control on Some seconds after turning on the RC, a warning "Alarm Warning" is displayed. This warning appears because we disabled the sound feedback, which was designed for model aircraft pilots. Click enter to get to the home screen. On the top left of this screen, you can see the battery remaining of the RC and the signal strength of the connection to the drone. If there is no connection to the drone, first check if the WingtraOne is powered. If it is powered, check if you have connection in WingtraPilot. Try to repower the remote controller. If there is still no connection, check the settings of the remote controller and check if the right model is selected (4 digit number). If you cannot connect, chat with the Wingtra Support. Once you have successfully completed all previous steps, you can arm the WingtraOne. The arming button will go solid green (-------) once you have armed the WingtraOne. If you "Arm for Mission Mode", the motors will idle spin for 4 seconds and the WingtraOne will take off and fly the planned mission. Check your options to interact and the different failsafe scenarios before flying.
- Page 11 Quick Start Guide If you "Arm for Position Mode", the WingtraOne awaits your take off signal from the RC. Check the manual flying instructions.
-
Page 12: Package Content
Package Content WingtraOne Deliveries Pilot Box 1. Remote Controller (RC) 2. Tablet 3. Batteries 4. Telemetry 5. Hex-wrench 6. Pitot Covering 7. SD Card Adapter Charging Box... - Page 13 Package Content 1. Main Charger for Flight Batteries with Balancer Cable 2. Charger for Remote Control 3. Charger for Tablet 4. Power Adaptor for Main Charger 5. Power Cable and Clamps for Charging on Car Battery WingtraOne Bottom...
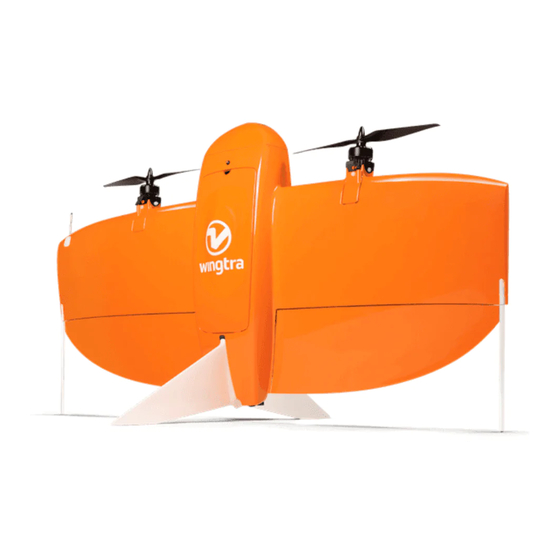
- Page 14 Package Content 1. Flaps 2. Middle Stand 3. Pitot Tube 4. Propellers 5. Battery Compartment 6. Sensor Compartment...
- Page 15 Package Content 1. Flaps 2. Middle Stand 3. Propellers 4. Battery Compartment 5. Pitot Tube 6. Cover - Access to Camera, Electronics 7. Arming button...
-
Page 16: No-Fly Conditions
No-fly Conditions Non-Flying conditions Do not fly in the following cases: RAIN or SNOWFALL: Check windfinder WIND GUSTS > 20 km/h: Check windfinder TEMPERATURE below 0 Celsius or above 40 Celsius Flight is within No-Fly Zone: Check BAZL Information Flying over group of people: Check BAZL Information Flying over streets with traffic Flying over residential houses... -
Page 17: Li-Ion Battery Handling
Li-Ion Battery Handling Lithium-Ion Batteries Safety Hazard Warnings for Li-Ion Batteries Lithium-ion battery packs may get hot, explode or ignite and cause serious injury if exposed to abusive conditions. Be sure to follow the safety warnings listed below: Do not connect the positive terminal and negative terminal of the battery to each other with any metal object (such as wire). Do not pierce the battery with nails, strike the battery with a hammer, step on the battery or otherwise subject it to strong impacts or shocks. Do not expose battery to water or salt water, or allow the battery to get wet. Do not attempt to charge an over-discharged or damaged battery, but dispose this battery safely. Please charge the battery safely, details here We require all user of Li-ion batteries to be professionals and have capability to handle emergency cases. Batteries used in this beta program are explicitly experimental batteries that require an extra level of care. I.e. they do not hold for the UL Test Standard for Li-Ion and packs. -
Page 18: Wingtraone
WingtraOne WingtraOne How to carry You can carry the WingtraOne easily if you hold it at the wing area between the propellers and the battery compartment or at the motor mounts. Attach and detach Middle Stand Look for the visual marker on the WingtraOne and the middle stand. The middle stand is inserted correctly if the visual markers are on the same side. To attach the middle stand, we recommend holding the WingtraOne with one hand and turn it vertically. Then simply attach the middle stand. There are two ways to detach the Middle Stand: 1. Place the WingtraOne on the ground and gently put one feet on the Middle Stand. Lift the WingtraOne from the ground while keeping your foot on the WingtraOne and the stand will come off. 2. Lift the WingtraOne by holding the two motor mounts. Turn the WingtraOne vertically and place one hand between the upper motor mount and the battery compartment. With the other hand, detach the middle stand. Power the WingtraOne Open battery compartment and insert battery Power the batteries by matching the red cable with the red one and the black with the black one. The cables need a firm push. You do not connect the balancer port. Arming button - dis-arm, pre-arm, arm When powered, the WingtraOne can be in 3 different states: Dis-armed: Arming button blinks green slowly (- - - -). Pre-armed: Arming button blinks green with double blinks (-- -- -- --) - Page 19 WingtraOne Armed: Arming button is solid green (------------). If powered, the WingtraOne enters the dis-armed state. Reaching that point on the preflight checklist, you can pre-arm the WingtraOne by pressing the arming button for 2 seconds. There will be a confirmation sound and the arming button will start to blink with double blinks ( -- -- -- -- ). By pre-arming the WingtraOne you allow for signals to the motors and flaps and start a routine that checks the camera by taking some test pictures. "Un"-pre-arming of the WingtraOne is not recommended. Please repower the aircraft if you want to "Un"-pre-arm. You can arm the the WingtraOne through WingtraPilot. Check the Quick Start Guide on how to start a mission or fly the WingtraOne manually.
-
Page 20: Battery Charging
Battery Charging Flight batteries 8s3p Li-Ion Please don't leave battery packs unattended during charging and make sure to place it away from easily flammable environments such as wood or carpet. It is recommended to charge batteries in a fire proof container. You can use the included charging system either on a power plug or on the field using the car battery for charging. Set up your charging system as shown below and follow the following instructions: Switch on the power supply. Select the mode by clicking on “Batt Type”, navigate to Li-Ion mode with the “+” and “-” buttons, and confirm with the “enter” button. Set the number of cells to 8S, which corresponds to 28.8V and confirm with “enter”. Set the charging current to 7.5A, which corresponds to 1C and confirm with “enter”. Confirm your settings by pressing the “enter” button for 2 seconds. Check the settings (Li-Ion balancing mode, 8S (28.8V), 7.5A), and confirm by pressing “enter”. Charger Setup (Office): Charger Setup (Car Battery):... - Page 21 Battery Charging RC and Tablet Charging Always charge tablet and RC before going to the field!
-
Page 22: Sensor Sony Qx1
Sensor Sony QX1 Sony QX1 1. SD card slot 2. Battery compartment 3. Wi-Fi button 4. Closure lid 5. Power on / off button The SD card can be inserted in the wrong direction - always check if you insert it as displayed on the figure. Check and Adjust Camera Settings (Sony QX1) In most cases the default camera settings should be fine. If you want to change the settings, you have to power the WingtraOne, manually switch on the camera (press On/Off button on camera housing), open the PlayMemories app on your tablet and connect to the camera (FAQ). Recommended settings:... - Page 23 Sensor Sony QX1 The WingtraOne takes a series of test pictures after pre-arming to check if the camera is setup correctly, i.e. to make sure that the lens-cover is removed, the SD-card is inserted correctly, and triggering from the Autopilot is possible. Listen to the camera after pre-arming, if you hear the aperture opening and closing (clicking sound) you can be sure that everything works fine. If you run into trouble, try consulting the Camera section in the FAQ first before reaching out to Wingtra support...
-
Page 24: Remote Control
Remote Control Remote and Manual Control 1. Menu navigation buttons, allow you to change RC settings 2. On / off switch, turns remote control on / off 3. Navigation stick right 4. Navigation stick left 5. Engage manual (position assisted) mode: when pressed during a mission this allows you to take manual control of the aircraft 6. Transition: performs the "transition" maneuver switching from forward flight to hover regime and vice versa (only works in manual (position assisted) mode) 7. Emergency button Be very careful with the emergency button, it will abort power supply (kill motor s) and you won't be able to regain control. 8. Return-to-land: initiates the aircraft to return to its landing position and perform an autonomous landing. See also your options of Interaction in a Mission. - Page 25 Remote Control Control sticks Use the control sticks to fly manually. The WingtraOne will always be position assisted, which means that you are guiding high level inputs with your sticks: Manual mode - hover right stick input (3.): up / down, gain and lose altitude left / right, change heading (turn around central axis) left stick input (4.): move plane in x-y-plane, seen by aircraft up / down, back and forth (pitching) left / right, move left and right (move aircraft along the wing) Manual mode - cruise / forward flight right stick input (3.): left / right, perform turns in the respective direction up / down, increase / decrease flight speed (velocity will stay within safe boundaries) left stick input (4.): down, gain in altitude ("pitch up") up, loss in altitude ("pitch down") left / right, no functionality Manual flight maneuvers Take-off The WingtraOne can harm people severely if not handled correctly. Only fly the drone manually if you know what you are doing. Do not take off manually in windy conditions. Depending on GPS quality, the drone can drift once it is in the air. Be prepared to react. Do not take-off near any obstacles.
- Page 26 Remote Control To take off manually, you need to go through the safety checklist first (you can leave out the mission planning), place the WingtraOne on ground at a safe distance of 10 meters or more to any person including yourself, and click to "Arm for Position Mode" in WingtraPilot. Always recapitulate your control input options (see Control Sticks) before taking off. Once you are armed, you can take off by holding the right stick (3.) 2 seconds on the maximum value. Let the sticks go back to center during take-off to gain control over the aircraft . The WingtraOne will take-off and hold position 2 meters above ground and await your command input. Landing If you are flying in cruise, transition back to hover (use transition button (6.)) at a safe distance and altitude. Change heading after back transition such that the Wingtra logo is facing you. Direct the aircraft to its intended landing position. Once you are above your landing spot, push the right stick (3.) hard down (really to its minimum!). The aircraft will use its distance sensor to detect landing and switch-off the engines at 10cm distance to the ground.
-
Page 27: Wingtra Pilot
Overview WingtraPilot Overview Main Menus WingtraPilot is organized into 3 main menus. Settings Under Settings you can connect to your vehicle, change between user modes, adjust the app appearance and modify high level settings. Flight The Flight Menu is used for all flight planning and in-flight monitoring and feedback. Geotagging The Geotagging Menu is used after flight to assign the right GPS tags to your images. User Modes WingtraPilot is shipped with three different modes: Basic, Advanced and Wingtra. We strongly encourage to use the Basic Mode as all features are well tested. Use the advanced mode with caution! Only switch to Wingtra mode if you are told to do so by the Wingtra Support! More information on the user modes. -
Page 28: Settings
Settings Settings Menu Connect to your vehicle On the settings tab, you can manually connect to your vehicle under the "Comm Links" button on the left side. Click on "WingtraOne" and onto "Connect" at the bottom of the page. If you cannot connect, make sure that you have attached the Telemetry and powered the WingtraOne. Get Satellite Tiles as Offline Maps On the settings tab, select “Offline Maps” and “Add new set”. Choose the right zoom options and location, give it a descriptive name, and download. Be patient if the tiles are not loading immediately. If the download is stuck, restart WingtraPilot, navigate to the settings tab, select "Offline Maps" again, and click onto your new set. On the right side click onto "resume download" and be patient again. Change User Mode On the settings tab, you can change the user mode under the "General" button on the left side. For our early beta customers, we highly recommend to fly in basic mode, as functionality in higher modes is not thoroughly tested. Basic You get all functionality, which is needed to plan and conduct a survey mission or fly the WingtraOne manually in basic mode. There is principally no need to go to higher modes. Advanced ONLY USE ADVANCED MODE IF YOU KNOW WHAT YOU ARE DOING. - Page 29 Settings In advanced mode, you get some additional functionality in mission planning. If you want to manually adjust the start and/or landing procedure, add custom waypoints into your mission, or change e.g. side-overlap of your survey, switch to advanced mode. Wingtra NEVER SWITCH TO WINGTRA MODE UNLESS YOU ARE TOLD BY THE WINGTRA SUPPORT. In Wingtra mode you have full access to the flight parameters, sensor calibrations, and advanced settings. This mode will be removed for the final product and only is in place for beta customers to make first support as efficient as possible. You can easily make the WingtraOne un-flyable if you do not know what you are doing - DO NOT SWITCH TO WINGTRA MODE. Further settings You can adjust further settings under the "General" button: change units for distance, area and speed select map provider: Bing, Google or Statkart change UI font size to optimize appearance...
-
Page 30: Flight
Flight Flight Menu - Mission Planning The high level mission planning procedure contains these steps: Set home Add take-off and landing waypoint Add survey Review mission You can either plan the mission in office or directly on the field. In either case make sure you have internet connection on the field or load the satellite tiles beforehand. The following steps describe how to setup a standard mission in WingtraPilot. A standard mission consists of a take-off/landing point and one or several survey areas, where each survey is flown at constant altitude. The flight path is calculated automatically and ensures good image coverage of the drawn area (where side-overlap is set to 70%). Step 1 Set Home Position The shown location in WingtraPilot is set to the area of the last flown mission. You have two options to change location: OPTION 1: Enter GPS coordinates in field “home position” on the right side, zoom out and into home. OPTION 2: Select the “Street Map” tiles and navigate to your position. Step 2 Set Take-off And Landing Point First, click on the take-off/landing icon and second to the position in the map, where you want to take-off and land. The WingtraOne will take off, rise to 40 meters above the take-off/landing point, transition into forward flight, fly to the loiter circle, loiter up to the survey altitude and start the survey. After finishing the survey it will fly back to the loiter circle... - Page 31 Flight at the survey altitude, loiter down to 40 meters above takeoff, fly back to the take-off/landing point, transition 40 meters above the takeoff/landing point and land. You can adjust the take- off direction and spot of the loiter circle by modifying the “loiter angle” on the right side. Caution: Plan your mission in office but be aware that you would probably have to change the take-off/landing position on the field! Step 3 Add your survey You can add one or several surveys to your mission by clicking on the survey item on the left side. Choose your desired Ground sampling distance (or, alternatively, your desired altitude) on the right side and adjust the grid angle if needed. Move the corners (minus signs) and add additional corners until you draw the area that you want to map. Step 4 Review your mission You can see a summary of your mission on the lower left side of the screen. Check if your mission stays within these limitations: Flight time < 40 min...
- Page 32 Flight Hover time < 5 min Distance < 40 km Max telem distance < 1’000 m Terrain review: No collision? Mission Planning on the Field If planning is performed on the field, it is recommended to set up equipment (start WingtraPilot → connect telemetry → power plane) before planning the mission. This way, home is automatically set to the vehicle's position. Make sure you have internet access on the field or load the satellite tiles before going to the field! Save Mission to File Use the menu with the two arrows on the left side to save your mission to file, load a mission from file, or send a mission to the vehicle. Mission Planning Features in Advanced Mode Change Take-Off Procedure Transition Altitude Loiter Offset Loiter Radius Unlink Take-off and Landing Waypoints Change advanced survey settings Overlap Pattern (multithreading vs single threading) Change Sensor Model Add Additional Waypoints Normal 3D Waypoints Camera Trigger Waypoints In-Flight transition Waypoints...
- Page 33 Flight Flight Menu - Preflight Checklist To ensure safe operation of the WingtraOne, a series of preflight checks is run in the background. Additionally, the user has to go through the preflight checklist within WingtraPilot before the mission can be started. Flight Menu - In-Flight Feedback As soon as you are connected to the WingtraOne, you get additional information about the drone. The following picture explains the different feedback symbols. 1. Messages 2. GPS Reception with number of satellites and EPV value 3. Remote Control Reception 4. Flight Battery Remaining in Percentage 5. Flight Mode - Mission or Position Flight Menu - In-Flight Interactions Interaction in a Mission...
- Page 34 Flight Action Consequence Kill all motors and spiral down. You have to hold the button Emergency Stop: for half a second. THERE IS NO WAY TO REGAIN CONTROL! The plane flies back autonomously on the current altitude, RTL (return to land): performs the planned landing procedure and lands. Engage Position Gives the pilot authority on the RC. Engage in cruise only if Control (from RC or you know how to fly the WingtraOne! WingtraPilot): Interaction in Position Mode (Manual flying) Action Consequence Emergency Kill all motors and spiral down. You have to hold the button for half a Stop: second. THERE IS NO WAY TO REGAIN CONTROL! RTL (return The plane rises/sinks to 60 meter above home, flies back to home, to land): transitions and lands. Lets the WingtraOne transition. If it is in Hover mode, it transitions to Transition: Cruise, if it is in Cruise mode, it transitions to Hover. Failsafe Scenarios GPS Loss There is nothing a user can do to save a plane if GPS is lost on both GPS modules. Neither RTL, mission nor position control work reliably in this situation. Therefore the plane tries to land where it is and switch off motors just above ground. Telemetry and RC loss If flying in mission and losing telemetry, RC, or both, the mission is continued but the user gets a warning. If flying with RC and losing connection to RC, RTL is triggered Geofence Violation If the plane outruns the geofence, RTL is triggered.
- Page 35 Flight...
-
Page 36: Geotagging
Geotagging Geotagging The Beta Workflow includes handling of 2 SD cards to get the geotagged images after flight. The following steps describe how to geotag the images after the WingtraOne has landed. 1. Power off WingtraOne 2. Get the Autopilot-SD and Camera-SD 3. Save the content of the Autopilot-SD onto your laptop 4. Insert the Camera-SD and open WingtraPilot’s geotagging menu choose correct logfile log/sessXXX/log001.px4log from Autopilot-SD folder choose folder on Camera-SD card containing the images 5. Save the tagged images on your laptop and import them to your favorite tool (Pix4D, DatamapperPro, DroneDeploy, AgisoftPhotoscan, …) 6. Clear Camera-SD after every flight, clear Autopilot-SD at the end of the day. -
Page 37: Survey Mission
Survey Mission Workflow to fly a survey mission Before the flight - In Office Check flight conditions Charge Batteries (flight batteries, RC, tablet, laptop) Check the WingtraOne and make sure that both SD cards are inserted Optional: Plan Mission Load Offline Maps Before the flight - On the Field For a detailed explanation and first troubleshooting steps, see the Quick Start Guide. Attach middle stand Power the WingtraOne Start WingtraPilot and Connect to the Vehicle Go through the preflight checklist - Plan or review your mission on the respective checkpoint Start the mission by clicking “Arm for Mission” and watch the WingtraOne fly In Flight Observe the drone at all times. See this chapter for your options to interact. After Flight Geotag your images. See this chapter. Upload the images to your favorite post processing toolchain. -
Page 38: Manual Flight
Manual Flight Workflow for Manual Flying Check the remote control chapter for a detailed explanation about manual flying and stick inputs. To hover the WingtraOne for fun, go through the safety checklist (leave out “upload mission”) and press “Arm for Position Mode”. Take the RC and take off by moving the throttle stick to the max value for more than 2 seconds. Take off, hover and land like a quad. Move the throttle stick completely down for landing! Do not fly the WingtraOne in forward flight without having accomplished an official Wingtra Training. -
Page 39: Camera
Camera Q: Camera: My camera does not connect over WiFi Make sure that your camera is powered (green LED on the camera housing) Take camera out of the foam and look at the tiny screen. Check if you can read WiFi on the screen - if not, open the camera cover and click the small WiFi button to change to single-channel WiFi mode. Close the cover and try to connect again. The Sony QX1 has 3 WiFi modes: No WiFi Single-channel WiFi Multi-channel WiFi Q: Camera: My images are blurry Check if there is dust / water on the lens The Sony QX1 is set to manual focus mode to ensure accurate triggering (time delays in auto mode). If you see that the images are out of focus, take camera out of the foam and adjust the focus manually to infinity by turning the focus ring clockwise (looking into the camera) for 2 turns. Q: Camera: My images are too dark Increase shutter speed and/or ISO. See section on camera settings. Q: Camera: What is the meaning of the message “Test Snapshot Process Started / Finished”? The autopilot performs a routine after pre-arming that triggers 4 test pictures. If you hear the shutter on the camera, your camera is setup correctly (lens cover is removed and SD card is inserted correctly. Q: Camera: I did not capture images during flight Check if you have removed the lens cover Check if you have inserted the Camera-SD card correctly Check if your Camera-SD card is empty... - Page 40 Camera Repower the Wingtra plane, pre-arm, and listen to the camera shutter sound from the test pictures (automated preflight routine).
-
Page 41: Wingtrapilot
WingtraPilot Q: Calibration: I get a warning about a failed calibration. What can I do? Sensor Calibration of all sensors except Airspeed (Pitot Tube) can only be done by the Wingtra Customer Support. Chat with the Wingtra Support if you get a warning about a failed calibration of any other sensor. If Airspeed calibration fails, redo the calibration. Q: Info View: How do I get more flight information feedback? You can get additional information about flight speed and altitude under Widgets → Info View... -
Page 42: Contact
Contact us Contact Wingtra AG ETH LEO C4 Leonhardstr. 27 8092 Zürich E-Mail support@wingtra.com Phone Numbers +41 79 633 10 01 (Julian Surber) +41 76 724 17 38 (Maximilian Boosfeld) +41 44 632 57 76 (Office) Skype Contacts Julian Surber: juliansurber Maximilian Boosfeld: maximilian.boosfeld...
Need help?
Do you have a question about the WingtraOne and is the answer not in the manual?
Questions and answers