
Subscribe to Our Youtube Channel
Related Manuals for Systemline SN1210


Summary of Contents for Systemline SN1210
- Page 1 Instruction manual NetConnect Amplifier S7 NetConnect Hi-Res Zone Amplifier SN1210...
- Page 2 Important safety instructions 1. Read these instructions. 2. Keep these instructions. 3. Heed all warnings. 4. Follow all instructions. 5. Do not use this apparatus near water. 6. Clean only with dry cloth. 7. Do not block any ventilation openings. Install in accordance with the manufacturer’s instructions.
- Page 3 Instructions de sécurité importantes 1. Veuillez lire ces instructions. 2. Veuillez conserver ces instructions. 3. Veuillez prendre connaissance de tous les avertissements. 4. Veuillez suivre toutes les instructions. 5. N’utilisez pas cet appareil a proximite de l’eau. 6. Nettoyez uniquement avec un chiffon sec. 7.
-
Page 4: Table Of Contents
Contents 1.0 NetConnect pack contents 2.0 Introduction 3.0 Connections 4.0 Wiring Diagram 5.0 NetConnect Setup - First Steps Connections 6.0 NetConnect Configuration Quick Start 7.0 NetConnect Advanced Settings 8.0 NetLink Configuration – Quick Start 9.0 Factory Setup 10.0 Network Setup 11.0 Factory Setup 12.0 Zone Setup 13.0 Using a USB Hard/Thumb drive (master mode only) -
Page 5: Netconnect Pack Contents
(obtained from a dedicated cable or powerline adaptor). Multiple NetConnects can be used as a standalone Systemline 7 system, one being configured as the ‘master’ . It is a reliable, simple to install solution that can be deployed in many ways, and its HIRES audio capability ensures the very best sound quality. -
Page 6: Wiring Diagram
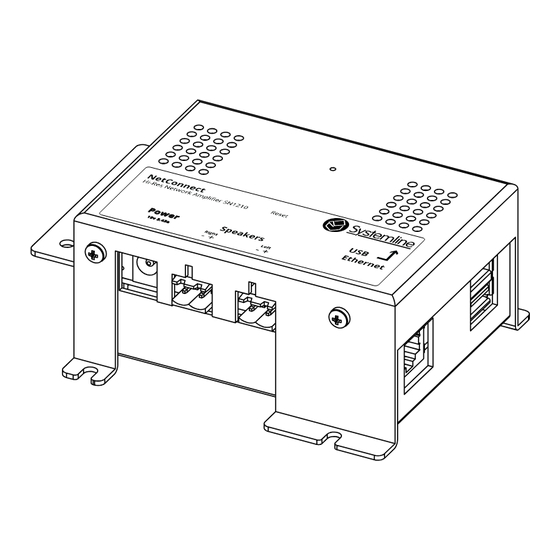
4.0 Wiring Diagram Local power option using power supply direct In-Line PSU Speaker Speaker Remote power option using passive POE coverters (SN8510) KEY: Power Network Cable Speaker Cable + Speaker Cable - In-Line PSU Speaker Speaker 5.0 NetConnect Setup - First Steps Connections Note: Only one NetConnect should be plugged in to the Network at a time during set up Insert (RJ45) LAN connection from network switch/router, requires a network patch cable not supplied. -
Page 7: Netconnect Configuration Quick Start
6.0 NetConnect Configuration Quick Start Open a Web browser on a PC or Mac In the web bar at the top type http://netconnect/ Quick Start page: this is where you decide if the NetConnect should be in Master or Slave mode. -
Page 8: Network Setup
Set Factory Defaults : This sets NetConnect back to factory defaults and erases all user settings. Reboot : Reboots/Restarts NetConnect. 10.0 Network Setup DHCP Enabled : With this setting selected NetConnect will obtain its IP address from the router and fill out the information in the boxes below automatically. This setting is what we would suggest you leave it on. -
Page 9: Zone Setup
12.0 Zone Setup Zone Name : This is where you can call your zone a name, usually associated with the area that NetConnect and the speakers are located e.g. ‘Mollies Room’ or ‘Kitchen’ etc. Live Control : In this area you can confirm that NetConnect is operating correctly over the Network. -
Page 10: Remote Power (Optional Extra) Sn8510
14.0 Remote Power (optional extra) SN8510 The remote power adapters give the ability to send power and network down one CAT 5/6 cable. This means that the power supply and network connection can be located elsewhere (less than 50M). 15.0 Troubleshooting No stored music appearing in App: Check that you have a USB drive attached to the NetConnect that is in master mode and that the USB drive is in the correct format as indicated in section 13.0. -
Page 11: Factory Default
S7 app press the zone you want to rename and make sure it is at the top of your list. Now press the i button to the right of the zone name, select change zone name and enter in the required name followed by Done. For any further help please email systemline.support@armourhome.co.uk or check our website www.systemline.co.uk. 16.0 Factory Default... -
Page 12: Specification
17.0 Specification Features >192kHz/24bit Network (Gigiabit recommended) Audio Changeable in the S7 app Favourites/Pre-sets TCP/IP, S7 App Control options Voltage Standby consumption <0.5W Mains voltage 19v – 3.43A External Power supply Audio Power 4 ohms Total Harmonic Distortion <0.1% @ 1000Hz Noise -80dBV A weighted... -
Page 13: Mounting Guide Page
Mounting guide page Note: Diameter of the marked holes is 4mm. Note: If you print off this page as a template please check that the sizes are to the correct scale BEFORE you start drilling. Note: All measurements are in millimetres. SCALE 1:1... - Page 14 Stortford Hall Industrial Park Dunmow Road Bishops Stortford Hertfordshire CM23 5GZ United Kingdom www.armourhome.co.uk ©2018 Armour Home Electrioncs, All rights reserved. Our policy is one of continuous product improvement. We reserve the right to change the design and specifications without notice. All information is given in good faith.
Need help?
Do you have a question about the SN1210 and is the answer not in the manual?
Questions and answers