Advertisement
Table of Contents
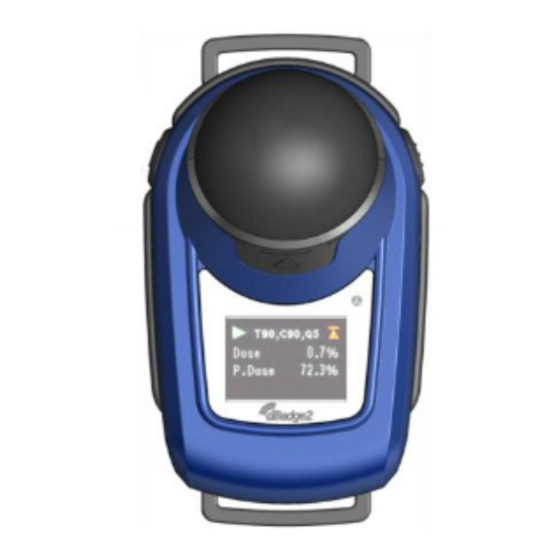
dBadge2
is
measurements simpler than ever before. It is available in Intrinsically
Safe models and features up to three simultaneous dosimeters (D1,
D2 & D3).
windscreen and mounting clips which are all pre-assembled on
delivery. This field guide is designed to get you 'up and running' but
we recommend that to get the best from your purchase that you
refer to the full dBadge2 handbook (HB4056). The handbook, P.C
data download utility plus other useful information and updates are
available from the Support section of the Casella website.
The Airwave app is available at:-
www.casellasolutions.com
FIELD GUIDE for dBadge2®
Personal Noise Dosimeter
designed
to
It consists of the instrument body, microphone,
For important safety information
relating to Intrinsically Safe models,
please
refer
handbook (HB4056) available for
download at:-
www.casellasolutions.com
make
personal
to
the
dBadge2
noise
exposure
Advertisement
Table of Contents

Subscribe to Our Youtube Channel
Related Manuals for Casella dBadge2


Summary of Contents for Casella dBadge2
- Page 1 This field guide is designed to get you ‘up and running’ but we recommend that to get the best from your purchase that you refer to the full dBadge2 handbook (HB4056). The handbook, P.C data download utility plus other useful information and updates are available from the Support section of the Casella website.
-
Page 2: Switching On/Off
*Bluetooth may be disabled if not required Switching On/Off To switch the dBadge2 on, press and release the left hand key. The display will show a number of start-up screens which include the dBadge2 logo, specific model type (PLUS/PRO), serial number and firmware version followed by an indication of battery, memory and Bluetooth®... - Page 3 The status indictor will flash Red whilst the display is blank. The display may be ‘woken’ by pressing either key. To switch the dBadge2 off, press and hold the left hand key during the 3-2-1 countdown.
- Page 4 Configure the dBadge2 You will typically not need to do this every time the dBadge2 is used. Press the left hand key to power up the dBadge2, release the key then immediately press both keys to enter the configuration mode.
-
Page 5: Mounting Clips
Windscreen. Refit by aligning the tab with the recess in the main body of the dBadge2. An audible “click” confirms that it is securely in place. - Page 6 Two further screens will show progress and confirm that calibration has been completed. Starting a Measurement Run Manually With the dBadge2 turned on, press & hold both keys during the 3-2-1 countdown to start a measurement run. The ‘play’ icon indicates that a run has started.
-
Page 7: Locking The Keys
OSHA PEL or ACGIH criteria. The screens below show some of the Dosimeter setup options:- Locking the keys If the Auto Lock feature has been selected in the Configuration Mode (shown below) the keys will lock automatically when a measurement run has started and a padlock symbol will appear in the display:- To lock manually (and unlock) after a measurement run has started, press &... - Page 8 Ensure that Bluetooth is switched on (i.e. indicated in the status screen and/or switched on in the Configuration settings). Load the Casella Airwave App on your IOS or Android mobile device (Android OS from ver4.3 with Bluetooth 4.0 hardware support). Open the App and it will scan for all instruments in range and display them accordingly.
- Page 9 Example of ISO D1 settings (left) and OSHA D1 & D2 (right) Touch and hold the appropriate icon during the 3-2-1 countdown to Start, Pause or Stop a run. Touching the Menu option will allow data to be copied to the clipboard or emailed along with additional field notes and any photographs of the task.
-
Page 10: Downloading Data To Pc
With the Docking Station connected to both the power supply adapter (part PC18) and to a PC using a USB Mini B to USB (PC) cable (part CMC51), place the dBadge2 in the left-most pocket. The dBadge2 will begin to charge and a USB connection symbol will be displayed.
Need help?
Do you have a question about the dBadge2 and is the answer not in the manual?
Questions and answers